Push Notification Simulations
A push notification (PN) contains data related to: (i) the PN's short message, (ii) the PN's big message, and (iii) the PN's payload. If the sending and receiving solutions are one and the same solution, then, in a simulation, the data transfer between sending and receiving parts is carried out within that one solution's simulation; the simulation in this case is straightforward.
However, if the sending solution and receiving solution are different, then the simulation mechanism is as follows: PN data sent during a simulation of the sending solution is recorded in a MT PN Simulation file (which has a .mtpnsim extension). When the receiving solution is simulated, you can load that .mtpnsim file. The simulator will now display all the sets of PN data in the .mtpnsim file, and you can select the PN that you want to simulate.
Recording PN Simulation Data
If, while simulating a sending solution, you trigger an event that sends a PN, then the dialog shown below appears.
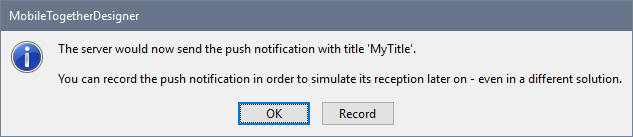
Click Record to record the PN data to memory. You can record multiple PNs to memory in this way. On closing the simulation, the recorded PNs are in memory—but not yet saved to file.
When you save or close the solution file, you will be informed that there is unsaved recorded PN data in memory, and you will be asked whether you wish to save this data to file. If you select Yes, then the different sets of recorded PN data in memory will be saved to a MT PN Simulation file in the same folder as the solution. This file will be named with the following pattern: YourSolutionName.mtpnsim. Any additional PNs sent during the current or subsequent simulations of that solution will be saved to the same file. Each set of PN data in the file is identified by a name, which is that PN's recording date and time.
Loading recorded PN Simulation Data into the simulator
To load recorded PN simulation data from an MT PN Simulation file (.mtpnsim file), start a simulation of the receiving solution (an MTD file) and then click the Push Notifications icon  in the simulator's toolbar. This causes the Manage Recorded Push Notification (Simulation) dialog (see screenshot below) to appear. Click Load from File, then browse for the .mtpnsim file you want to load, and click Open. The recorded PN data in this file will be loaded into the dialog (see screenshot) and into memory. It will not automatically be saved to the MTD file. If you reload the MTD file without saving, then the recorded PN data will have to be reloaded from the .mtpnsim file. Click Save to File to save the recorded PN data to the MTD file; this will prevent you having to reload the .mtpnsim file. If you load PN data from another .mtpnsim file, then the new data will overwrite the PN data in memory. If you now wish to overwrite any recorded PN data in the MTD file, click Save to File in this dialog.

In the Manage Recorded Push Notification (Simulation) dialog (screenshot above), each recorded PN is shown on a separate line, and is shown with its name, short message data, big message data, and payload information. You can change the order of the PNs by selecting one or more of them and clicking the Move Up and Move Down toolbar icons (located top right). You can delete a PN by selecting it and clicking the Delete toolbar icon. You can also edit the names of PNs so that you can identify them more easily; to do this, double-click the name and edit. Changes made in the dialog are made in memory. To save the changes to the MTD file, click Save to File.
To select which PN is used in the simulation, click the dropdown arrow of the Push Notifications icon in the simulator's toolbar. This displays a list of all the PNs that are currently in memory (see screenshot below). The order in which PNs are displayed is the same as their current order in the Manage Recorded Push Notification (Simulation) dialog (compare screenshot below with that above).
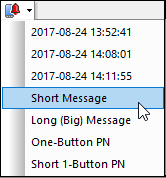
After you select a PN from this list, the solution will simulate that it has received the selected PN. To simulate the receipt of another PN, select a new PN from the dropdown list.