Expression Evaluator
The Expression Evaluator (screenshot below) enables you to apply an XPath/Query expression to a data source file and preview the return value. In Expression Evaluator, the window has three panes:
•an Expression pane (at top left), in which you enter the XPath/XQuery expression to evaluate
•a Schema Tree pane (top right), which shows the structure of the document that is currently loaded; the pane also acts as an entry helper for adding nodes from schema trees
•a Results pane (bottom), which displays the result of the evaluation

The XPath expression in the screenshot above is applied to the tutorial file SubpagesAndVisibility.mtd. You can open this design and try out the XPath expression (listed below) during a simulation (started with F5),

for $i in $CUSTOMERS/Customers/Customer, $j in $ORDERS/Orders/Order[CustomerCode=$i/@code] return concat($i/Name, ', ID=', $i/@code, ', Order=', $j/@number, ', Amount=', $j/OrderAmount),
for $i in $CUSTOMERS/Customers/Customer return concat($i/Name, ', TotalAmount=', sum($ORDERS/Orders/Order[CustomerCode=$i/@code]/OrderAmount))
|
Using Expression Builder and switching to Expression Evaluator for the results
•You can switch between the Builder and the Evaluator without losing the expression that was typed in the Expression pane. To switch, click the appropriate toolbar button (Builder or Evaluator).
•The advantages of the Builder are entry helper support and the simultaneous availability of schema trees of all page sources. (In the Evaluator, on the other hand, only one schema tree is available at a time.)
•After building an expression, you can evaluate it in Expression Evaluator by selecting Start Evaluation.
•If the Evaluate on Typing button in the window's toolbar is toggled on, then the expression is evaluated as you type in Expression Evaluator.
Data source on which the expression is applied
Two situations may be distinguished in this context:
•If the XPath/XQuery Window is opened from the Simulator window, then the data sources of the design have already been loaded for the simulation. As a result, evaluation can be directly carried out on these data sources. You can see the structures (schema trees) of these data sources in the Schema Tree pane of both the Evaluator and Builder. (In Expression Evaluator, however, only one schema tree is displayed at a time (see screenshot above). To switch trees in the Schema Tree pane of Expression Evaluator, select another tree in the dropdown menu of the schema tree selector (see screenshot above).
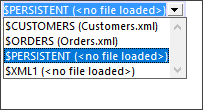
•If the XPath/XQuery Window is opened from within the design and no corresponding XML file is loaded, this is indicated (see screenshot below). In this case, you must explicitly load an XML file that has the same structure as one of the page sources of the design. Do this via the Load button below the Schema Tree pane (see screenshot above that shows Schema Tree).
Schema Tree pane
In addition to displaying the selected schema tree (described above), the Schema Tree pane provides the following features:
•The icons below the pane toggle on/off the display of the following XML syntactic constructs: (i) processing instructions, (ii) comments, (iii) attributes, (iv) text nodes. You can therefore see the entire XML document structure, together with the text contents of nodes, but you can also hide certain constructs if you wish to reduce clutter in the pane.
•You can change the context node of the XPath expression by clicking the node in the document tree that you want as the new context node and then selecting Set Evaluation Context. (located below the Schema Tree pane at right). Note, however, that the actual context node for the expression at run time will be the context node within which the current design component is being created.
Expression pane
The XPath/XQuery expression is entered in the Expression pane. The results of the evaluation are displayed in the Results pane (see screenshot above).
Note the following points:
•To create the expression over multiple lines (for easier readability), use the Return key.
•To increase/decrease the size of text in the expression field, click in the expression field, then press Ctrl and turn the scroll wheel. Note that this also applies in the Results pane.
Results pane
The Results pane is shown in the screenshot below, at bottom. Note that it has its own toolbar.

The Results pane has the following functionality:
•The result list consists of two columns: (i) a node name or a datatype; (ii) the content of the node.
•If the XPath expression returns nodes (such as elements or attributes), you can select whether the entire contents of the nodes should be shown as the value of the node. To do this, switch on the toggle Show Complete Result.
•For data sources loaded during simulations: When the result contains a node (including a text node)—as opposed to expression-generated literals—clicking that node in the Results pane highlights the corresponding node in the Schema Tree pane.
•You can copy both columns of a result sub-line, or only the value column. To copy all columns, right-click a sub-line and toggle on Copying Includes All Columns. (Alternatively you can toggle the command on/off via its icon in the toolbar of the Results pane.) Then right-click the sub-line you want to copy and select either Copy Subline (for that subline) or Copy All (for all sublines).
Toolbar of the Results pane
The toolbar of the Results pane contains icons that provide navigation, search, and copy functionality. These icons, starting from the left, are described in the table below. The corresponding commands are also available in the context menu of result list items.
Icon | What it does |
Next, Previous | Selects, respectively, the next and previous item in the result list |
Copy the selected text line to the clipboard | Copies the value column of the selected result item to the clipboard. To copy all columns, toggle on the Copying includes all columns command (see below) |
Copy all messages to the clipboard | Copies the value column of all result items to the clipboard, including empty values. Each item is copied as a separate line |
Copying includes all columns | Switches between copying (i) all columns, or (ii) only the value column. The column separator is a single space |
Find | Opens a Find dialog to search for any string, including special characters, in the result list |
Find previous | Finds the previous occurrence of the term that was last entered in the Find dialog |
Find next | Finds the next occurrence of the term that was last entered in the Find dialog |
Expand with children | Expands the selected item and all its descendants |
Collapse with children | Collapses the selected item and all its descendants |
Clear | Clears the result list |