Generate Program Code from Project
To generate program code for appstore apps that run on Android, iOS, Windows Phone, and Windows mobile devices, click the command File | Generate Program Code for AppStore Apps. The command opens a wizard that has seven screens if all mobile formats are selected. Each screen contains settings for the generated code.
Note: You can also generate program code for AppStore Apps from MobileTogether packages.

•Build modes: (i) The Publish option generates the app for publication to app stores; (ii) The Trial Run on Client option generates a package that can be used to test the package by simulating a trial run on the client device. The compiled app will connect to MobileTogether Designer and use the design file in MobileTogether Designer. This means that you would be able to modify the design in (MobileTogether Designer) and directly test the effect of the modifications in a client simulation. Note that if the Trial Run on Client option is selected, then Step 10: Deploy will be skipped—since the app must not be deployed to the server. •Executable file name: The name that is used internally to reference the code. You should use a name that has no spaces. •Visible name: The name of the app that will be visible to the user. •Version: The version number of the app. Must be an integer or a decimal number. For example: 1 or 1.0 or 1.1 or 1.21. In case you do not want to deploy for all platforms (for example, because an app that was not approved by one app store has to have its design modified and code regenerated), then the best practice is as follows. Increase the version number by one, and generate program code for the platform/s you want. For example: v1.2 is approved on all platforms but rejected on iOS; v1.3 is created for iOS and approved for iOS (it is not submitted to other stores); v1.4 is created for all platforms and accepted by all stores (so non-iOS jumps from v1.2 to v1.4) •App languages (on Windows App and Windows Phone only): The app's user interface can be displayed in EN, ES, FR, DE, JA. Select the languages you want to include in the app. If the language of the mobile device is one of the selected languages, then the app is displayed in this language. If the language of the mobile device is not among the selected languages, the app defaults to English. Note that the language of the app interface is independent of the localization of solution strings. •URL scheme and host: The URL that will start the app from a hyperlink. The hyperlink's target URL will have the format: <url-scheme>://<url-host>. Enter a unique URL scheme and unique URL host. The scheme information will be stored in the app's manifest file, and indicates to the device that the app can be used to open URLs that start with this scheme. If a link having a URL with this scheme is tapped, then the device will access the resource pointed to by the URL—which is the app.
|

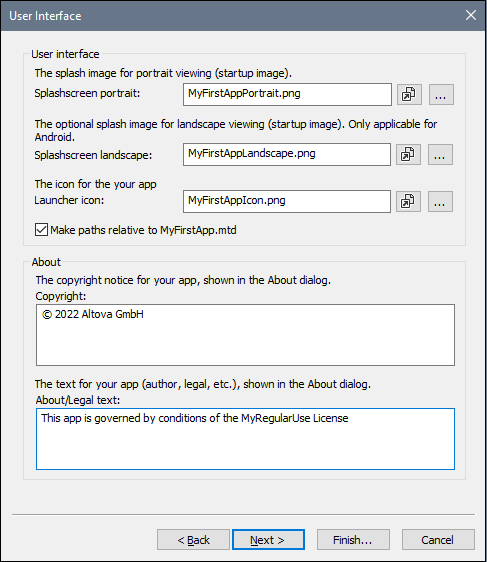 •Splashscreens: Browse for the splashscreens that should be used in portrait and landscape orientations. The corresponding splashscreen will be used on the mobile device when the device's orientation changes. For iOS apps, the portrait splashscreen is drawn in both orientations to aspect-fill the screen in both orientations. If you want individual splashscreens for orientations/devices, then assign different splashscreens for different dimensions before building the generated program code as described here. Click the Open File icon to view the image file in the system's default image viewer app. •Launcher icon: The icon that is displayed in the Apps screen of the mobile device to launch the app. The maximum pixel size of icons is 200x200. Click the Open File icon to view the image file in the system's default image viewer app. •Copyright and legal notice: The text to be displayed in the mobile device.
|
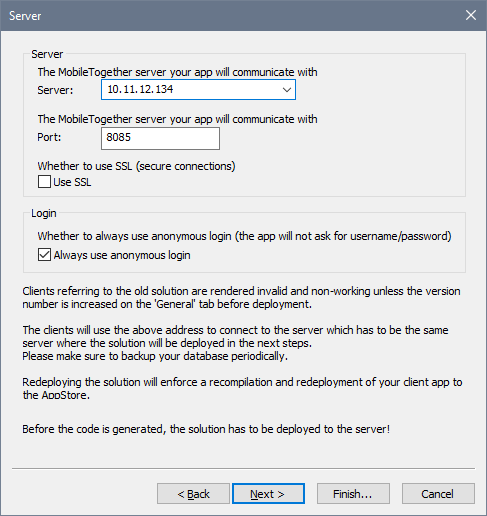 In Screen 1 you can select (in the Build Modes option) whether the appstore app you are currently building is for publication or for simulations on a client device. If you are generating for publication, then specify the connection details of the MobileTogether Server to which the app will connect. If you are generating for simulation on a client, then specify the connection details of the MobileTogether Designer machine. The screenshot above shows Screen 3 when the build is for publication; this is why the first pane takes the properties of the Server rather than those of the Designer.
•Server/Designer: The IP address of the server on which the workflow will be deployed (publish mode) or of the designer that you want to use for trial runs (client-simulation mode). •Port: The port on the server/designer via which the app can be accessed. The server's client device access port is set in MobileTogether Server. See the MobileTogether Server user manual for information. For trial runs, you can use the designer as the server. The designer's client device access port is set in the Trial Run on Client tab of the Options dialog. For the Port setting, enter the Server's or Designer's device access port. •SSL: If you use SSL, this will need to be set up in MobileTogether Server. See the MobileTogether Server user manual for information. •Always use anonymous login: Select this option if you want to allow end users to access the app without providing login details. Otherwise, end users will need a user name and password to log in. See the MobileTogether Server user manual for information about setting up login credentials.
|
You can set whether the end user is allowed to reset persistent data or not. App privileges are privileges that the mobile device OS grants the app. The privileges you select here are stored in the app's manifest files. When the app is installed, the device checks the app's manifest and informs the end user about the privileges that the app is requesting. If the end user allows these privileges, the app will be installed and the requested privileges are granted to the app. For example, if the design contains a Send SMS action, then this privilege will be preset by default and cannot be changed. Location access refers to the GPS location information of the mobile device. In the screenshot above, the design uses geolocation features, and so requires access to the geolocation information of the device. Because of this the Location access privilege is automatically selected, and you cannot change it.
|

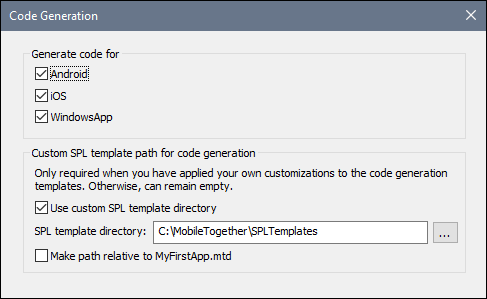 Select the app formats for which you want to generate program code. SPL templates for the different app formats are required for generation of the program code. These are provided with your MobileTogether Designer installation and are located here: C:\Program Files (x86)\Altova\MobileTogetherDesigner10\MobileTogetherSPL. This directory will be the default SPL template directory.
If you customize one or more SPL templates, create a copy of the SPL template directory (in which the customized files will be saved). Specify its location of this directory in the SPL template directory option of this screen (see screenshot above). The new SPL template directory must reproduce the directory structure of the original. The option Use custom SPL template directory enables you to switch quickly between the original SPL template directory and your custom SPL template directory. Select or deselect the option according to which templates you want to use (custom or original).
|
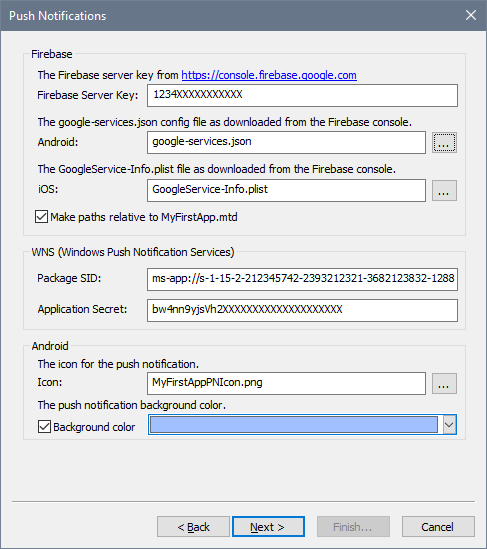 This screen appears only if the OnPushNotificationReceived event has an action defined for it. In this screen, enter the details you obtained when making the push notification (PN) registrations for the different operating systems (see Push Notifications in AppStore Apps). For PNs that are sent to Android devices, you can also select a background color for the PN.
|
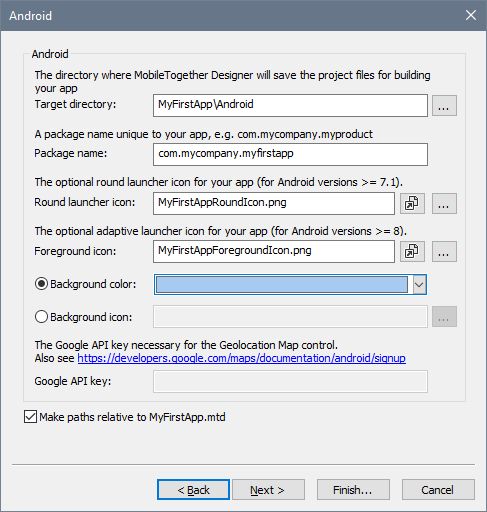 Sets the target directory where the program code will be generated for the Android format. You must specify the package name for the Android package. You can also select icons for Android's round launcher and adaptive launcher, as well as the background color of the adaptive launcher. To preview the image files, click the respective image's Open File icon. The Google API Key field is enabled if the design contains a Geolocation Map control. A Google API Key is needed for enabling the features of the control. You can get an API key via your developer account on the Google Cloud Platform.
|
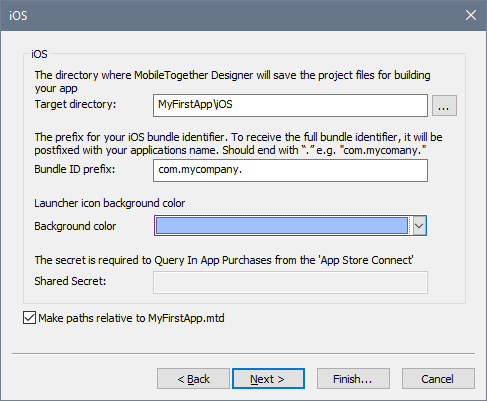 Sets the target directory where the program code will be generated for the iOS format. You must specify the Bundle ID prefix for iOS. Make sure that the Bundle ID prefix ends with the dot character .. For example, com.altova. has the required format. The Bundle ID is constructed by appending the app name you provided in Screen 1 to the Bundle ID prefix. If you have specified that the app should have iCloud access, then an iCloud Container ID is automatically generated and stored in a file called <appname>.entitlements. This file will be created automatically in the target directory of the program code. (See Compile Program Code: iOS for more information.) You can also set the background color of the iOS launcher icon. For In-App purchases, you can set the shared secret of the app at the App Store.
|
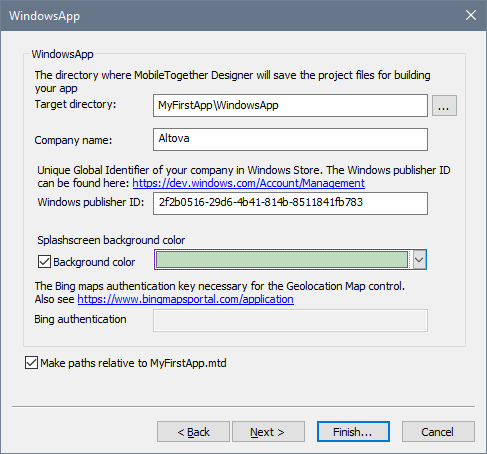 Sets the target directory where the program code will be generated for the Windows App format. You must specify your company's Windows Publisher ID. The Publisher ID is the GUID that’s assigned to your developer account (see Windows App | Requirements; your Windows Publisher ID can be found on your Account Summary page in the Dev Center; the link in the dialog takes you there). You can also select a background color for the splashscreen of the app. The Bing Authentication field is enabled if the design contains a Geolocation Map control. A Bing Authentication Key is needed for enabling the features of the control. You can get an authentication key after registering as a developer at the Bing Maps Dev Center.
|
Fill in the data fields of the dialog as described in the description of the Deploy to MobileTogether Server command.
|

On clicking OK, the following happens:
1.The workflow is deployed to MobileTogether Server.
2.Program code is generated for all the selected formats in the respective target directories that you specified.
You can now compile the generated program code for the respective formats (Android, iOS, Windows App and/or Windows Phone) into the respective AppStore Apps.
The workflow key
Each time program code is generated and the workflow is deployed to the server, a unique workflow key is assigned to the program code and to the workflow on the server. When the program code is compiled, the workflow key is stored in each of the compiled formats. This workflow key serves as the "handshake" that associates a compiled app with a particular workflow and allows the app to access the workflow.
If you run the Generate Program Code Wizard again, the program code will be re-generated and the workflow will be re-deployed to the server. The app/s and the workflow will have a new workflow key. If the newly deployed workflow overwrites the previous workflow, then previous app versions will no longer be able to access the new workflow on the server. This is because the workflow key of the previous app/s will not match the workflow key of the newly deployed workflow. Only apps generated from the new program code will be able to access the newly deployed workflow (since both have the same workflow key).
Therefore, every time you modify the solution, assign a new version number (in Screen 1 of the Generate Program Code Wizard) before generating the code and deploying the workflow to the server. This way, the previous workflow on the server is not replaced by the new workflow. Apps of the previous version can continue to use the previous workflow, while apps of the new version can use the new workflow.
Note: Even if you have not changed your design, a new unique workflow key is generated every time you run the Generate Program Code Wizard.
Note: To ensure that you do not lose compatibility between apps and workflows, we recommend that you back up your MobileTogether Server periodically. This is so that you do not lose previously deployed workflows. See the MobileTogether Server manual for information about backing up MobileTogether Server.