Tables that Force Full Screen Height
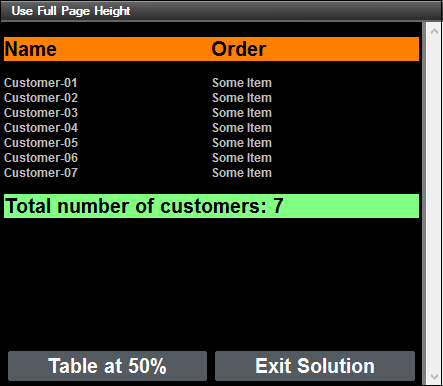
The first page of the design, Use Full Page Height, contains a table with dynamic rows that is created with the $XML1/Customers/Customer element as its repeating element (see screenshot below). This means that each Customer element is created as a Table Row Group and is displayed in its own row. The table is created with a header (styled with an orange background color in the design; see screenshot below) and a footer (green background color). The XML data for the table is taken from the XML file ScrollableTables-01.xml.
Below the table, we have created two buttons: one to go to the next page, the other to exit the solution.

We wish to create the design so that the two buttons always appear at the bottom of the screen, no matter what the height of the table, that is, even if the table does not have enough rows to extend to the bottom of the screen. We do this by using the following settings:
•The table's Max Table Height property is set to Rest of screen height (always). This ensures that additional space is added below the table so that the last component of the page is displayed just above the bottom of the screen.
•The table's Scroll Vertically property is set to Whole table. This ensures that the footer is kept with the body of the table (see screenshot below). Otherwise, the footer would be positioned just above the rest of the page's content, which might lead to an unsightly gap between the last row of the table and the footer.
The point to note is the following: If the table's Max Table Height property is set to Rest of screen height (always), then the height of the table will auto-adjust so that the components of the page are displayed to occupy the full screen.
You can modify the values of properties to test the various possibilities. See the section Table Properties for details of scrollable table properties.