Simulation on Server
A server simulation uses MobileTogether Server to run the simulation (Run | Use Server for Workflow Simulation). It reports client messages in the Messages Pane. Additional to testing that the design is error-free, this simulation enables you to test whether data sources are correctly located, whether URLs are correct, whether current server settings are appropriate, and whether the server has all permissions to access the used DBs, URLs, and files.
Simulating the workflow on the server works as follows:
1.The workflow of the active design file in MobileTogether Designer is temporarily passed to MobileTogether Server. So the design file does not need to be deployed to the server in order to see how the design will work from the server.
2.The server serves the workflow to the simulator of MobileTogether Designer. In this way the simulator plays the role of a client.
Simulation language
The simulation language for designer and server simulations is selected via the Project | Simulation Language command. The language of client simulations is the same as the language of the client mobile device on which the simulation runs.
Running the simulation
1.Start MobileTogether Server. See the MobileTogether Server user manual for information about how to do this.
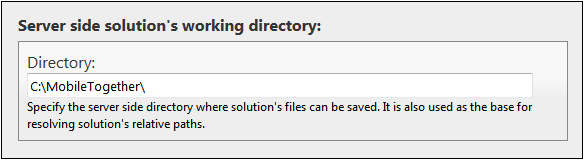
2.In the Web UI of MobileTogether Server, you must set the solution's working directory (Settings | Server Side Solution's Working Directory, see screenshot below). All relative paths in the design will be resolved relative to the directory specified in this setting. In order for server simulation to work correctly, enter the path of the directory where your referenced files are saved.
3.In MobileTogether Designer, make sure that the server settings are correctly defined.
4.In MobileTogether Designer, select Run | Use Server for Workflow Simulation.
5.If you are prompted for credentials to access the server, you can enter the user-name/password combination of root/root, or any other user credentials that have been set up with the privilege of running server simulations. See the MobileTogether Server user manual for information about assigning privileges to users.
The simulator window is opened and runs the workflow.

File locations
If MobileTogether Server is used for simulation, files referenced by the design must be located either directly in the directory designated as the Server Side Solution's Working Directory, or in a descendant directory of this directory. (The Working Directory setting is made in the MobileTogether Server settings page.)
•If absolute paths are used, the file must be located in the Working Directory or a descendant directory of the Working Directory.
•If relative paths are used, the path is resolved relative to the Working Directory.
Simulator features
The simulator window provides the following features:
•The left-hand (Simulation) pane displays the simulation. Options for the Simulation pane are described below.
•The right-hand (Page Sources) pane shows the changes taking place in the XML data as the simulation progresses. Options for the Page Sources pane are described below.
•While the simulation progresses, the Messages Pane of the MobileTogether Designer GUI provides a detailed and step-by-step report of all the activities taking place. You can therefore see what is happening at each step in the progress of the workflow. This is an invaluable feature for testing and debugging design files.
ϖ Simulations on the designer report activities on both server and client.
ϖ Simulations on the server report client messages.
ϖ Simulations on the client report server messages.
•Controls that require user interaction are enabled. In the screenshot above, for example, the combo box is enabled.
Simulation pane toolbar
The toolbar of the Simulation pane contains the following buttons (from left to right):
•Back: If the page is a subpage, then clicking Back closes the subpage. If the page is a top page, the simulator closes. Also see OnBackButtonClicked.
•Change Orientation: You can switch the view between landscape and portrait.
•Simulator Options: Drops down a menu of simulator options (described below under Simulator options).
•Simulate Return to App (Reopen): Enabled when page refreshes have been defined to occur on page reopens. Refreshes the page during simulations.
•Stop at Next Error: Stops the simulation at the next XPath error and displays the XPath expression in the XPath Debugger.
•Stop at Next Breakpoint: Stops the simulation at the next breakpoint (which may be on an action or XPath expression) and opens the appropriate Debugger.
•Stop at Next Action: Stops the simulation at the action/s of the next event that is triggered and displays the action/s in the Actions Debugger.
•Stop Recording Test Case: When the recording of a test case is started, the simulator is opened and the recording runs in the simulator. Clicking this button: (i) stops the recording of the test case, and (ii) opens the Recorded Test Case Confirmation dialog, in which you specify the name of the recorded test case.
•Playback Next Step: Plays back the next step in the currently running test-case playback. This button is enabled when playback is set to step-by-step. See the Playback Options section of Playing Back a Test Case.
•Record Snapshot: Records a snapshot of the test case that is being recorded. This button is enabled when the recording of snapshots has been set to manual (not automatic). See the Recording Options section of Recording a Test Case.
•Push Notifications: If the design contains a push notification, opens the Manage Recorded Push Notification (Simulation) dialog. See Simulating Push Notifications for a description of usage.
•Barcode Scanner: Drops down a menu that has three parts, one for each supported barcode scanner. For each scanner, you can simulate receiving barcode data from the scanner. In the case of Zebra scanners, you can also simulate connection established, receiving image data, and connection terminated. Note that (for Zebra scanners) you must simulate a connection-establishment before the options for subsequent simulations become available. For some of these simulations, a dialog will appear in which you must supply the data for the simulation (for example an ISBN or an image file).
•Styles Inspector: Open the Styles Inspector window.
•Purchase: If the design enables in-app purchases, provides a list of all the in-app purchase products that are available for purchase and enables you to purchase one or more. The list of products is obtained from the In-app Purchase XML data file for simulations. See In-App Purchases for more information.
•Purchased: If the design enables in-app purchases, provides a list of all the in-app purchase products that are listed as purchased (that is, as a Purchase element) in the In-app Purchase XML data file for simulations. If you select one of these purchased products, then this product together with all its purchase properties is considered, in the simulation, to have been purchased. If you were to subsequently run the Query Purchases action or Restore Purchases action, then the products that you selected will be returned (by the action) as having been purchased. See In-App Purchases for more information.
•Simulate Reception of MQTT Message: If the design enables the receipt of MQTT messages, simulates actions that are performed on receiving an MQTT message. The MQTT messages to simulate are taken from a sample file specified in the Options dialog.
•Simulate Reception of Broadcast Message: If the design enables the receipt of Broadcast messages, simulates actions that are performed on receiving a broadcast message. The broadcast messages to simulate are taken from a sample file specified in the Options dialog.
•Submit: If the page is not the last page, then clicking Submit takes you to the next page. If the page is the last page, then the workflow is exited. Also see OnSubmitButtonClicked.
•Refresh Page: If the Page Refresh option has been set to Manual, then this button becomes visible. On clicking Refresh Page, the page is updated with the changed data.
Simulator options
On clicking the Simulator Options toolbar button, a dropdown list of options for the simulator is displayed (screenshot below). Each option is described below. Default settings are specified in the Simulation 1 and Simulation 2 tabs of the Options dialog. Note that, if you change a setting in the simulator, the new setting becomes the default and will be shown as such in the Simulation 1 and Simulation 2 tabs of the Options dialog.
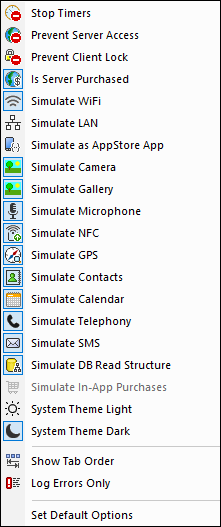
•Stop Timers: If a timer has been set to run at intervals and actions have been defined to be executed at these intervals, you can stop timers (and, consequently, actions) by clicking Stop Timers. This will clear up the clutter of messages generated by these actions, and will allow you to more easily analyze other messages and aspects of the workflow.
•Prevent Server Access: When selected, disables access to the server, and so allows you to test the solution's behavior in a server-connection-error scenario. When unselected, server access is allowed. For more information about this feature, see Server Connection Errors.
•Prevent Client Lock: When selected, prevents the client being locked from server access when the Lock Client action is executed. If the server is inaccessible because the Lock Client action has been executed from another client, then preventing the lock will of course not work.
•Is Server Purchased: For simulations in the designer and for trial runs on client, simulates that MobileTogether Server licenses have been purchased. For simulations on the server, the actual purchase-state of licenses on the server is returned.
•Simulate WiFi: Sets the mt-connected-via-wifi XPath extension function to true() when toggled on, and to false() when toggled off. This allows the simulator to behave as though WiFi access is available. In this way, you can simulate design scenarios in which WiFi access is required.
•Simulate LAN: Sets the mt-connected-via-lan XPath extension function to true() when toggled on, and to false() when toggled off. This allows the simulator to behave as though a LAN connection is available. As a result, you can simulate design scenarios that require a LAN connection.
•Simulate as AppStore App: Sets the static global variable MT_IsAppStoreApp to true() when enabled, to false() when disabled. This allows simulations to be carried out that are conditional on the value of this variable.
•Simulate Camera: When toggled on, the simulator behaves as though the device's camera is available. This enables you to simulate design scenarios that require camera access.
•Simulate Gallery: When toggled on, the simulator behaves as though the device's photo gallery is available. This enables you to simulate design scenarios that require gallery access.
•Simulate Microphone: When toggled on, the simulator behaves as though the device's microphone is available. This enables you to simulate design scenarios that require microphone access.
•Simulate NFC: When selected, enables NFC functionality so that NFC actions can be executed. Actual NFC data is supplied to the simulator via NFC sample files.
•Simulate Bluetooth (BT): When toggled on, the simulator behaves as though the device's Bluetooth connectivity is available. This enables you to simulate Barcode Scanner scenarios that require Bluetooth.
•Simulate GPS: When selected, enables geolocation functionality so that geolocation features can be tested. Dummy geolocations can be supplied via the Geolocations XML file, which is used specifically to supply geolocations for simulations.
•Simulate Contacts: When toggled on, the simulator behaves as though the device's address book is available. This enables you to simulate design scenarios that require access to the address book. The address book is simulated either from a sample file or from your Microsoft Outlook contacts. Which option to use is specified in the Simulation 2 tab of the Options dialog.
•Simulate Calendar: When toggled on, the simulator behaves as though the device's calendar is available. This enables you to simulate design scenarios that require access to the calendar. The calendar is simulated either from a sample file or from your Microsoft Outlook calendar. Which option to use is specified in the Simulation 2 tab of the Options dialog.
•Simulate Telephony: When toggled on, the simulator behaves as though the device's telephony functionality is available. This enables you to simulate design scenarios that require telephone access.
•Simulate SMS: When toggled on, the simulator behaves as though the device's SMS functionality is available. This enables you to simulate design scenarios that require SMS access.
•Simulate DB Read Structure: When toggled on, the simulator takes the DB structure from the XML file that is specified in the Simulation 2 tab of the Options dialog. For relevant information, see the DB Read Structure action.
•Simulate Telephony: When toggled on, the simulator behaves as though the device's telephony functionality is available. This enables you to simulate design scenarios that require telephone access.
•Simulate In-App Purchases: When selected, enables the simulation of In-App Purchases by using sample data that is stored in an XML file. The XML file to use is specified in the Simulation 2 tab of the Options dialog.
•System Theme Light/Dark: Switches to the selected theme (light or dark).
•Show Tab Order: If tab ordering has been set, then select this option to show all tabbed controls with their respective tab-order number.
•Log Errors Only: Select this option to log errors only and to ignore other types of messages.
•Set Default Options: Resets Simulation pane options to their default settings.
Page Sources pane: options and features
The following options are available in the Page Sources toolbar.
•Evaluate XPath: Opens the XPath/XQuery Window, in which you can evaluate XPath expressions. XPath expressions can also be evaluated from the Styles & Properties Pane while the simulation is running.
•Clear Persistent Data and Restart: When a simulation is started, persistent data from the previous simulation is, by default, not cleared. This button enables you to clear persistent data and restart the simulation.
•Restart Simulation: Restarts the simulation at any time.
•Search: Enables searches for text in the page sources in the Page Sources pane, starting from the root element of page sources.
•In the Page Sources pane you can use copy-paste to copy parts of the tree to other locations in the tree. This is useful if you wish to copy data, such as DB records, in order to add more data for the simulation. The copied nodes are available only for the duration of the simulation.
•You can right-click a node and then insert, append, or add a child element or attribute. You can also rename an element or attribute by double-clicking its name. If the page structure is modified in any of these ways, then the page source is reloaded with the new structure and the updates will be correctly reflected in the displayed page.
•If you right-click a node of a page source and select Load XML, then the entire page source is replaced by the XML file you select. Note that, if the structure of the loaded XML file does not match the structure expected of this page source, then those parts of the design that are based on this page source will contain errors.
•If you right-click a node of a page source and select Save XML, then the entire page source is saved to the selected XML file.
•If you right-click a node of a page source, you can copy the XPath locator expression of that node to the clipboard by selecting the Copy XPath context menu command.
Note: If you have problems connecting to the server, try checking the settings on the server. See the MobileTogether Server user manual for information about how to do this.
Editing the XML trees of page sources in the Simulator
The XML trees in the simulator display the XML data of the various page sources and how these values change as the simulation progresses. You can edit the XML trees directly in the Simulator using cut/copy/past/delete and drag-and-drop, and you can also add, insert, and append attributes and elements to the tree. The editing commands are available in the context menu of the XML tree. The Simulation pane will instantly show the modified data. Modifying the XML tree in this way enables you to test the solution with modified XML data structures containing different manually entered data. As a result, you can quickly try out alternatives that contain different data and/or structures.
The context menu of XML trees in the simulator offers the following features:
•Add / Insert / Append Attribute/Element: The attribute or element is, respectively, added, inserted before, or appended after the item on which the context menu was called.
•Load XML: Loads an external XML file (that has the same structure and elements as the XML tree) into the XML tree.
•Save XML: Saves the structure and data of an XML tree to any location you like.
•View in XMLSpy: Opens the XML tree in Altova's XMLSpy program.
•Overwrite $XML structure based on this tree: Overwrites the structure of a page source with the structure of the XML tree in the simulator.
Server IP address and network firewall settingsYour server can have a public IP address (accessible over the Internet) and/or a private IP address (accessible within a private network; for example, via WiFi within a company network). If a mobile client device tries to connect via the Internet using the server's private IP address, then the connection will not work. This is because the private IP address is not known on the Internet and cannot be resolved. If a client device uses a private IP address, then the client device must already have access to the private network.
To ensure that the server can be accessed, do one of the following:
•Provide the server with a public IP address so that it can be reached via the Internet. On the client device, use this public IP address to access the server. •If you use a firewall and install MobileTogether Server on a server with a private IP address (inside the private network), then use the network firewall to forward requests sent to a public IP-address/port-combination to your MobileTogether Server server. On the client device, use the public IP address.
You must also ensure that the firewall is configured to allow access to the server port used for MobileTogether Client communication. The ports used by MobileTogether Server are specified in the Settings page of the Web UI of MobileTogether Server (see the MobileTogether Server user manual). On the client device, this is the port that must be specified as the server port to access.
Tip: Port 80 is usually open on most firewalls by default. So, if you are having difficulties with firewall settings and if port 80 is not already bound to some other service, you could specify port 80 as the MobileTogether Server port for client communication.
|