Modules
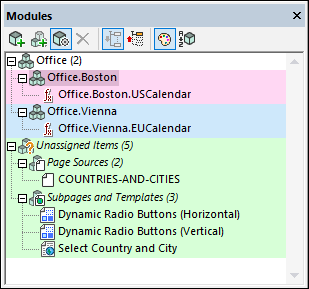
The Modules feature of MobileTogether Designer enables you to group components of a MobileTogether project into different modules and assign properties to individual modules. This enables you to group project components and to then conveniently apply a common property to the whole group of components. When project components have been grouped together in a module, we refer to them as the items of that module. All the modules of a project and their items can be viewed and managed in the Modules pane (screenshot below).
The following properties can be set on a module. The selected property value will apply to all items of the module.
•Background color: This enables you to easily locate all the components of a module in application windows and dialogs (because all components of a module will have the same background color).
•Export setup: You can specify whether the components of a module should be exported or not when a subproject is created from a project. You can therefore group those components that you want to export into a module and set the module to the Not Exported property.
Module items
The following project components can be assigned as the items of a module:
•User-Defined XPath/XQuery Functions
Within each module (other than the Unassigned Items module), the module items are listed alphabetically in a flat list. In the Unassigned Items module, module items are grouped first by component type and are sorted alphabetically within each type.
Creating modules: module names and item names
A module is created in the Modules pane via the Add Module and Add Submodule commands. (A submodule is defined as a module that is within another module.) A module must exist—that is, be created explicitly—before any item can be added to it.
Module names
When you create a module, you must give it a name. The name of a module or submodule is a string that does not contain a period. For example, in the screenshot of the Modules pane shown above, note the names of the Office module and its two submodules, Boston and Vienna.
Item names
A module item, however, has a name that is composed of the module name followed by a period and the component name (for example, ModuleName.ComponentName). If the item belongs to a submodule, then the ModuleName part of the item's name contains the names of ancestor modules, with each ancestor being separated from the next by a period. For example, in the screenshot above, see the name of the function in the Boston module (Office.Boston.USCalendar). The item's name consists of the names of its two ancestor modules separated by a period.
The importance of an item (or component) name is that it determines whether it belongs to a module and to which one. For example, if a component (such as a function) is created in the project and is given a name that contains a module name as described in the previous paragraph, then that component will be added automatically to the list of items of that module in the Modules pane (see screenshot above). If a component name does not contain a match for any module or submodule, then it is listed as an item of the Unassigned Items module—which exists by default and does not need to be explicitly created.
If a component name contains periods and if the module hierarchy indicated by those periods does not exist, then that module hierarchy is created for the component and the component is correctly placed in the hierarchy. If a module is created automatically by the system in this way—as opposed to having been created explicitly by you—then it is removed automatically if it becomes empty and has no property.
If you wish to move an item from one module to another, then you can do one of two things:
•Drag it from its current module and drop it in the new module. As a result, the module name part of the item's name will be changed automatically.
•Rename the item (via its context menu) to have a module name part that matches an existing module. As a result, the item will be moved automatically to the new module.
Note: A component can belong to one module only (either the Unassigned Items module or one that you create).
The Background Color property
When you right-click a module (including the Unassigned Items module), you can select, in the context menu that appears, the Module Settings command to display the Attributes (or Properties) dialog of the current module (screenshot below, which shows the Attributes dialog of the Boston module).
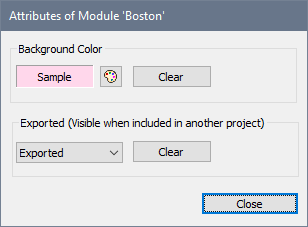
By setting the background color of the module, you set the background color of all the items of this module. This enables you to easily locate the corresponding project components in application windows and dialogs—because all components of the module will have the same background color. Note that the background color of a module also applies to all its descendant submodules unless a descendant module has its own background color setting.
You can toggle background colors on/off via a toolbar button of the Modules pane.
The Export property
The Export property is available in the Attributes dialog of a module (see screenshot above), which is accessed via the Module Settings command in the context menu of the module.
The property specifies whether the components of that module will be exported or not when the project is extracted to a subproject (via the Refactor | Extract New Subproject command). The ability to export or not export components is useful when extracting subprojects because you might want to export only a few specific components, or you might want to not export one or more components (for example, a top page, since top pages are not allowed in subprojects). Note that the Export property can also be used for the Unassigned Items module.
Select the value of the Export property: Not Set (which causes the value of the parent module to be inherited), Exported, or Not Exported.
Application windows and dialogs that display modules
The following windows and dialogs provide display module-related features:
•Pages Pane (showing pages, sub pages, and control templates)
•Static Global Variables (lower part for user variables)
Right-click a module in these windows and dialogs to access module-related commands.