Top Page: Customers Table
We will now create a table to display details of all the customers currently stored in the XML page source Customers.xml. Create the table as follows.
1.Drag a Table control from the Controls Pane and drop it into the design.
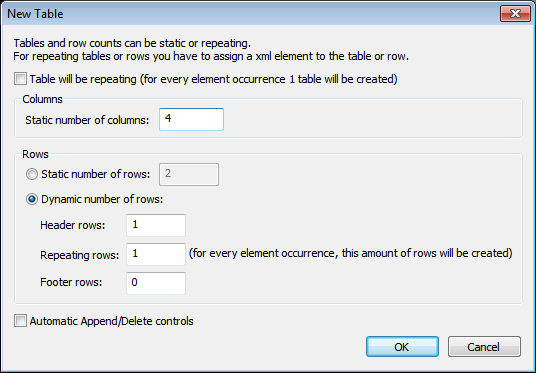
2.In the New Table dialog that appears (see screenshot below), create the table as a dynamic table. Do this by selecting Dynamic number of rows. This will create a table with as many rows as there are corresponding row elements in the page source. Specify that the table has four columns and one header row (see screenshot below). Click OK to create the table.
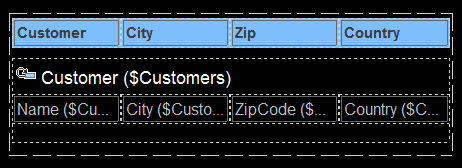
3.From the Page Sources Pane, drag the Customer element to the Repeating Row icon of the table in the design. Each customer element will now correspond to one row of the table, and the customer element will be the XPath context node of the table.
4.Drag a Label control from the Controls Pane and drop it into the first column of the header row. Type in Customer as the text of the label (see screenshot below). Create headers for the other columns similarly: City, Zip, and Country.
5.Select all four labels (by pressing Ctrl while selecting each label), and apply whatever label formatting you like (via the Styles & Properties Pane).
6.Drag a Label control from the Controls Pane and drop it into the first column of the table-body row. Then, from the Page Sources Pane, drag the Customer/Name element of the $CUSTOMERS page source onto the label (see screenshot below). This label will display the contents of the customer's Name element.
7.Create the contents of the other table columns similarly: by dragging the City, ZipCode, and Country elements onto the respective labels (see screenshot below).
8.Select all four labels (by pressing Ctrl while selecting each label), and apply whatever label formatting you like (via the Styles & Properties Pane).