Selecting DB Objects as Data Sources
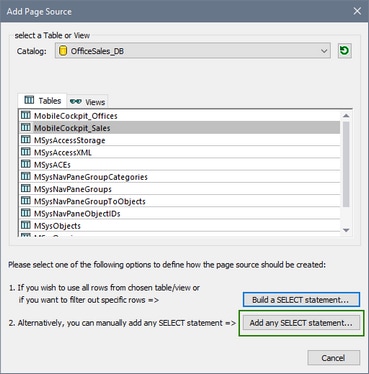
After connecting to a DB, the Add Page Source dialog (screenshot below) is displayed. In this dialog, you can select the DB object (table or view) that you wish to add as a data source. All the columns of the table or view will be selected by default. You can refine your selection in the next steps by using the flexibility offered by SQL SELECT statement. You can either build a SELECT statement with the help of MobileTogether's DB wizard or you can build it manually. Click the appropriate button at the bottom right of the dialog. A SELECT statement can also serve to access other database object types, including, but not limited to, stored procedures.
Note the following points:
•The DB to which you connected is shown as the selected DB source. It cannot be changed.
•Only one table/view can be selected as a data source.
•You can filter in/out specific rows of the selected table/view by using a SELECT statement, as well as use other search capabilities of the SELECT statement.
•You can build a SELECT statement based on the currently selected table/view (double-click the selected table/view or click Build a SELECT statement). Alternatively, you can enter a SELECT statement using SQL code (click Add any SELECT statement). The dialog that appears in each case is described below.
Note: This dialog (screenshot above) appears only when you add a data source for the first time. It enables you to select a data source. After a page source has been created, you can only edit the SELECT statement of the data source; you cannot change the data source.
Build a SELECT statement
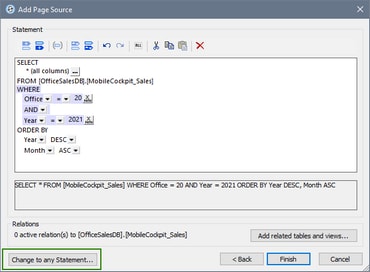
When, in the Add Page Source dialog (screenshot above), you double-click a table/view in the list box or click the Build a SELECT statement button, the dialog to build a SELECT statement appears (screenshot below). This dialog is aware of the currently selected table and provides you with context-sensitive interactive help to build a SELECT statement. You can use toolbar buttons and dialog controls (such as combo boxes and buttons) to build the statement, which will be displayed in a pane below the Build pane.
Use the following mechanisms to build a SELECT statement:
•For the SELECT keyword, choose the columns you want by clicking the Additional Dialog button. In the Columns dialog that appears, check the Use all columns check box to use the SELECT * instruction for selecting all columns, or check the individual columns you want to select.
•The value of the FROM keyword will be the name of the DB table to use. It is pre-selected and cannot be modified. If you want more flexibility in editing your SELECT statement, use the Add/Modify Any SELECT Statement dialog (see below).
•Add expressions for the WHERE clause by using the Insert expression before/behind toolbar buttons. (To insert an expression before, you must select another expression.) For each expression, you can (i) choose one of the available columns in the first combo box, (ii) choose a WHERE clause conditional operator in the second combo box, and (iii) enter, as an XPath expression, a conditional value for the selected column .
•When you add a new expression to a WHERE clause, the logical AND operator will be pre-selected as the joining operator. You can change the logical operator (AND or OR) via the combo box.
•Create complex filters by grouping one or more expressions of the WHERE clause in parentheses (brackets). Select a set of adjacent expressions (including the logical operators within the set) and select the toolbar button to enclose the selected set of expressions in brackets.
•To sort the output, add an ORDER BY clause, in which you can choose: (i) the column on which to sort, and (ii) the sort order (ascending or descending). To sort on multiple columns, add more ORDER BY clauses before or after the first ORDER BY clause, as required.
•The following editing commands are available: Undo, Redo, Select Entire WHERE Clause, Cut, Copy, Paste, and Delete.
•If you want to add relations from the current table/view to one or more other tables/views, you can add the related tables/views and build relations in a graphical interface. Click Add related tables/view to open the Add/Edit Relations dialog (described below).
Add related tables and views
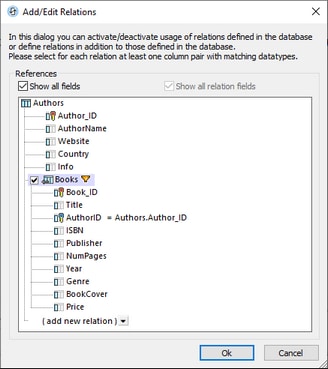
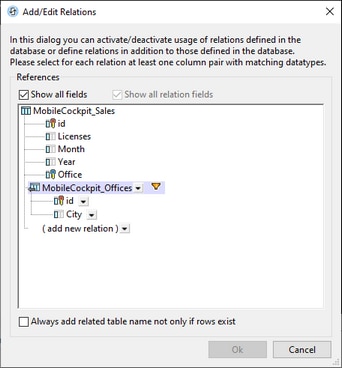
In the Add/Edit Relations dialog (screenshot below), you can (i) enable relations that exist in the DB (screenshot below left), and (ii) create relations between tables (screenshot below right). This also enables you to create hierarchical DB page sources.
If, in the DB, tables are related to the main table, then these are each displayed with a check box. You can select the tables for which you want to maintain the relation. (The relations are built using primary and foreign keys). For example, in the screenshot above left, the Books table has an AuthorID foreign key that relates each book record to an author in the Authors table. If the relation is maintained (by checking the Books table), then the page source will be created so that Books is hierarchically related to Authors as a child. For an example of a how a hierarchical DB is used, see the Hierarchical Database tutorial.
If you want to add a new relation to a column (or field) that is in another table, do this as follows:
1.Click the combo box of the Add New Relation entry, and select the table in which the related field is located. In the screenshot above right, for example, the MobileCockpit_Offices table has been added.
2.Select Show All Relation Fields and Show All Fields to show all fields of all tables/views.
3.In the added table, click the dropdown arrow of the field for which you want to create a relation.
4.The dropdown list of the this added table's field will display the names of the original table's columns. Select the column you want to relate to the current field. The related column will be displayed to the right of the equal sign. In the screenshot above, for example, the id field of the added Offices table is related to the id field of the original Sales table.
5.Click OK to finish.
Note the following points:
•Checking the Show All Relation Fields option displays only those columns that have relations. Checking the Show All Fields option displays all fields of all tables/views. If both these options are unchecked, then no fields are displayed.
•Clicking the Filter icon near the name of the added table/view (see screenshot), opens the Build Select Statement dialog (see above) in which you can build a statement to filter the added table/view.
•To add related table names even if no rows exist in the table, select the corresponding check box at the bottom of the dialog (see screenshot above right).
Hierarchical DB-write support
When the main data source is added as a page source of the design, its related tables (created as described above) will be displayed as child nodes of the main table. These child nodes can be assigned to controls of the design as usual and the hierarchical relations as shown in the page source tree can be used in XPath expressions in the design. Furthermore, if the main DB table is assigned to a Table control and its child nodes are assigned to cells of the table control, then data is shown in the table according to the relations in the hierarchy. For an example of this, see the Hierarchical Database tutorial.
For information about saving data to the DB, see Saving Data to the DB.
Add/modify a SELECT statement
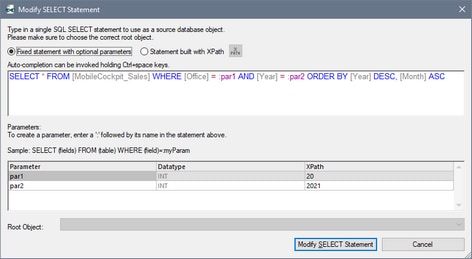
The previous section describes the dialog to build a SELECT statement of the selected table/view. In that dialog, the table/view is pre-selected and cannot be changed. If, however, you want to create a SELECT statement without any restrictions or to modify an existing SELECT statement, you can use the Add/Modify SELECT Statement dialog (screenshot below). This dialog can be accessed at two points in the data selection procedure (see the buttons highlighted green in the two screenshots above).
•In the Select Table or View dialog (first screenshot of this topic), click Add Any SELECT Statement.
•In the Build a SELECT Statement dialog (second screenshot of this topic), click Change to Any SELECT Statement. The SELECT statement that you have created till this point will be displayed in the Modify SELECT Statement dialog (screenshot below), and you will be able to edit it.
In the top pane, enter or modify the SELECT statement using the database query language SQL. Note from the screenshot above how you can use parameters instead of values. To use parameters, first enter a colon and a parameter name in the SELECT statement, for example, :par1. An entry for this parameter name will be created automatically in the Parameters pane in the bottom half of the dialog. Here, for each parameter, you can edit the parameter's datatype and supply a value for the parameter via an XPath expression.
After you finish editing your SELECT statement, click Modify SELECT statement to finish.
Statement built with XPath
You can also build an SQL statement with an XPath statement, which would typically be a string or a string concatenation. For example:
"SELECT * FROM Books WHERE ID = :iD"
concat("SELECT * FROM ", $XML1/MediaList/DBSelection, " WHERE ID = :iD")
After you finish editing your SELECT statement, click Build a SELECT statement or Modify SELECT statement to finish.
