The Charts
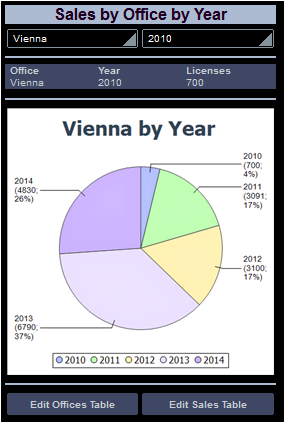
There are two charts in the design. The first chart shows the yearly breakdown of all sales of the office selected in the combo box (see the simulator screenshot below).
XPath context node
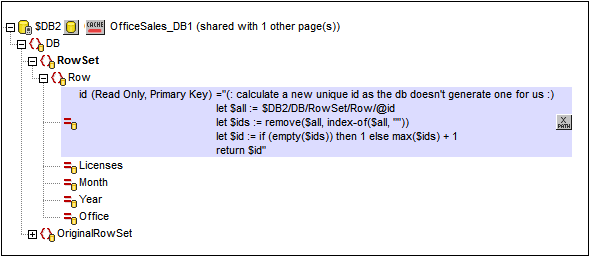
The main chart definitions are what goes on the X and Y axes. Since these are determined by XPath expressions it is important to correctly select the XPath context node for the chart. For the context node, it is best to select the immediate parent of the nodeset that will be used for the X and Y axes. Since we are going to use data from the Sales data table, we will use the $DB2 tree for creating the chart (screenshot below). And since our nodeset for both axes will consist of the Row element, we select RowSet as the XPath context node. We do this by dragging the RowSet node onto the chart. The node is displayed bold, indicating that it is a source node.
Defining the chart axes
We are now ready to define the chart's axes. Open the chart's Chart Configuration dialog (screenshot below) by either double-clicking the chart or clicking the Additional Dialog button of the Chart Settings property (in the Styles & Properties Pane). Note that the chart type is a pie chart.

For pie charts, we need two series (for the X and Y axes). The Flexible option is ideal for defining the axes for two series. The For-each setting selects the current node (RowSet). We define the following XPath expressions for the two axes:
•X-Axis: Creates a sequence of the unique years during which the selected office recorded sales.
for $i in distinct-values(Row[@Office=$XML1/root/@DesiredOffice]/@Year) return $i
•Y-Axis: For the selected office and for each of its unique years, sums up the sales (stored in its @Licenses attribute)
for $i in distinct-values(Row[@Office=$XML1/root/@DesiredOffice]/@Year) return sum(Row[@Office= $XML1/root/@DesiredOffice][@Year=$i]/@Licenses)
Additional definitions
Additionally, the following settings were made:
•In the Chart Configuration dialog, click Dynamic XPath Settings and set the title using an XPath expression. This enables the selected office to be displayed in the title.
•In the Chart Configuration dialog, click All Settings. In the Change Appearance dialog that appears, select Pie and select Add Value to Labels and Add Percent to Labels.

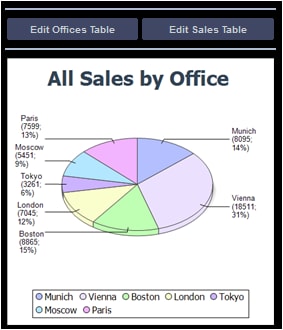
The second chart
The second chart is similar to the first, but is a 3D pie chart (screenshot below). It shows the sales of each office over all years as a part of total sales over all years.
The XPath expressions are as follows:
•X-Axis: Creates a sequence of the city names of offices (not IDs), with city names being taken from $DB1.
for $i in distinct-values(Row/@Office) return $DB1/DB/RowSet/Row[@id=$i]/@City
•Y-Axis: For the selected office, sums up the sales (stored in its @Licenses attribute)
for $i in distinct-values(Row/@Office) return sum(Row[@Office=$i]/@Licenses)