Messages Pane
The Messages Pane (screenshot below; see User Interface for its location) displays messages in the following contexts:
•It reports the validation results of the currently active project. This includes all pages in the project. If an error is reported, the error message contains a link that points to the component that generated the error.
•During simulations, it provides a detailed and step-by-step report of the progress of the workflow.
Every time you run one of these actions, the messages of previous actions are cleared from the current tab. However, since there are nine Messages tabs, you can retain the results of an action in one tab while carrying out a second action in another tab.
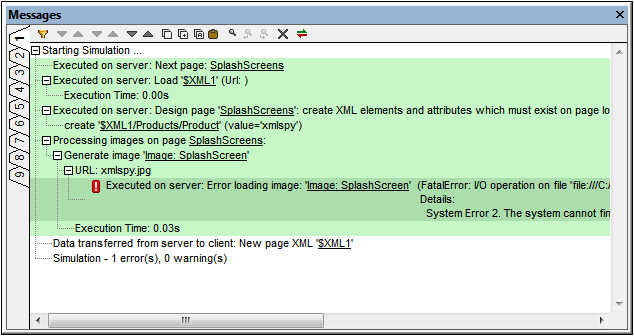
The toolbar of the Messages Pane contains commands that enable the following actions: filtering of the messages, navigation of the messages, copying of messages, pasting of the server log message, searching the messages, clearing the current tab, setting the background colors of server and client log messages, and setting the timer.
Paste server log messages to locate error sources in the design
If, when a solution runs on MobileTogether Server, the server logs show an error, you can hover over the error message to display a Copy button that enables you to copy the error message to the clipboard.
Now if you open the design of the solution in MobileTogether Designer, you can paste the error message in the Messages Pane. Do this by clicking the Paste Server Log icon of the pane's toolbar (see screenshot above). The server log message that you copied to the clipboard will be pasted. From details in the message, MobileTogether Designer will locate the referenced points in the design, and the message will be displayed with links to these design definitions. Click the link/s to find the source of the error.
Using XPath trace() to generate messages
You can use XPath's trace() function to generate messages in the Messages Pane. For example, the following XPath expression will generate a message that reflects the value in the Company/Name node:
if (Company/Name="Altova") then trace("Company is Altova") else trace("Company is not Altova")
The text of the relevant trace function is returned as the message in the Messages Pane. This message will also be a link, which when clicked takes you to the the originating trace function.
Filtering messages
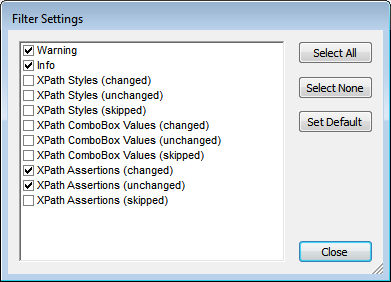
You can specify what kind of messages are displayed in the Messages Pane. To do this, click the Filter button in the toolbar of the Messages Pane (screenshot above). This displays the Filter Settings dialog (screenshot below). Select the message types you want to display and click Close. This feature can be very useful, for example, if there are too many messages and you wish to focus on just one type of message.
Color settings
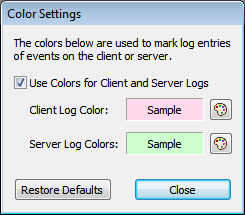
For messages that are displayed during simulations, different colors can be set for actions that take place on the server and on the client. If you set clearly distinguishable colors, you can very easily follow the workflow in the Messages Pane. This can be of great help in debugging. To set customs colors, click the Colors button in the toolbar of the Messages Pane (screenshot above). This displays the Color Settings dialog (screenshot below), in which you can set the colors you want.
Timer settings
Messages can be displayed with their timestamps (see screenshot below). The Timer button enables you to configure the display of timestamps. The following options are available.
•Hide Timestamps: No timestamps are displayed. This is the default setting.
•Show Relative Timestamps: Timestamps are displayed relative to the start of the action (validation or simulation). The messages of previous actions are cleared from the current tab.
•Show Absolute Timestamps: Timestamps are displayed as the actual time according to the system clock.
•Set Line Timestamp to Zero: This option is enabled only when Relative Timestamps is selected. On selecting a message line and then choosing this option, that message line is set to zero. This enables you to see the time taken for various events relative to the selected message line. In the screenshot below, for example, the message line highlighted in gray is set to zero; as a consequence we can see the time taken by various events relative to the selected event. You can set different lines to zero one after the other.
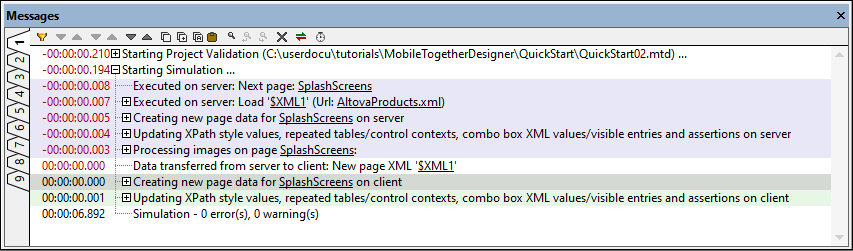
Click the Timer button and select the option you want. Note that setting line timestamps to zero is enabled only if the Relative Timestamps option is selected.