Drag-and-Drop (JSON)
Grid View offers a very useful drag overlay that enables you to drag a JSON document fragment into Grid View from a document that is open in XMLSpy, an external application, or even a website.
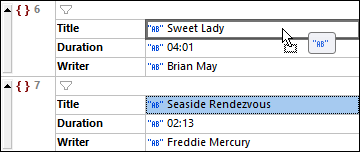
When you place the cursor over the target node, a drag overlay appears that not only provides information about what is being dragged but also information about how the item will be created when it is dropped. For example, in the screenshot below, the value Seaside Rendezvous is being dragged (moved). That the item is a string value is indicated by the AB popup.
•If you hover a value field (as in the screenshot at left), then the entire field is marked, indicating that the value of the marked field will be replaced by the value of the dragged field.
•If you hover over a node name (such as Duration in the screenshot at right), then an insertion line appears, indicating that the value string will be dropped there to create the value node of a key–value pair. The key in this case will be an empty string.
| Note: | You can always undo any move with Ctrl+Z or the menu command Edit | Undo. |
Information contained in the drag overlay
The following kinds of drag overlay information will be displayed.
Normal Grid View
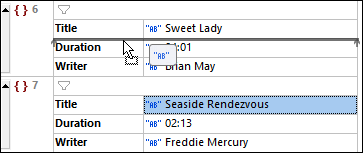
•Value dropped onto a value field moves the source value to overwrite the value in the target field (see screenshot above left).
•Value dropped into the tree as a node creates the value node of a key–value pair (see screenshot above right). The key will be an empty string.
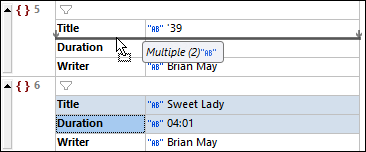
•The overlay for multiple nodes of a single type shows the node type that is being dropped and the number of these nodes. Note that in order to select a node (and not its value), you must click the node's name. In the screenshot below, the information in the drag overlay indicates that two key–value pairs of type string will be dropped.
•The overlay for multiple nodes of different types shows that the new nodes will be created with a default type of string (see screenshot below). You can change the type of the dropped nodes by clicking the respective Edit Type icons. Note that in order to select a node (and not its value), you must click the node's name.
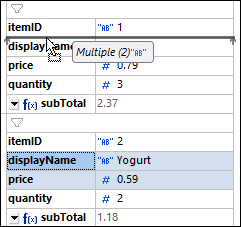
Table Display
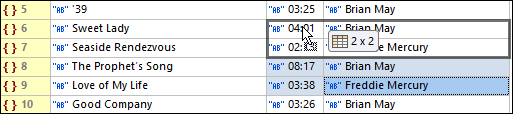
•When values are dragged, the number of selected cells are indicated by column x rows (see screenshot below). The matrix of dragged cells will replace a corresponding matrix. The target cell (the cell on which you drop the matrix) will receive the value of the top left cell of the matrix. The other dragged cells will fill the cells rightwards and downwards from the target cell. For example, in the screenshot below the blue cells are dragged and dropped onto the Duration cell of row 6. This results in them replacing the cells that have been marked. If the matrix of dragged cells exceeds the table boundaries, then the appropriate number of columns and/or rows is added to accommodate all dragged cells. In this case, the boundaries that will be expanded are indicated with dashed lines.
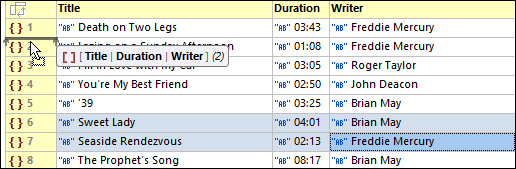
•When the target is the node tree—and not a cell—then the node being added is indicated, together with (i) the columns that will be added (contained in square brackets), and (ii) the number of instances of the new item. For example, in the screenshot below, an array is added that contains two objects, each of which has a Title, Duration, and Writer key–value pair.
•A table column can be moved by selecting it (click its header to do this) and dropping it onto the column header adjacent to which you want to move it. An insertion line will indicate on which side of the target column the relocated column will be placed.