Overview of the Environment
The Scripting Editor consists of the following parts:
•Toolbar
•Project pane
•Properties pane
•Main window
•Toolbox
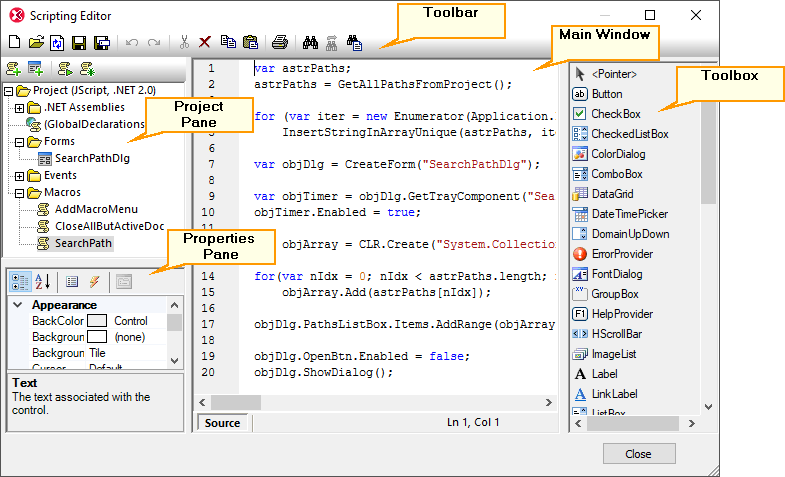
Toolbar
The toolbar includes standard Windows file management commands (New, Open, Save, Save As) and editor commands (Copy, Cut, Delete, Paste). When editing source code, the Find and Replace commands are additionally available, as well as the Print command.
Project pane
The project pane helps you view and manage the structure of the project. A scripting project consists of several components that can work together and may be created in any order:
•A "Global Declarations" script. As the name suggests, this script stores information available globally across the project. You can declare in this script any variables or functions that you need to be available in all forms, event handler scripts, and macros.
•Forms. Forms are typically necessary to collect user input, or provide some informative dialog boxes. A form is invoked by a call to it either within a function (in the Global Declarations script) or directly in a macro.
•Events. The "Events" folder displays XMLSpy application events provided by the COM API. To write a script that will be executed when an event occurs, double-click any event, and then type the handling code in the editor. The application events should not be confused with form events; the latter are handled at form level, as further detailed below.
•Macros. A macro is a script that can be invoked either on demand from a context menu or be executed automatically when XMLSpy starts. Macros do not have parameters or return values. A macro can access all variables and functions declared in the Global Declarations script and it can also display forms.
Right-click any of the components to see the available context menu commands and their shortcuts. Double-click any file (such as a form or a script) to open it in the main window.
The toolbar buttons provide the following quick commands:
New macro | Adds a new macro to the project, in the Macros directory. | |
New form | Adds a new form to the project, in the Forms directory. | |
 | Run macro | Runs the selected macro. |
 | Debug macro | Runs the selected macro in debug mode. |
Properties pane
The Properties pane is very similar to the one in Visual Studio. It displays the following:
•Form properties, when a form is selected
•Object properties, when an object in a form is selected
•Form events, when a form is selected
•Object events, when an object in a form is selected
To switch between the properties and events of the selected component, click the Properties ![]() or Events
or Events  buttons, respectively.
The Categorized ![]() and Alphabetical
and Alphabetical ![]() icons display the properties or events either organized by category or organized in ascending alphabetical order.
icons display the properties or events either organized by category or organized in ascending alphabetical order.
When a property or event is selected, a short description of it is displayed at the bottom of the Properties pane.
Main window
The main window is the working area where you can enter source code or modify the design of the form. When editing forms, you can work in two tabs: the Design tab and the Source tab. The Design tab shows the layout of the form, while the Source tab contains the source code such as handler methods for the form events.
The source code editor provides code editing aids such as syntax coloring, source code folding, highlighting of starting and ending braces, zooming, autocompletion suggestions, bookmarks.
Autocompletion suggestions
JScript and VBScript are untyped languages, so autocompletion is limited to COM API names and XMLSpy built-in commands. The full method or property signature is shown next to the autocompletion entry helper.
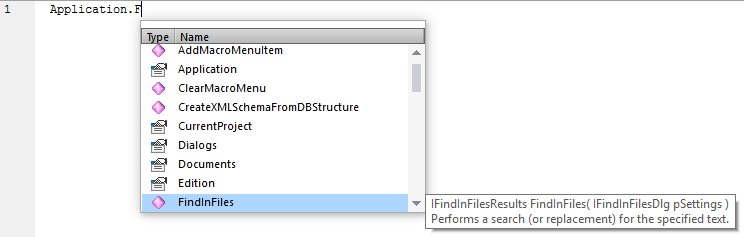
If names start with objDocument, objProject, objXMLData, or objAuthenticRange, members of the corresponding interface will be shown.
Placing the mouse over a known method or property displays its signature (and documentation if available), for example:

The auto-completion entry helper is normally shown automatically during editing, but it can also be obtained on demand by pressing Ctrl+Space.
Bookmarks
•To set or remove a bookmark, click inside a line, and then press Ctrl+F2
•To navigate to the next bookmark, press F2
•To navigate to the previous bookmark, press Shift+F2
•To delete all bookmarks, press Ctrl+Shift+F2
Zooming in/out
•To zoom in or out, hold the Ctrl key pressed and then press the "+" or "-" keys or rotate the mouse wheel.
Text view settings
To trigger text settings, right-click inside the editor, and select Text View Settings from the context menu.
Font settings
To change the font, right-click inside the editor, and select Text View Font from the context menu.
Toolbox
The Toolbox contains all the objects that are available for designing forms, such as buttons, text boxes, combo boxes, and so on.
To add a Toolbox item to a form:
1.Create or open a form and make sure that the Design tab is selected.
2.Click the Toolbox object (for example, Button), and then click at the location in the form where you wish to insert it. Alternatively, drag the object directly onto the form.
Some objects such as Timer are not added to the Form but are created in a tray at the bottom of the main window. You can select the object in the tray and set properties and event handlers for the object from the Properties pane. For an example of handling tray components from the code, see Handling form events.
You can also add registered ActiveX controls to the form. To do this, right-click the Toolbox area and select Add ActiveX Control from the context menu.