Integration at Document Level
Compared to integration at application level, integration at document level is a more complex, yet more flexible way to embed XMLSpy functionality into your application by means of ActiveX controls. With this approach, your code can access selectively the following parts of the XMLSpy user interface:
•Document editing window
•Project window
•Entry helper windows
•Validator output window
•XPath profiler window
•XPath dialog window
•XSLT/XQuery debugger windows
•SOAP debugger window
As mentioned in Integration at Application Level, for an ActiveX integration at application level, only one control is required, namely the XMLSpyControl. However, for an ActiveX integration at document level, XMLSpy functionality is provided by the following ActiveX controls:
These controls are supplied by the XMLSpyControl.ocx file available in the application installation folder of XMLSpy. When you develop the ActiveX integration with Visual Studio, you will need to add these controls to the Visual Studio toolbox (see Adding the ActiveX Controls to the Toolbox).
The basic steps to integrate the ActiveX controls at document level into your application are as follows:
1.First, instantiate XMLSpyControl in your application. Instantiating this control is mandatory; it enables support for the XMLSpyControl Document and XMLSpyControl Placeholder controls mentioned above. It is important to set the IntegrationLevel property to ICActiveXIntegrationOnDocumentLevel (or "1"). To hide the control from the user, set its Visible property to False. Note that, when integrating at document level, do not use the Open method of the XMLSpyControl; this might lead to unexpected results. Use the corresponding open methods of XMLSpyControl Document and XMLSpyControl PlaceHolder instead.
2.Create at least one instance of XMLSpyControl Document in your application. This control supplies the document editing window of XMLSpy to your application and can be instantiated multiple times if necessary. Use the method Open to load any existing file. To access document-related functionality, use the Path and Save or methods and properties accessible via the property Document. Note that the control does not support a read-only mode. The value of the property ReadOnly is ignored.
3.Optionally, add to your application the XMLSpyControl Placeholder control for each additional window (other than the document window) that must be available to your application. Instances of XMLSpyControl PlaceHolder allow you to selectively embed additional windows of XMLSpy into your application. The window kind (for example, Project window) is defined by the property PlaceholderWindowID. Therefore, to set the window kind, set the property PlaceholderWindowID. For valid window identifiers, see XMLSpyControlPlaceholderWindow. Use only one XMLSpyControl PlaceHolder for each window identifier.
For placeholder controls that select the XMLSpy project window, additional methods are available. Use OpenProject to load a XMLSpy project. Use the property Project and the methods and properties from the XMLSpy automation interface to perform any other project related operations.
For example, in C# or VB.NET with Visual Studio, the steps to create a basic, one-form application which integrates the XMLSpy ActiveX controls at document level could be similar to those listed below. Note that your application may be more complex if necessary; however, the instructions below are important to understand the minimum requirements for an ActiveX integration at document level.
1.Create a new Visual Studio Windows Forms project with a new empty form.
2.If you have not done that already, add the ActiveX controls to the toolbox (see Adding the ActiveX Controls to the Toolbox).
3.Drag the XMLSpyControl from the toolbox onto your new form.
4.Set the IntegrationLevel property of the XMLSpyControl to ICActiveXIntegrationOnDocumentLevel, and the Visible property to False. You can do this either from code or from the Properties window.
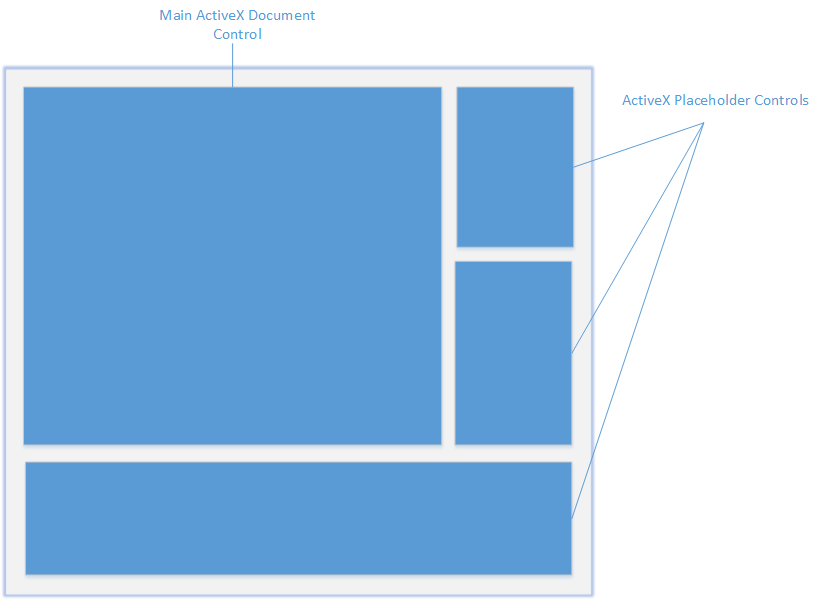
5.Drag the XMLSpyControl Document from the toolbox onto the form. This control provides the main document window of XMLSpy to your application, so you may need to resize it to a reasonable size for a document.
6.Optionally, add one or more XMLSpyControl Placeholder controls to the form (one for each additional window type that your application needs, for example, the Project window). You will typically want to place such additional placeholder controls either below or to the right or left of the main document control, for example:
7.Set the PlaceholderWindowID property of each XMLSpyControl Placeholder control to a valid window identifier. For the list of valid values, see XMLSpyControlPlaceholderWindow.
8.Add commands to your application (at minimum, you will need to open, save and close documents), as shown below.
Querying XMLSpy Commands
When you integrate at document level, no XMLSpy menu or toolbar is available to your application. Instead, you can retrieve the required commands, view their status, and execute them programmatically, as follows:
•To retrieve all available commands, use the CommandsList property of the XMLSpyControl.
•To retrieve commands organized according to their menu structure, use the MainMenu property.
•To retrieve commands organized by the toolbar in which they appear, use the Toolbars property.
•To send commands to XMLSpy, use the Exec method.
•To query if a command is currently enabled or disabled, use the QueryStatus method.
This enables you to flexibly integrate XMLSpy commands into your application's menus and toolbars.
Your installation of XMLSpy also provides you with command label images used within XMLSpy. See the folder <ApplicationFolder>\Examples\ActiveX\Images of your XMLSpy installation for icons in GIF format. The file names correspond to the command names as they are listed in the Command Reference section.
General considerations
To automate the behaviour of XMLSpy, use the properties, methods, and events described for the XMLSpyControl, XMLSpyControl Document, and XMLSpyControl Placeholder.
For more complex access to XMLSpy functionality, consider using the following properties:
•XMLSpyControlDocument.Document
•XMLSpyControlPlaceHolder.Project
These properties give you access to the XMLSpy automation interface (XMLSpyAPI)
Note: To open a document, always use XMLSpyControlDocument.Open or XMLSpyControlDocument.New on the appropriate document control. To open a project, always use XMLSpyControlPlaceHolder.OpenProject on a placeholder control embedding a XMLSpy project window.
For examples that show how to instantiate and access the necessary controls in different programming environments, see ActiveX Integration Examples.