Creating a Scripting Project
All scripts and scripting information created in the Scripting Editor are stored in Altova Scripting Projects (.asprj files). A scripting project may contain macros, application event handlers, and forms (which can have their own event handlers). In addition, you can add global variables and functions to a "Global Declarations" script—this makes such variables and functions accessible across the entire project.
To start a new project, run the menu command Tools | Scripting Editor.
The languages supported for use in a scripting project are JScript and VBScript (not to be confused with Visual Basic, which is not supported). These scripting engines are available by default on Windows and have no special requirements to run. You can select a scripting language as follows:
1.Right-click the Project item in the upper-left pane, and select Project settings from the context menu.
2.Select a language (JScript or VBScript), and click OK.
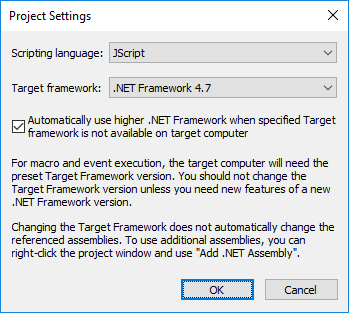
From the Project settings dialog box above, you can also change the target .NET Framework version. This is typically necessary if your scripting project requires features available in a newer .NET Framework version. Note that any clients using your scripting project will need to have the same .NET Framework version installed (or a later compatible version).
By default, a scripting project references several .NET assemblies, like System, System.Data, System.Windows.Forms, and others. If necessary, you can import additional .NET assemblies, including assemblies from .NET Global Assembly Cache (GAC) or custom .dll files. You can import assemblies as follows:
1.Statically, by adding them manually to the project. Right-click Project in the top-left pane, and select Add .NET Assembly from the context menu.
2.Dynamically, at runtime, by calling the CLR.LoadAssembly command from the code.
You can create multiple scripting projects if necessary. You can save a scripting project to the disk, and then load it back into the Scripting Editor later. To do this, use the standard Windows buttons available in the toolbar: New, Open, Save, Save As. Once the scripting project has been tested and is ready for deployment, you can load it into XMLSpy and run any of its macros or event handlers. For more information, see Enabling Scripts and Macros.
You can also find an example scripting project at the following path: C:\Users\<user>\Documents\Altova\XMLSpy2026\Examples\SampleScripts.asprj.
The next sections focus on the parts that your scripting project may need: global declarations, macros, forms, and events.