Main Window: Elements Tab
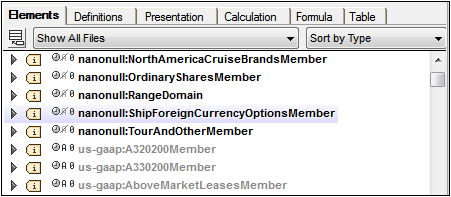
The Elements tab of the Main Window (screenshot below) displays the concepts of the taxonomy, including, by default, the concepts contained in imported taxonomies. Concepts in the current taxonomy are displayed in black; concepts in imported taxonomies are displayed in gray.
For additional information, see the sections XBRL and the description of commands in the XBRL menu.
Selecting the taxonomy to display
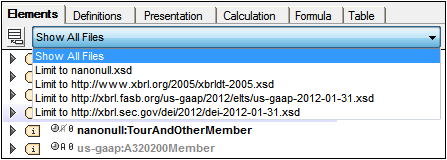
In the File combo box located below the tabs of the Main Window (screenshot below), you can select whether concepts from the current taxonomy only, or whether concepts from the current taxonomy plus its imported taxonomies, should be displayed. Select Show All Files to show the imported taxonomies. Filtering out large imported taxonomies from the display will speed up editing considerably.
Sorting elements
In the Sort combo box located below the tabs of the Main Window and to the right (screenshot below), you can sort the elements in the Main Window.
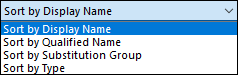
The sorting criterion can be one of the following:
•Sort by Name: Elements are listed by the alphabetical order of their names. The names include the prefix. So abc:yname will occur before bcd:xname.
•Sort by Qualified Name: Element names are fully resolved (which means that their namespaces are expanded), and the expanded names are listed in alphabetical order. So if the abc namespace prefix is bound to the namespace http:people.altova.com, then the element name abc:yname will be resolved to http:people.altova.com:yname.
•Sort by Substitution Group: There are four substitution groups: items; tuples; hypercubeItems; dimensionItems.
•Sort by Type: Refers to the Type attribute of the XBRL element.
Finding elements in the Main Window
To find an element in the Main Window press the key combination Ctrl+F. This pops up a Find dialog, in which you can enter the string for which you wish to search. The namespace prefixes used in the taxonomy can also be searched.
About concepts (the <element> elements)
Each taxonomy concept is defined in an XML Schema <element> element (see listing below). This plain text definition can be seen on switching to the Text View of the taxonomy document. (To see the text definitions of an imported taxonomy document, the imported taxonomy document will have to be opened in XMLSpy.)
<xs:element id="icui_UnrealizedHoldingLoss"
name="UnrealizedHoldingLoss"
substitutionGroup="xbrli:item"
type="xbrli:monetaryItemType"
xbrli:balance="credit"
xbrli:periodType="instant"
abstract="false"
nillable="true"/>
Each element (or concept) is displayed in the Elements tab with an icon indicating its substitution group (item, tuple, hypercube, or dimension). Additionally, icons indicating the values of the concept's balance, periodType, abstract, and nillable attributes are displayed to the left of the concept name (screenshot below).
To edit the name of the concept, double-click the name of the concept and edit the name.
Substitution group
The substitution group value of a concept is indicated by the concept's icon:
xbrli:item | |
xbrli:tuple | |
xbrldt:hypercubeItem | |
xbrldt:dimensionItem |
The screenshot below shows an element with a substitutionGroup value of xbrli:item.

The attributes balance, periodType, abstract, nillable
The additional icons to the left of an element's name (see screenshot above) indicate the values of the concept's main attributes, respectively, from left to right:
• xbrli:balance: a plus icon for a value of credit, a minus icon for debit
• xbrli:periodType: a clock icon with a gray segment between the clock hands for a value of duration, white segment for instant
• xs:abstract: black A icon when true, gray when false
• xs:nillable: black 0 icon when true, gray when false
Note that the xbrli: attributes listed above are from the XBRL schema and the xs: attributes are from the XML Schema schema.
In the screenshot above, the plus icon indicates that the value of the xbrli:balance attribute is credit. The values of the other attributes in the screenshot (xbrli:periodType, xs:abstract, xs:nillable), respectively, are: duration, false, (i.e. not abstratct), and true (i.e. nillable).
The values of these four attributes are displayed in a popup when the cursor is placed over any of the four icons. Clicking any of these icons pops up a list box containing the allowed values for that attribute. You can select one of the allowed choices, and in this way edit the value of concept attributes quickly.
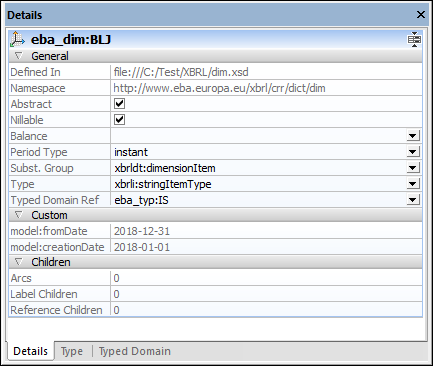
These attribute values can also be edited in the Details entry helper (screenshot below).
The attributes substitutionGroup, type
Clicking the arrowhead symbol at the left of the element name expands the display of the element so that the values of the two attributes, xs:substitutionGroup and xs:type, are displayed graphically (screenshot below).
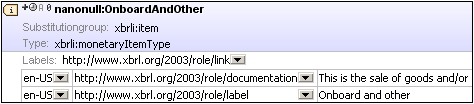
In the screenshot above, the value of the xs:substitutionGroup and xs:type attributes are, respectively: xbrli:item and xbrli:monetaryItemType. These values can be edited by selecting alternative values from the dropdown list of the corresponding combo boxes. Both attribute values can also be edited in the Details entry helper (see screenshot further above) by double-clicking in the respective value field in the Details entry helper and editing the value via the keyboard.
Label links
To add a label child, right-click an element and select Add Label Linkrole from the context menu. This adds a label row (screenshot below), in which you can specify the label's properties (language, label type, and value). You can expand and collapse labels by clicking the + and - icons on the right edge of the box.
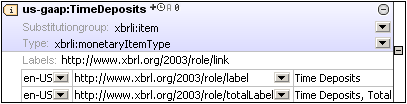
The language and label type properties of each label can be edited by selecting the required property value from in respective combo boxes (screenshot above).
Reference links
To add a reference child, right-click an element and select Add Reference Linkrole from the context menu. This adds a reference box, in which the properties of the reference can be edited by clicking in the Reference field and editing the reference URN. You can expand and collapse references by clicking the + and - icons on the right edge of the box.