Defining a Rule Set
A Schema Rule Set can be opened for editing in the Schema Rules Editor (screenshot below). You can then create, edit, and delete schema rules in that Schema Rule Set file. To open a Rule Set in the Schema Rules Editor, do the following:
1.Select the Rule Set in the list of Rule Sets in the Info window.
2.Clicking the context menu ![]() button of that Rule Set.
button of that Rule Set.
3.In the context menu that appears, select Edit Rule.
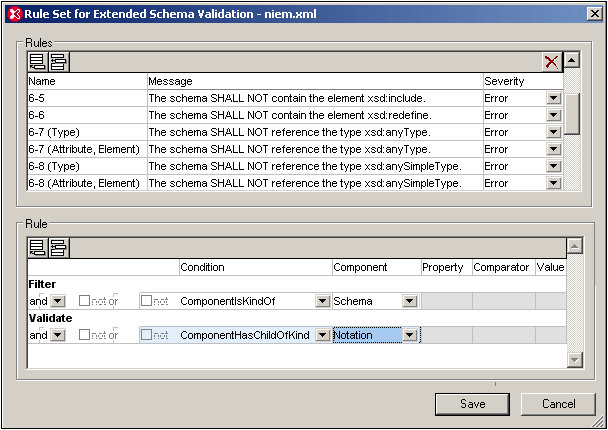
The Schema Rules Editor dialog has two panes:
•A Rules pane (in the top part of the Editor), in which you can add and delete rules. An empty line for a rule can be appended or inserted by clicking on the respective button (Append or Insert) in the top left of the pane. A rule can be deleted by selecting it and clicking the Delete button in the top right of the pane. Each rule in this pane has a name, a descriptive message text, and a severity level (if the rule is contradicted, validation can be set to return an error or a warning).
•A Rule pane (in the bottom part of the Editor). This pane displays the details of the rule that has been selected in the Rules pane above it, and enables the details of the rule to be edited. For details about defining rules, see the section, Defining a Rule, below.
After the rules in a Rule Set file have been edited, click Save to save the rules to the Rule Set File.
Defining a rule
To define or edit a rule, select the rule from the listing in the upper Rules pane. The definition of the rule will be displayed in the Rule pane and can be edited. The screenshot below displays a rule which can be defined as follows: If a complex type is an extension of a simple type, then it must have a child kind AttributeGroup.
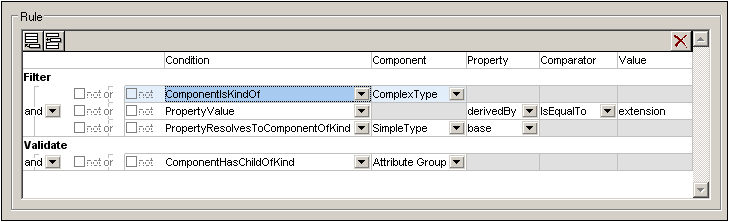
The Validate condition set and Filter condition set
•Each rule has one set of Validate conditions and one set of Filter conditions (see first column in screenshot above).
•The set of Filter conditions must eventually evaluate to true in order for the Validate condition to be evaluated.
•Each set of conditions (Validate or Filter) consists of one or more Condition Groups, with each Condition Group containing one or more conditions. In the screenshot above, the Validate set contains one Condition Group of one condition, and the Filter set contains three Condition Groups, each having one condition. In the screenshot below, the Filter set contains three Condition Groups: The first contains contains two conditions, the second contains three conditions, and the third contains one condition.
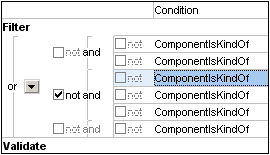
•Each individual condition can be negated by checking its Not check box (located to the left of the condition).
•Within a Condition Group, the logical connectors and or or indicate, respectively, whether all conditions in the group or one condition in the Condition Group must evaluate to true in order for the entire Condition Group to evaluate to true. In the GUI, these logical operators are the inner of the two columns of logical operators.
•Each Condition Group can be negated by checking its Not check box (located to the left of the Condition Group's logical operator).
•The outer logical connector and or or indicates, respectively, whether all the Condition Groups in the set (Validate or Filter) or one Condition Group must evaluate to true in order for the entire set (Validate or Filter) to evaluate to true.
•Logical connectors can be changed by selecting the appropriate option in the combo box for the outer logical connector (the Condition Group connector). The value of the inner logical connectors (the connectors for conditions within a Condition Group) are all switched to the opposite value as that of the outer logical connector.
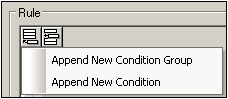
•A Condition Group or Condition can be appended or inserted relative to the selected condition. Do this by selecting a condition, then clicking the Append or Insert button (at the top left of the pane) and then selecting the required item (Condition Group or Condition) from the menu (see screenshot below).
Kinds of condition
A condition can belong to one of three groups (also see screenshot below):
•Component kind (in the dropdown list the kinds beginning with Component; see screenshot below)
•Property kind (Property Value)
•A combination of component and property kinds (kinds with Property and Component in their names)
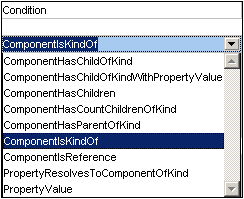
The kind of a condition is selected from the dropdown list in the Condition column of the condition (screenshot above). Each of the three groups of conditions is described below.
Conditions of Component kind
For conditions of the Component kind (kinds beginning with Component), the component must be specified subsequently in the Component column (see screenshot below). The component is selected from the dropdown list in the Component field of a sub-condition. Since no other field (Property, Comparator Value) is to be defined for conditions of the Component kind, all other fields are grayed out.
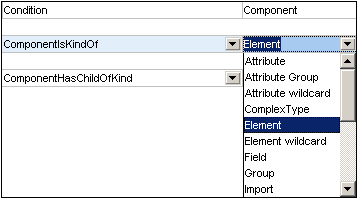
In the screenshot above, the Filter condition specifies that the rule concerns components of kind Element. If the Validate condition then specifies that the component must have a child of kind Notation, then the complete rule can be stated as: An Element component must have a child of kind Notation. If the Validate condition had its NOT option checked, then the rule would be stated as: An Element component must not have a child of kind Notation.
Conditions of Property kind
The condition of the Property kind is Property Value (see screenshot below). This kind of condition specifies the nature of a property. It therefore requires entries in the Property and Comparator columns, and, optionally, an entry in the Value column. No entry is required in the Component column, which is therefore grayed out. Properties listed in the dropdown lists of the Property column include not only XML attributes (such as default and maxOccurs) but also the logical properties of components (such as derivedBy).

The screenshot above shows a rule in which the Model property has a value equal to All and is negated (via the Not check box). Taken in conjunction with the filter on the Model Group component, this rule simply states that a schema must not contain any xsd:all element.
Note: The following points should be noted:
•When using the IsQNameEqualTo comparator, the corresponding value must be written in the form: {URI}localName. For example, a value could be: {http://www.w3.org/2001/XMLSchema}NOTATION.
•The default property can be present and empty (<element name default=""/>) or it can be absent (<element name/>).
Conditions that combine Component and Property kinds
Conditions that are a combination of Component and Property kinds are:
•ComponentHasChildOfKindWithPropertyValue: Specifies the component kind of a child element and the property's value.
•PropertyResolvesToComponentOfKind: A property is specified that resolves to a component kind. The Comparator and Value columns are empty.
Negating a condition
A condition is negated by checking the Not check box to its immediate left (the inner Not check boxes). A Condition Group is negated by checking the Not check box to the left of the logical connector for conditions in that Condition Group..