CSS
CSS documents can be edited using Text View's intelligent editing features. These features, as they apply to the editing of CSS documents, are listed below.
Syntax coloring
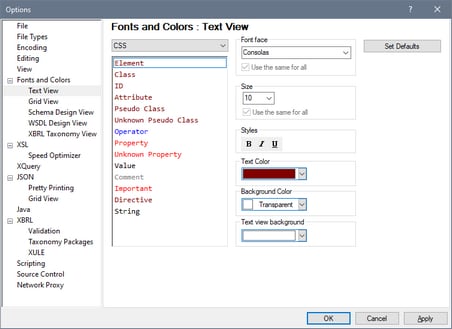
A CSS rule consists of a selector, one or more properties, and the values of those properties. These three components may be further sub-divided into more specific categories; for example, a selector may be a class, pseudo-class, ID, element, or attribute. Additionally, a CSS document can contain other items than rules: for example, comments. In Text View, each such category of items can be displayed in a different color (screenshot below) according to settings you make in the Options dialog (see below).

You can set the colors of the various CSS components in the Fonts and Colors section of the Options dialog (screenshot below). In the combo box at top left, select CSS, and then select the required color (in the Styles pane) for each CSS item.
Source folding
Source folding refers the ability to expand and collapse each CSS rule, which is indicated in the source folding margin by a +/- sign. The margin can be toggled on and off in the Text View Settings dialog. When a rule is collapsed, this is visually indicated by an ellipsis. If the mouse cursor is placed over an ellipsis, the content of the collapsed rule is displayed in a popup. If the content is too large for a popup, this is indicated by an ellipsis at the bottom of the popup.
The Toggle All Folds icon  in the Text toolbar toggles all rules to their expanded forms or collapses all rules to the top-level document element.
Note: that the pair of curly braces that delimit a rule (screenshot above) turns bold when the cursor is placed either before or after one of the curly braces. This indicates clearly where the definition of a particular rule starts and ends.
CSS outline
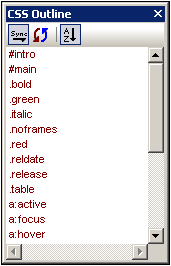
The CSS Outline entry helper (screenshots below) provides an outline of the document in terms of its selectors. Clicking a selector in the CSS Outline highlights it in the document. In the screenshot at left below, the selectors are unsorted and are listed in the order in which they appear in the document. In the screenshot at right, the Alphabetical Sorting feature has been toggled on (using the toolbar icon), and the selectors are sorted alphabetically.
You should note the following points: (i) For evaluating the alphabetical order of selectors, all parts of the selector are considered, including the period, hash, and colon characters; (ii) If the CSS document contains several selectors grouped together to define a single rule (e.g. h4, h5, h6 {...}), then each selector in the group is listed separately.
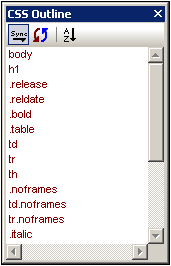
The icons in the toolbar of the CSS Outline entry helper, from left to right, do the following:
Toggles automatic synchronization (with the document) on and off. When auto-synchronization is switched on, selectors are entered in the entry helper even as you type them into the document. | |
Synchronizes the entry helper with the current state of the document. | |
Toggles alphabetical sorting on and off. When off, the selectors are listed in the order in which they appear in the document. When sorted alphabetically, ID selectors appear first because they are prefaced by a hash (e.g. #intro). |
Properties entry helper
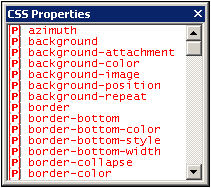
The Properties entry helper (screenshot below) provides a list of all CSS properties, arranged alphabetically. A property can be inserted at the cursor insertion point by double-clicking the property.
Auto-completion of properties and tooltips for properties
As you start to type the name of a property, XMLSpy prompts you with a list of properties that begin with the letters you have typed (screenshot below). Alternatively, you can place the cursor anywhere inside a property name and then press Ctrl+Space to pop up the list of CSS properties.
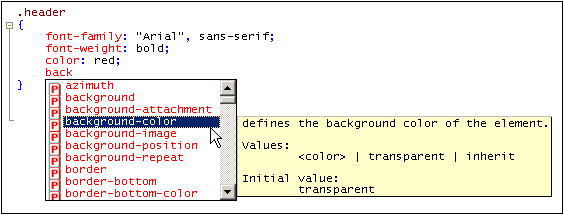
You can view a tooltip containing the definition of a property and its possible values by scrolling down the list or navigating the list with the Up and Down keys of your keyboard. The tooltip for the highlighted property is displayed. To insert a property, either press Enter when it is selected, or click it.
CSS Info window
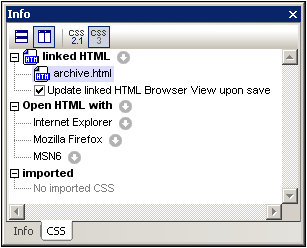
When a CSS file is active, the CSS Info window (screenshot below) is enabled. The CSS Info window provides the following functionality:
•It enables you to switch between CSS 2.1 and CSS 3.0. The entry helpers and intelligent editing features of the GUI will be switched according to the CSS version selected in the toolbar of the Info window.
•It enables the CSS file to be linked to an HTML file. This functionality enables you to modify the CSS document and view the effect of changes immediately. Additionally, the linked HTML file can be opened in multiple browsers via the CSS Info window, thus enabling changes in the CSS document to be viewed in multiple browsers.
•The CSS Info window lists the imported CSS stylesheets, thus giving you an overview of the import structure of the active CSS stylesheet.
Note the following usage points:
•The toolbar of the Info window contains icons for CSS 2.1 and CSS 3.0. Select the version you want in order to switch entry helpers and intelligent editing features to the selected CSS version.
•Only one HTML file can be linked to the active CSS document. Do this by clicking the icon to the right of the Linked HTML item, then selecting the command Set Link to HTML and browsing for the required HTML file. The linked HTML file will be listed under the Linked HTML item in the Info window (see screenshot above). Creating this link does not modify the CSS document or the HTML document in any way. The link serves to set up an HTML file to which the active CSS document can be applied for testing.
•Double-clicking the Linked HTML file listing opens the HTML file in XMLSpy.
•The toolbar icons enable you to horizontally and vertically tile the CSS document and the HTML file.
•When changes to the CSS document are saved, the HTML file that is open in XMLSpy can be automatically updated. To enable these automatic updates, check the Update Linked HTML Browser check box. Note that these updates will only occur if the HTML file contains a reference to the CSS document being edited.
•To change the linked HTML file, select another HTML file via the Set Link to HTML command.
•To remove the link to the HTML file, click the icon to the right of the Linked HTML item and select the command Remove Link.
•The icon to the right of the Open HTML With item enables applications to be added to the Open HTML With list. All the browsers installed on the system, or any other application (such as a text editor), can be added via the menu commands accessed via the Open HTML With icon. The associated applications would typically be browser or editor applications.
•After an application has been added to the Open HTML With list (except when added with the Add Installed Browsers command), its name in the Open HTML With list can be changed by selecting it, pressing F2, and editing the name.
•The icons to the right of each application listed in the Open HTML With list each opens a menu containing commands to: (i) open the application; (ii) open the application and load the linked HTML file; (iii) remove the application from the list. Double-clicking an application name opens the linked HTML file in that application.
•Applications added to or removed from the Open HTML With list are also added to or removed from the HTML Info window.
•The Imported item displays a list of the CSS files imported by the active CSS document.
