Namespaces
The target namespace
The target namespace of a taxonomy is defined in the xs:targetNamespace attribute of the taxonomy's xs:schema element (see listing below). (The xs:schema element is the document element of the concept definitions file.)
<xs:schema targetNamespace="https://www.altova.com/XBRL/Taxonomies">
...
</xs:schema>
In addition to defining the target namespace (specifying it, that is), the target namespace must also be declared on the xs:schema element so that the namespace is in scope for the entire length of the document. The listing below declares the namespace that is the target namespace.
<xs:schema targetNamespace="https://www.altova.com/XBRL/Taxonomies" xmlns:ns1="https://www.altova.com/XBRL/Taxonomies" >
...
</xs:schema>
In the listing above, the namespace is declared on the xs:schema element and is given a prefix of ns1.
Setting the target namespace
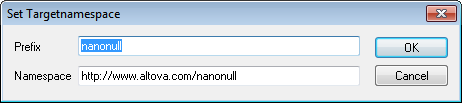
When a new taxonomy is created using the New Taxonomy dialog, the taxonomy's target namespace is specified in the Taxonomy Schema pane. However, the prefix is not specified and a default prefix is assigned. The target namespace and prefix can then be edited by accessing the Set Target Namespace dialog (via the XBRL | Set Target Namespace command) and editing it there (screenshot below). These edits will modify not only the definition of the target namespace (the value of the targetNamespace attribute) but also the declaration of the target namespace.
To modify only the declaration of the target namespace (but not its definition) or the declaration of any namespace, edit the prefix and value of the namespace in the Namespace Prefixes dialog (XBRL | Namespace Prefixes command); see below.
Taxonomy namespaces
Taxonomy namespaces can be managed in the Namespaces Prefixes dialog (screenshot below), which is accessed in XBRL View via the menu command XBRL | Namespace Prefixes. In the dialog, you can declare namespaces and associate prefixes and background colors for each namespace. Edits made in this dialog modify the declarations of namespaces in the taxonomy.
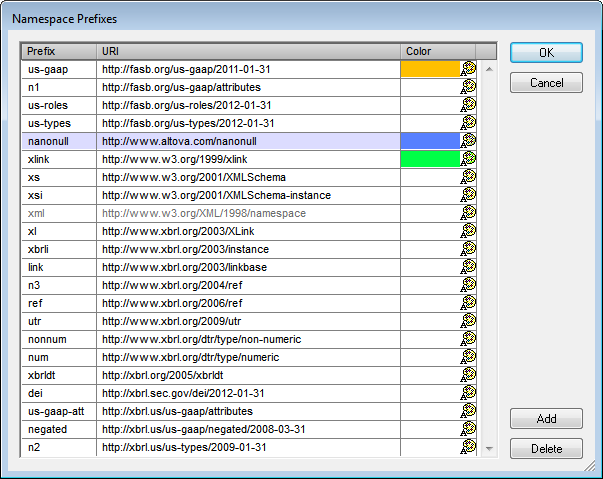
The Namespace Prefixes dialog lists all the namespaces in the taxonomy.
•To add or delete a namespace, use the Add or Delete buttons, respectively. After adding a namespace, edit the default prefix and default URI by double-clicking in the respective field and entering the changes.
•A color can be assigned to a namespace via the color palette for that namespace. If a color has been assigned to a namespace, all components in that namespace will be displayed with this color as its background in the Main Window and entry helpers of XBRL View. Note that a color setting for a given namespace applies for that namespace across all taxonomy documents opened in XBRL View.
When you have finished editing in the Namespaces dialog, click OK to make your editing changes take effect.
Example file: Step 2
Open the Set Target Namespace dialog via the XBRL | Set Target Namespace command. Double-click in the fields to edit. We have used the namespace https://www.altova.com/nanonull and assigned it a prefix of nanonull (see screenshot above). On clicking OK in the dialog, the target namespace will be assigned and the target namespace will be declared with the prefix you have assigned. In our case the target namespace and prefix are, respectively, https://www.altova.com/nanonull and nanonull.
In the next step, we will take a closer look at linkbase files and the referencing mechanism.