Editing in Table Display
Grid View contains a special view called Table Display, which is convenient for editing elements that have multiple occurrences. For example, the Person element has multiple occurrences (see screenshot below), so it can be displayed as a table. To display such an element as a table, click the Table Display icon of the first occurrence of the element. For example, in the screenshot below, the Table Display icon of the Person elements is circled in green. (Alternatively, select the menu command XML | Display as Table or the command's toolbar icon in the Grid View toolbar.)
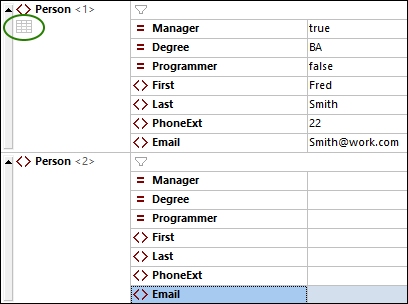
When you click the Table Display icon, the Person element will be displayed as a table. In Table Display, the child nodes of the element (its attributes and elements) are displayed as columns, while each Person element is displayed as a row (see screenshot below).

Advantages of Table Display
Table Display provides the following advantages:
•You can drag-and-drop a column header to reposition entire columns relative to each other. In the actual XML document, this translates to a change of the the relative position of child nodes of all element occurrences (that correspond to the rows of the table).
•Tables—and, correspondingly, the element occurrences they represent—can be sorted (in ascending or descending order) according to the contents of any column. Use the menu command XML | Ascending Sort or Descending Sort for this.
•Additional rows (that is, element occurrences) can be appended or inserted quickly using commands in the XML menu. The advantage is that not only is a new element added but all its children that are represented by the columns of the table.
•You can copy-and-paste structured data to and from third party products, such as Microsoft Excel.
•The intelligent editing features of XMLSpy are available in Table Display also.
Displaying an element with multiple occurrences as a table
To display the Person element type as a table, do te following:
1.Click the Table Display icon of the first occurrence of the Person element as described above.
2.Select the menu option View | Optimal Widths or the Optimal Widths icon in the Grid View toolbar.
Note: Table Display can be toggled on/off for all elements that have multiple occurrences. However, child elements that were displayed as tables will continue to be displayed as tables.
Entering content in Table Display
To enter content for the second Person element, double-click in each of the table cells in the second row, and enter some data. The intelligent editing features are active also within cells of a table, so you can select options from dropdown lists where available (for example, Boolean content and the enumerations of the Degree attribute).

Dynamic validation
Note that, as defined in the schema, PhoneExt must be an integer from 0 to 99 in order for the file to be valid. You can toggle on XMLSpy's function to validate while editing. When switched on, the file is validated each time the focus switches to a new node. Try out dynamic validation as follows:
1.Toggle on the menu command XML | Validate on Edit.
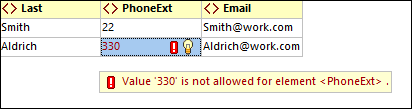
2.Enter an invalid PhoneExt value (any value greater than 99), as shown in the screenshot below.
3.Press the Tab key. An error icon and a smart fix icon appear in the PhoneExt cell (see screenshot below).
4.Hover over the error icon to see the validation-error message (screenshot below).
5.Click the smart fix icon and then the smart fix option that pops up. The invalid value will be substituted with a valid value, and the error flag disappears.
Copying XML data to and from spreadsheet applications
When you are in Table Display, you can copy data as Tab-separated text so that it can be interchanged with spreadsheet applications such as MS Excel. To copy data from your XML file, do the following:
1.Click on the Person element (see screenshot below). This selects the column headers as well as both rows of the table.

2.Right-click inside the selection, and, in the context menu that appears, select the command Copy | Copy as Tab-separated Text. Alternatively, press Ctrl+C.
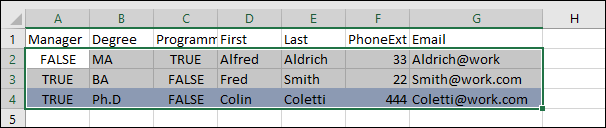
3.Switch to an Excel worksheet, select the cell A1 and paste (Ctrl+V) the XML data. The data will be entered as rows that correspond to the table structure in Table Display (see screenshot below).

4.Enter a new row of data in Excel as shown in the screenshot below. Make sure that you enter a three digit number for the PhoneExt element (say, 444).
5.Mark the table data in Excel, excluding the column headers (the green frame in the screenshot below), and copy it with Ctrl+C.
6.In XMLSpy make sure that the XML | Validate on Edit command is toggled on.
7.In the Table Display of your XML document in XMLSpy, select the Manager cell of the first row and paste the clipboard contents with Ctrl+V. Your new table will look something like the screenshot below.

8.The validation errors for the Boolean values have been caused by the casing difference between XML and Excel. To fix these, apply the smart fixes of the respective table cells.
Sorting the table on the contents of a column
A table in Table Display can be sorted, in ascending or descending order, on any of its columns. We want to sort the Person table on last name. Do this as follows:
1.Select the Last column by clicking its header.

2.Select the menu option XML | Ascending Sort or click the Ascending Sort icon in the Grid View toolbar. The column, and the whole table with it, is now sorted alphabetically. The column remains highlighted.

Since the phone extension 444 is correct but invalid, what we need to do is modify the XML Schema so that this number is valid. We will do this in the next section.