Export to a Database
The command Convert | Export to a Database exports XML data to a database. On clicking this command, the Connection Wizard starts up and enables you to set up a connection to the database you wish to update. After a connection has been established, the Export Data to Database dialog pops. It consists of two parts (shown separately in the screenshots below):
•an upper part with two tabs: (i) Selection, and (ii) Export Options.
•a lower part, which is a Preview window.
After you have selected the desired options in this dialog (described below), click the Export button to export to the database.
Selection
In the Selection tab, you can select the destination database and table generation options. The destination field selects the connection to the database. You must select whether the data is created as new tables, updates existing tables, or first tries to update an existing table and then creates a new table if an an update is not possible. You can also set a stop action based on the number of errors, and, optionally, SQL script logging.
Export Options
Export options, which are described below, can be specified in the Options tab (screenshot below):
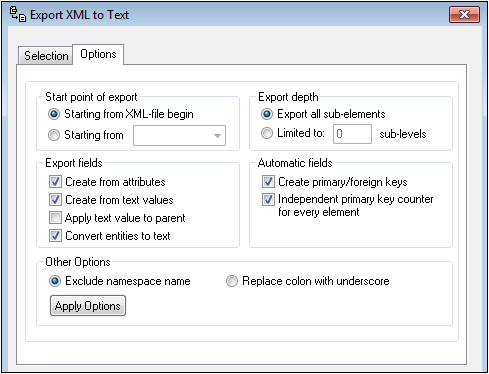
Start point of export: You can choose to export the entire XML document or restrict your export to the data hierarchy starting from the currently selected element. The number of sub-levels below the start point that will be exported is specified in the Export Depth option.
Export depth: Specifies the number of sub-levels below the start point that will be exported.
Export fields: Depending on your XML data, you may want to export only elements, attributes, or the textual content of your elements. Note that you can also deselect the export of individual elements in the Preview window.
Automatic fields: XMLSpy will produce one output file or table for each element type selected. You can choose to automatically create primary/foreign key pairs to link your data in the relational model, or define a primary key for each element.
Exclude namespace name: Together with the Replace Colon With Underscore radio button this is an either/or choice. Specifies whether namespace prefixes of elements and attributes should be excluded or whether the colon in the namespace prefix should be replaced with an underscore.
Apply Options: After you have set options, click this button to apply the options. The preview in the preview pane will be updated with the new options.
Preview window
The Preview window (screenshot below) is displayed below the Selection and Options tabs.
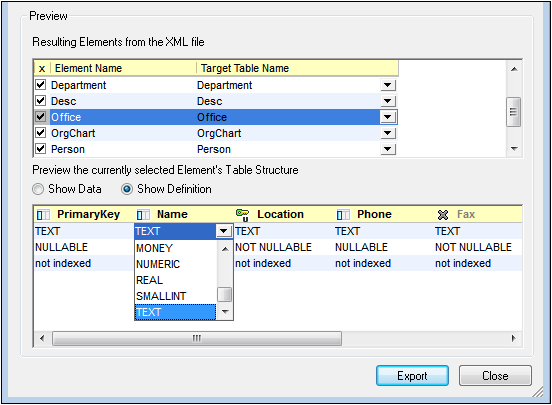
The Resulting Elements from XML File pane shows the name of the nodes in the XML document that will be exported and its corresponding name in the generated file. You can select/deselect nodes that will be exported. When an element is selected, a preview of its structure in the generated file is shown in a second pane below. This preview can be switched between a preview of: (i) data in the generated structure (Show Data); or (ii) definitions of each column in the generated structure (Show Definition). The screenshot above shows the column definitions.
In this second pane, clicking to the left of a column name cycles the column through four settings: (i) Include in table structure; (ii) Unique constraint; (iii) Primary Key constraint; (iv) Exclude from table structure. In the screenshot above, the Location column has a Unique constraint, while the Fax column has been excluded from the table structure. All the other columns are included in the table structure.
When the element's table structure shows field definitions (Show Definition), the definitions can be edited by selecting the definition and selecting an option from the definition's combo box (see screenshot above).