Validating the Document
XMLSpy provides two important checks of the XML document:
•A well-formedness check
•A validation check
 | Check Well-Formedness |
 | Validate XML |
Since the Validate on Edit feature is switched on by default, any validation error created during editing will be immediately flagged, with the error message/s being displayed in the Messages Window. If you do not want background validation, you can switch off Validate on Edit in the Validation settings of the Options dialog. In the event you do this, note that you can always carry out well-formed checks and validation checks at any time by invoking the respective command in the XML menu. This part of the tutorial shows you how to carry out these checks.
Checking well-formedness
An XML document is well-formed if starting tags match closing tags, elements are nested correctly, and there are no misplaced or missing characters (such as an entity without its semi-colon delimiter). You can do a well-formedness check in any editing view. Check your document as follows:
1.Select Text View.
2.Select the menu option XML | Check Well-Formedness or press the F7 key. (Alternatively, you can click the command's icon in the toolbar.) A message appears in the Messages window at the bottom of the Main Window saying the document is well-formed.

Notice that the output of the Messages window has nine tabs, with the action's result always being displayed in the active tab. So you could check well-formedness in Tab1, and switch to Tab2 for a validation check. If you do not switch tabs, the new result overwrites the previous result in the active tab.
Note: This check does not check the the XML document for conformance with the schema. Schema conformance is evaluated in the validity check.
Checking validity
An XML document is valid according to a schema if it conforms to the document structure and document content specified in that schema. You can do a validity check in any editing view. Validate your document as follows:
1.Select Grid View.
2.Select the menu option XML | Validate or press the F8 key. (Alternatively, you can click the command's icon in the toolbar.) An error message appears in the Messages window saying the file is not valid. Mandatory elements are expected after the City element in Address. If you check your schema, you will see that the US-Address complex type (which you have set this Address element to be via its xsi:type attribute) has a content model in which the City element must be followed by a Zip element and a State element.
Fixing the invalid document
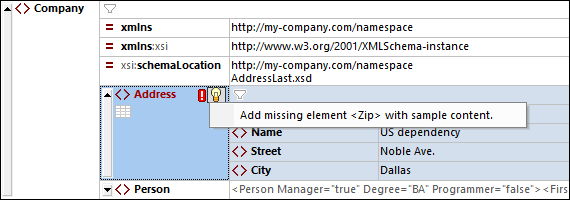
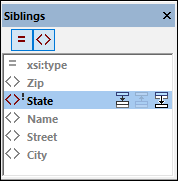
The point at which the document becomes invalid is highlighted in red, together with an error flag and a smart fix. The invalid element in this case is the Address element. If you click the smart fix icon, you will see the popup: Add missing element <Zip> with sample content. If you check the schema, you will find that the Address/City element must be followed by the mandatory element Zip. To double-check this, select the City element and look at the Siblings entry helper. You will notice that the Zip element is prefixed with an exclamation mark, which indicates that the element is mandatory in the current context.
Now click the smart fix (see screenshot above). The Zip element will be added and will contain sample content that makes the element valid. Enter the correct Zip code ( say 04812 for Dallas). Look at the Siblings entry helper again. It now shows that the State element is mandatory (it is prefixed with an exclamation mark). If you select the State element, the entry helper options available for it become enabled (see screenshot below). These are the actions to insert the State element after the element currently selected in the Main Window (which is City) or to append State after all the sibling elements of City.
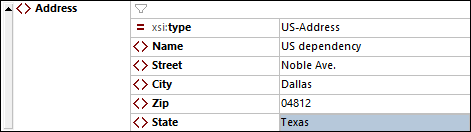
Since, in this case, both actions have the same effect, select either of the two actions. A State element is added after City. Double-click inside the contents field of State and enter the state's name, Texas (screenshot below). Notice that the Siblings entry helper now contains only grayed-out elements, indicating that there are no more mandatory elements to add.
Completing the document and revalidating
Let us now complete the document (by entering the remaining data of the first Person element) before revalidating.
Do the following:
1.Click the value field of the element First, and enter a first name (say Fred). Then press Enter.
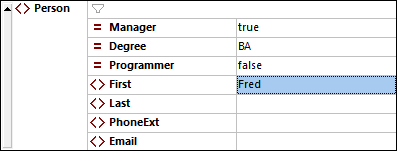
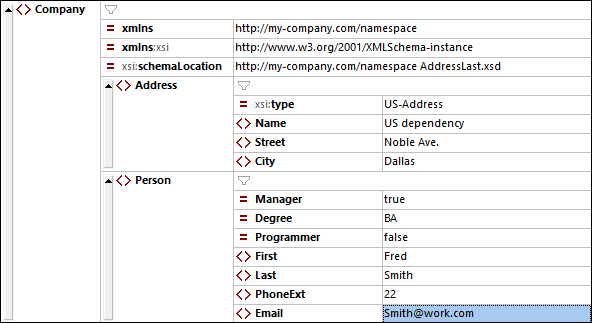
2.In the same way enter data for all the child elements of Person, that is, for Last, PhoneExt, and Email. You can use the Tab key to move forward through the cells. Note that the value of PhoneExt must be an integer with a maximum value of 99 (since this is the range of allowed PhoneExt values you defined in your schema). Your XML document should then look something like this in Grid View:
3.Click again to check if the document is valid. A message appears in the Messages window stating that the file is valid. The XML document is now valid against its schema.

4.Save the file with File | Save.
Note: An XML document does not have to be valid in order to save it. Saving an invalid document causes a prompt to appear warning you that you are about to save an invalid document. You can select Save anyway, if you wish to save the document in its current invalid state.