Authentic View Entry Helpers
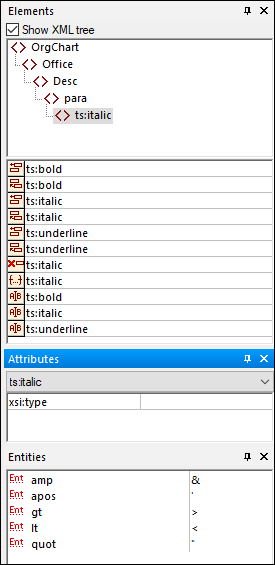
There are three entry helpers in Authentic View: for Elements, Attributes, and Entities. They are displayed as windows down the right side of the Authentic View interface (see screenshot below).
The Elements and Attributes Entry Helpers are context-sensitive, i.e. what appears in the entry helper depends on where the cursor is in the document. The entities displayed in the Entities Entry Helper are not context-sensitive; all entities allowed for the document are displayed no matter where the cursor is.
Each of the entry helpers is described separately below.
Elements Entry Helper
The Elements Entry Helper consists of two parts:
•The upper part, containing an XML tree that can be toggled on and off using the Show XML tree check box. The XML tree shows the ancestors up to the document's root element for the current element. When you click on an element in the XML tree, elements corresponding to that element (as described in the next item in this list) appear in the lower part of the Elements Entry Helper.
•The lower part, containing a list of the nodes that can be inserted within, before, and after; removed; applied to or cleared from the selected element or text range in Authentic View. What you can do with an element listed in the Entry Helper is indicated by the icon to the left of the element name in the Entry Helper. The icons that occur in the Elements Entry Helper are listed below, together with an explanation of what they mean.
To use a node from the Entry Helper, click its icon.
The element in the Entry Helper is inserted after the selected element. Note that it is appended at the correct hierarchical level. For example, if your cursor is inside a //sect1/para element, and you append a sect1 element, then the new sect1 element will be appended not as a following sibling of //sect1/para but as a following sibling of the sect1 element that is the parent of that para element.
The element in the Entry Helper is inserted before the selected element. Note that, just as with the Insert After Element command, the element is inserted at the correct hierarchical level.
Removes the element and its content.
An element from the Entry Helper can also be inserted within an element. When the cursor is placed within an element, then the allowed child elements of that element can be inserted. Note that allowed child elements can be part of an elements-only content model as well as a mixed content model (text plus child elements).
An allowed child element can be inserted either when a text range is selected or when the cursor is placed as an insertion point within the text.
•When a text range is selected and an element inserted, the text range becomes the content of the inserted element.
•When an element is inserted at an insertion point, the element is inserted at that point.
After an element has been inserted, it can be cleared by clicking either of the two Clear Element icons that appear (in the Elements Entry Helper) for these inline elements. Which of the two icons appears depends on whether you select a text range or place the cursor in the text as an insertion point (see below).
If you select an element in your document (by clicking either its start or end tag in the Show large markup view) and that element can be replaced by another element (for example, in a mixed content element such as para, an italic element can be replaced by the bold element), this icon indicates that the element in the Entry Helper can be applied to the selected (original) element. The Apply Element command can also be applied to a text range within an element of mixed content; the text range will be created as content of the applied element.
•If the applied element has a child element with the same name as a child of the original element and an instance of this child element exists in the original element, then the child element of the original is retained in the new element's content.
•If the applied element has no child element with the same name as that of an instantiated child of the original element, then the instantiated child of the original element is appended as a sibling of any child element or elements that the new element may have.
•If the applied element has a child element for which no equivalent exists in the original element's content model, then this child element is not created directly but Authentic View offers you the option of inserting it.
If a text range is selected rather than an element, applying an element to the selection will create the applied element at that location with the selected text range as its content. Applying an element when the cursor is an insertion point is not allowed.
This icon appears when text within an element of mixed content is selected. Clicking the icon clears the element from around the selected text range.
This icon appears when the cursor is placed within an element that is a child of a mixed-content element. Clicking the icon clears the inline element.
Attributes Entry Helper
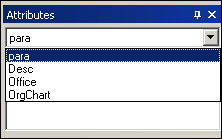
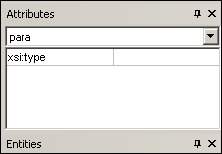
The Attributes Entry Helper consists of a drop-down combo box and a list of attributes. The element that you have selected (you can click the start or end tag, or place the cursor anywhere in the element content to select it) appears in the combo box. The Attributes Entry Helper shown in the figures below has a para element in the combo box. Clicking the arrow in the combo box drops down a list of all the para element's ancestors up to the document's root element, which in this case is OrgChart.
Below the combo box, a list of valid attributes for that element is displayed, in this case for para. If an attribute is mandatory on a given element, then it appears in bold. (In the example below, there are no mandatory attributes except the built-in attribute xsi:type.)
To enter a value for an attribute, click in the value field of the attribute and enter the value. This creates the attribute and its value in the XML document.
Note the following:
•In the case of the xsi:nil attribute, which appears in the Attributes Entry Helper when a nillable element has been selected, the value of the xsi:nil attribute can only be entered by selecting one of the allowed values (true or false) from the dropdown list for the attribute's value.
•The xsi:type attribute can be changed by clicking in the value field of the attribute and then either (i) selecting a value from the dropdown list that appears, or (ii) entering a value. Values displayed in the dropdown list are the available abstract types defined in the XML Schema on which the Authentic View document is based.
Entities Entry Helper
The Entities Entry Helper allows you to insert an entity in your document. Entities can be used to insert special characters or text fragments that occur often in a document (such as the name of a company). To insert an entity, place the cursor at the point in the text where you want to have the entity inserted, then double-click the entity in the Entities Entry Helper.
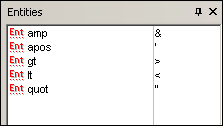
Note: An internal entity is one that has its value defined within the DTD. An external entity is one that has its value contained in an external source, e.g. another XML file. Both internal and external entities are listed in the Entities Entry Helper. When you insert an entity, whether internal or external, the entity—not its value—is inserted into the XML text. If the entity is an internal entity, Authentic View displays the value of the entity. If the entity is an external entity, Authentic View displays the entity—and not its value. This means, for example, that an XML file that is an external entity will be shown in the Authentic View display as an entity; its content does not replace the entity in the Authentic View display.
You can also define your own entities in Authentic View and these will also be displayed in the entry helper: see Define Entities in the Editing in Authentic View section.