Query Pane: Description and Features
The Query pane is an intelligent SQL editor for entering queries to the selected database. After entering the query, clicking the Execute command of the Database Query window executes the query and displays the result and execution messages in the Results/Messages pane. How to work with queries is described in the next section, Query Pane: Working with Queries. In this section, we describe the main features of the Query pane:
•SQL Editor icons in the Database Query toolbar
•SQL Editor options
•Definition of regions in an SQL script
•Insertion of comments in an SQL script
•Use of bookmarks
SQL Editor icons in the Database Query toolbar
The following icons in the toolbar of the Database Query window are used when working with the SQL Editor:
Execute | Executes currently selected SQL statement. If script contains multiple statements and none is selected, then all are executed. | |
Execute with Data Editing | Same as for Execute command, except that results (in Results tab) are editable. | |
Import SQL File | Opens an SQL file in the SQL Editor. | |
Export SQL File | Saves SQL queries to an SQL file. | |
Undo | Undoes an unlimited number of edits in SQL Editor. | |
Redo | Redoes an unlimited number of edits in SQL Editor. | |
Hide DB Query on XML Open | Sets whether the DB Query window should be hidden when an XML document is opened for editing. | |
Auto-Commit on XML Save | When an edited XML document is saved in XMLSpy, changes are committed to the DB if this toggle is on. Otherwise, changes have to be explicitly committed in the Results Pane. | |
Options | Open the Options dialog of SQL Editor. | |
Open SQL Script in DatabaseSpy | Opens the SQL script in Altova's DatabaseSpy product. |
Options
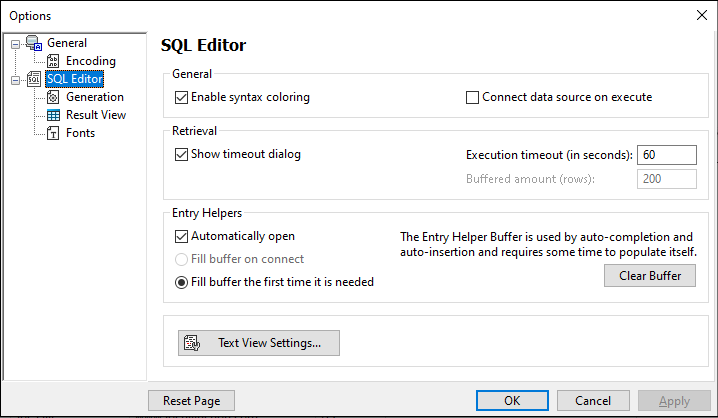
Clicking the Options icon in the Database Query toolbar pops up the Options dialog (screenshot below). A page of settings can be selected in the left-hand pane, and the options on that page can be selected. Click the Reset to Page Defaults button to reset the options on that page to their original settings.
The key settings are as follows:
•General | Encoding: Options for setting the encoding of new SQL files, of existing SQL files for which the encoding cannot be detected, and for setting the Byte Order Mark (BOM). (If the encoding of existing SQL files can be detected, the files are opened and saved without changing the encoding.)
•SQL Editor: Options for toggling syntax coloring and data source connections on execution on/off. A timeout can be set for query execution, and a dialog to change the timeout can also be shown if the specified time is exceeded. Entry helpers refer to the entry helpers that appear as part of the auto-completion feature. When you type in an SQL statement, the editor displays a list of context-sensitive auto-completion suggestions. These suggestions can be set to appear automatically. If the automatic display is switched off, then you can ask for an auto-completion suggestion in SQL Editor by pressing Ctrl+Spacebar. The buffer for the entry helper information can be filled either on connection to the data source or the first time it is needed. The Text View settings button opens the Text View options window of XMLSpy.
•SQL Editor | SQL Generation: The application generates SQL statements when you drag objects from the Browser pane into the Query pane. Options for SQL statement generation can be set in the SQL generation tab. Use the Database pane to select a database kind and set the statement generation options individually for the different database kinds you are working with. Activating the Apply to all databases check box sets the options that are currently selected for all databases. Options include appending semi-colons to statements and surrounding identifiers with escape characters. When the Append semicolons to statement end check box is activated, a semicolon is appended when you generate an SQL statement in the SQL Editor. Note that editing of data in Oracle databases and IBM iSeries and DB2 databases via a JDBC connection is possible only if this check box is unchecked.
•SQL Editor | Result View: Options to configure the Result tab.
•SQL Editor | Fonts: Options for setting the font style of the text in the Text Editor and in the Result View.
Define regions in an SQL script
Regions are sections in SQL scripts that are marked and declared to be a unit. Regions can be collapsed and expanded to hide or display parts of the script. It is also possible to nest regions within other regions. Regions are delimited by --region and --endregion comments, respectively, before and after the region. Regions can optionally be given a name, which is entered after the -- region delimiter (see screenshot below).
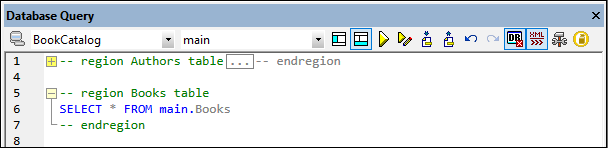
To insert a region, select the statement/s to be made into a region, right-click, and select Insert Region. The expandable/collapsible region is created. Add a name if you wish. In the screenshot above, also notice the line-numbering. To remove a region, delete the --region and --endregion delimiters.
Insert comments in an SQL script
Text in an SQL script can be commented out. These portions of the script are skipped when the script is executed.
•To comment out a block, mark the block, right-click, and select Insert/Remove Block Comment. To remove the block comment, mark the comment, right-click and select Insert/Remove Block Comment.
•To comment out a line or part of a line, place the cursor at the point where the line comment should start, right-click, and select Insert/Remove Line Comment. To remove the line comment, mark the comment, right-click and select Insert/Remove Line Comment.
Bookmarks
Bookmarks can be inserted at specific lines, and you can then navigate through the bookmarks in the document. To insert a bookmark, place the cursor in the line to be bookmarked, right-click, and select Insert/Remove Bookmark. To go to the next or previous bookmark, right-click, and select Go to Next Bookmark or Go to Previous Bookmark, respectively. To remove a bookmark, place the cursor in the line for which the bookmark is to be removed, right-click, and select Insert/Remove Bookmark. To remove all bookmarks, right-click, and select Remove All Bookmarks.