Attributes and Attribute Enumerations
In this section, you will learn how to create attributes and enumerations for attributes.
Defining element attributes
1.In the Schema Overview, click the Person element to make it active.
2.Click the Append icon ![]() , in the top left of the Attributes/Identity Constraints tab group (in the lower part of the Schema Overview window), and select the Attribute entry.
, in the top left of the Attributes/Identity Constraints tab group (in the lower part of the Schema Overview window), and select the Attribute entry.
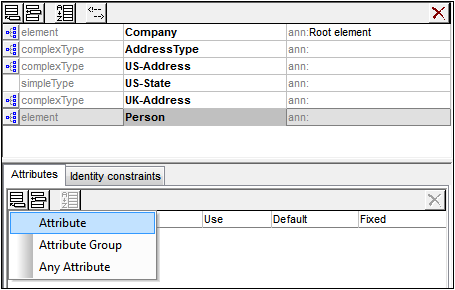
3.Enter Manager as the attribute name in the Name field.
4.Use the Type combo box to select xs:boolean.
5.Use the Use combo box to select required.
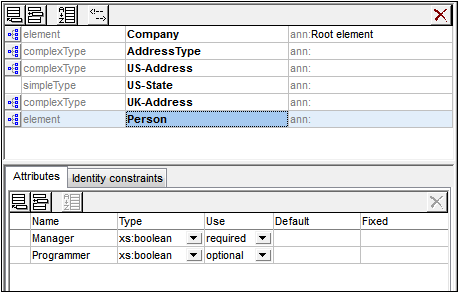
6.Use the same procedure to create a Programmer attribute with Type=xs:boolean and Use=optional.
Defining enumerations for attributes
Enumerations are values allowed for a given attribute. If the value of the attribute in the XML instance document is not one of the enumerations specified in the XML Schema, then the document is invalid. We will create enumerations for the Degree attribute of the Person element.
Do the following:
1.In the Schema Overview, click the Person element to make it active.
2.Click the Append icon  in the top left of the Attributes window, and select the Attribute entry.
3.Enter Degree as the attribute name, and select xs:string as its type.
4.With the Degree attribute selected, in the Facets Entry Helper, click the Enumerations tab (see screenshot).
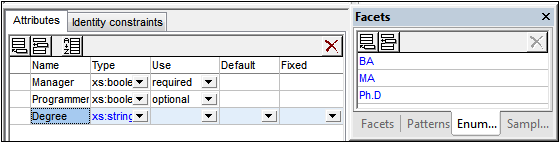
5.In the Enumerations tab, click the Append icon  .
.
6.Enter BA, and confirm with Enter.
7.Use the same procedure to add two more enumerations: MA and PhD.
8.Click on the Content Model View icon  of Person.

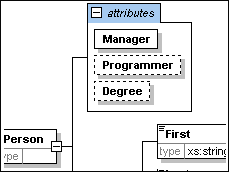
The previously defined attributes are visible in the Content Model View. Clicking the expand icon displays all the attributes defined for that element. This display mode and the Attributes tab can be toggled by selecting the menu option Schema Design | Configure view, and checking and unchecking the Attributes check box in the Show in diagram pane.
9.Click the Display all Globals icon  to return to the Schema Overview.
Saving the completed XML Schema
Before saving your schema file, rename the AddressLast.xsd file that is delivered with XMLSpy to something else (such as AddressLast_original.xsd), so as not to overwrite it. Save the completed schema with any name you like (File | Save as). We recommend that you save it with the name AddressLast.xsd. This is because the the XML file you will create in the next part of the tutorial will be based on the AddressLast.xsd schema.