Connecting to Oracle (ODBC)
This example shows how to connect from XMLSpy to an Oracle database server on a network machine, via an Oracle database client installed on the local operating system.
The example includes instructions for setting up an ODBC data source (DSN) using the database connection wizard in XMLSpy. If you have already created a DSN, or if you prefer to create it directly from the ODBC Data Source Administrator in Windows, you can do so, and then select it when prompted by the wizard. For more information about ODBC data sources, see Setting up an ODBC Connection.
Prerequisites
•The Oracle database client (which includes the ODBC Oracle driver) must be installed and configured on your system. For instructions, see the Oracle documentation.
•The tnsnames.ora file located in Oracle home directory contains an entry that describes the database connection parameters, in a format similar to this:
ORCL =
(DESCRIPTION =
(ADDRESS_LIST =
(ADDRESS = (PROTOCOL = TCP)(HOST = server01)(PORT = 1521))
)
(CONNECT_DATA =
(SID = orcl)
(SERVER = DEDICATED)
)
)
For Oracle database client 11.2.0, the default Oracle home directory path could be as follows:
C:\app\username\product\11.2.0\client_1\network\admin\tnsnames.ora
You can add new entries to tnsnames.ora, either by pasting the connection details and saving the file, or by running the Oracle Net Configuration Assistant, if available. If you want these values to appear in dropdown lists during the configuration process, then you may need to add the path to the admin folder as a TNS_ADMIN environment variable.
Connection
1.Start the database connection wizard, select Connection Wizard and then Oracle (ODBC/JDBC). Click Next.
2.Select ODBC and click Next.
3.In the dialog that appears (screenshot below), click Edit Drivers.
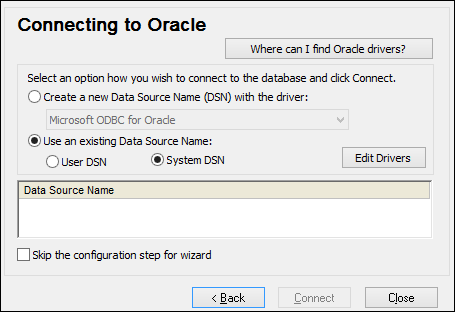
4.From the list of Oracle drivers available on your system, select the Oracle driver you wish to use and click Back.
5.Select Create a new data source name (DSN) with the driver, and then select the Oracle driver chosen in step 4. (Avoid using the Microsoft-supplied driver called Microsoft ODBC for Oracle driver. Microsoft recommends using the ODBC driver provided by Oracle.)

6.Click Connect.
7.In the dialog that appears fill in the required fields (shown filled in the screenshot below). The connection name must be entered in the TNS Service Name field as it is defined in the tnsnames.ora file (see Prerequisites above). Note: If you wish to have the dropdown list of the combo box automatically filled with the values of the tnsnames.ora file, then you may need to add the path to the admin folder as a TNS_ADMIN environment variable.

8.Click OK when done.
9.In the dialog that appears, enter the username and password to the database, and then click OK.