Manage XML Schemas
The Manage XML Schemas feature enables schemas to be added to and dropped from individual database schemas in an IBM DB2 database. To manage schemas, you have to do the following:
•Connect to the IBM DB2 database
•Select the database schema for which XML Schemas need to be added or dropped
•Carry out the schema management actions.
These steps are described in detail below.
Connecting to the IBM DB2 database
Clicking the Manage XML Schemas command pops up the XML Schema Management for Databases dialog (screenshot below).
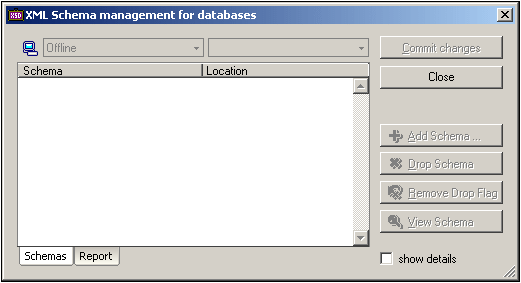
The first thing to do if there is no connection to the required database is to connect to it. If a connection already exists, it appears in the Database combo box. To start the connection process, click the Quick Connect icon ![]() in the dialog. This pops up the Quick Connect dialog, through which you can make the connection to the database (for instructions, see Connecting to a Database ).
in the dialog. This pops up the Quick Connect dialog, through which you can make the connection to the database (for instructions, see Connecting to a Database ).
Displaying the list of XML Schemas
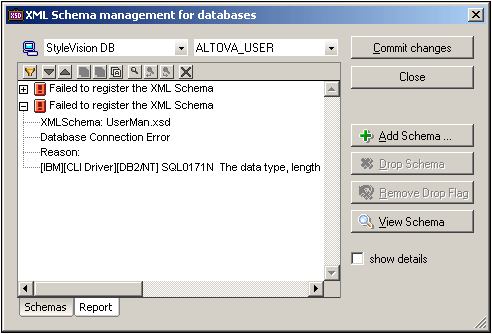
After the connection to the IBM DB2 database has been established, the database is listed in the combo box at left (see screenshot below). If more than one connection is currently open, you can select the required database in this combo box. In the screenshot below, the StyleVision DB database is selected.

The combo box at right lists all the database schemas of the currently selected IBM DB2 database. When a database schema is selected in this combo box, all the XML Schemas registered for the selected database schema are displayed in the main pane. In the screenshot above, all the XML Schemas registered with the Altova_User database schema are listed, together with their locations. Checking the Show Details check box causes additional information columns to be displayed in the main pane.
Managing the XML Schemas
The list of schemas in the main pane represents the schemas registered for the selected database schema. After the list of XML Schemas is displayed, you can add schemas to the list or drop (delete) schemas from the list.
To add a schema, click the Add button, browse for the required schema file, and select it. The selected schema file is added to the list in the main pane. Clicking the Commit Changes button registers the newly added schema with the database schema.
To drop a schema, select the schema in the main pane and click the Drop Schema button. A Drop Flag is assigned to the schema, indicating that it is scheduled for dropping when changes are next committed. The Drop Flag can be removed by selecting the flagged schema and clicking the Remove Drop Flag button. When the Commit Changes button is clicked, all schemas that have been flagged for dropping will be unregistered from the database schema.
Clicking the View Schema button opens the schema in XMLSpy. To close the XML Schema Management dialog, click the Close button.
Reports
When the Commit Changes button is clicked, the database is modified according to the changes you have made. A report of the Commit action is displayed in the Report pane (screenshot below), enabling you to evaluate the success of the action and to debug possible errors. Each subsequent report is displayed below the previous report.
The report pane has a toolbar containing icons that enable you to customize the display of the report listing, navigate the listing, copy report messages, search for text, and clear the pane (see screenshot below).
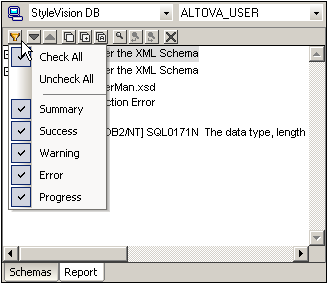
The Filter icon enables the display of particular types of messages to be toggled on or off. The Next and Previous icons move the selection down and up the list, respectively. Messages can also be copied with or without their child components to the clipboard, enabling them to be pasted in documents. The Find function enables you to specify a search term and then search up or down the listing for this term. Finally, the Clear icon clears the contents of the Report pane.