Formulas (JSON)
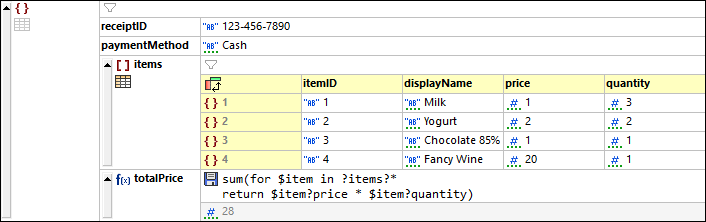
A formula is an XQuery 3.1 expression that generates output (either a nodeset or a calculations) for display in JSON Grid View. In the screenshot below, for example, the total price of the items 1 to 4 is calculated and the output (28) is displayed in a separate line. Each formula is executed independently and is not affected by other filters or formulas in the document.
For information about constructing XQuery expressions for JSON documents, see the section XQuery Expressions for JSON.

Note that the formula is stored as a JSON comment, but the formula result is stored as straight JSON code. The code below (with the formula output being stored) is a result of the formula's disk icon being clicked.
{ "receiptID": "123-456-7890", "paymentMethod": "Cash", "items": [ { "itemID": "1", "displayName": "Milk", "price": 1, "quantity": 3 }, { "itemID": "2", "displayName": "Yogurt", "price": 2, "quantity": 2 }, { "itemID": "3", "displayName": "Chocolate 85%", "price": 1, "quantity": 1 }, { "itemID": "4", "displayName": "Fancy Wine", "price": 20, "quantity": 1 } ], //(:altova_xq_embed:)totalPrice(:altova_xq_key:)sum(for $item in ?items?* return $item?price * $item?quantity) "totalPrice": 28 //(:altova_xq_end:) } |
In the screenshot above, the formula sums up the members of a sequence. These members are each the product of the price and quantity values of each object contained in the items array. The iteration to select each object and assign it in turn to the $item variable is specified by: for $item in ?items?*. It is important at this point to note the context node, which is the parent of the formula—and, consequently, the parent of the items node. Each product is obtained by looking up the price and quantity child nodes of the object currently in the $item variable, and multiplying these two values with one another. The products obtained in this way are the members of the sequence, which are then summed to generate the total price.
Create a formula
To create a formula, do the following:
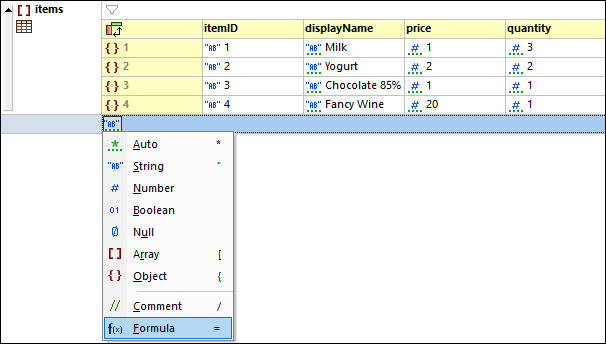
1.Select the node to which you want to add the formula, either as a sibling or child. Right-click, and add the sibling or child (whichever you want). In deciding where you want the formula to appear (as sibling or child), bear in mind that the context node of the formula's XQuery expression will be the parent node of the formula. For example, in the XQuery expression shown in the screenshot above, the context node is the parent node of the formula (totalPrice) and of its sibling, the items array. To create the formula in the screenshot above, a sibling node was appended to the items array (see screenshot below).
2.Change the type of the node to Formula (see screenshot below).
3.Double-click in the cell containing the f(x) icon to enter the name of the formula (see screenshot below). If the document is a JSON5 or JSONC document, then a disk icon is displayed. You can click this icon to save the output of the formula to the document.
4.By default, the XQuery expression is the string 'XQuery', so the output will be the string XQuery (displayed in the cell below the expression). Enter your XQuery expression by double-clicking in the expression's cell, typing in the expression, and then clicking Enter. This causes the formula to be evaluated and its result to be displayed. Other formulas will not be modified.
5.If there are multiple formulas in the document, click the menu command JSON | Re-evaluate All to update the results of all formulas. This command is especially useful if formulas in the document look up dynamically changing data (for example, exchange rates).
Summary of key points
Note the following points about formulas, especially the special properties of JSON5 and JSONC documents:
•The context node of the formula's XQuery expression is the parent node of the formula node.
•To add a new line in an expression, press Ctrl+Enter. This is useful if you want to display an expression over several lines for better readability.
•The XQuery expressions of a document's formulas are stored in a special application metadata file located in your (My) Documents folder: Altova\XMLSpyCommon\json-metadata.json. Formulas will automatically be applied from this file when the document is re-opened in Grid View.
•In JSON5 and JSONC documents, you can additionally save formulas as comments. Do this by selecting the Persistence option of Grid View Settings (Tools | Options | View | Grid View Settings). This option is selected by default.
•The calculation result of a formula is displayed in the cell below the formula's XQuery expression. In the case of JSON5 and JSONC, the output can additionally be stored in the document. If the Persistence option has been selected (see previous point), then a disk icon appears next to the XQuery expression. Toggle this icon on to save the formula's result in the document.
Formula output not saved to JSON content; click to save. Only in JSON5 and JSONC. | |
Formula output saved to JSON content; click to not save. Only in JSON5 and JSONC |
•Whether the disk is clicked or not, the formula's output will be calculated and stored in the document's metadata.
•When the output is a calculation and is stored in content, it is stored as a property which has the name you assigned the formula. For example, in the totalPrice formula described above, the output will be stored like this: "totalPrice": 28.
•Note this difference: In JSON5 and JSONC documents, formulas are saved as JSON comments, their outputs are saved as JSON properties.
| Note: | It is not possible to save either formulas or their results in JSON documents that are not JSON5 or JSONC. However, since the Grid View formulas of any JSON document are always stored in the application metadata file, they will always be applied to the document when the document is displayed in Grid View. |
Formulas in tables
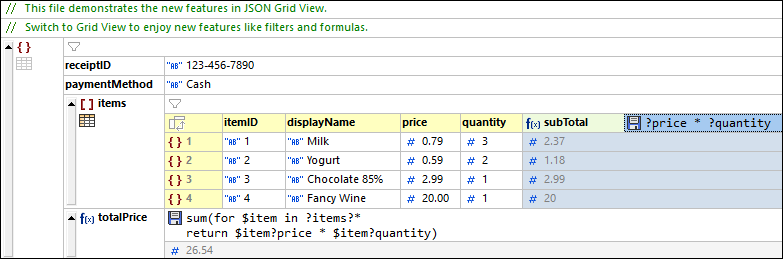
If all the cells of a table column (in Table Display) contain the same formula, then the formula is displayed only once—in the header of the column (see screenshot below). The results of the formula calculation, however, are displayed in the respective cells. The formula in the column header is a Grid View representation. In the JSON document content (in Text View), the formula is repeated for each table-row item.
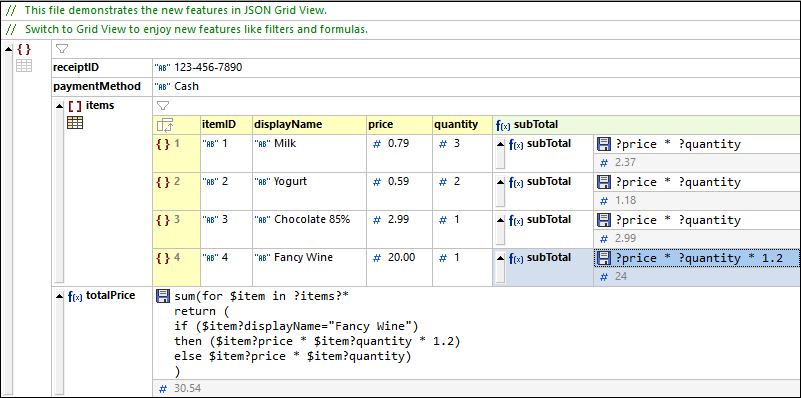
If even a single formula is different (as in the highlighted cell of the screenshot below), then each formula is displayed in its respective cell.
Re-evaluate all formulas
To update the results of all formulas in the document, click the menu command JSON | Re-evaluate All.
Procedures for relevant actions
•Add a new empty column to the table as follows: Switch to List Display from Table Display, right-click any key:value pair in the list display, and append or insert a new key:value pair via the item's context menu. When you switch back to Table Display, a new column is created for the new key:value pair that was appended/inserted. You can now edit this column in Grid View.
•If all formulas of a table column are the same so that the formula appears in the header and you now want to create a different formula for an individual cell, switch to List Display and edit the formula of that cell.