Basic Editing
When you edit in Authentic View, you are editing an XML document. Authentic View, however, can hide the structural XML markup of the document, thus displaying only the content of the document (first screenshot below). You are therefore not exposed to the technicalities of XML, and can edit the document as you would a normal text document. If you wish, you could switch on the markup at any time while editing (second screenshot below).

An editable Authentic View document with no XML markup.
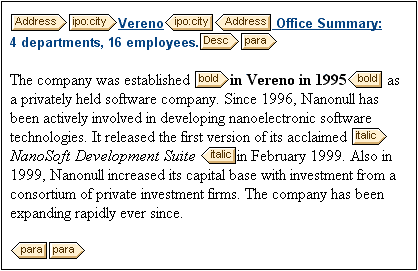
An editable Authentic View document with XML markup tags.
Inserting nodes
Very often you will need to add a new node to the Authentic XML document. For example, a new Person element might need to be added to an address book type of document. In such cases the XML Schema would allow the addition of the new element. All you need to do is right-click the node in the Authentic View document before which or after which you wish to add the new node. In the context menu that appears, select Insert Before or Insert After as required. The nodes available for insertion at that point in the document are listed in a submenu. Click the required node to insert it. The node will be inserted. All mandatory descendant nodes are also inserted. If a descendant node is optional, a clickable link, Add NodeName, appears to enable you to add the optional node if you wish to.
If the node being added is an element with an abstract type, then a dialog (something like in the screenshot below) appears containing a list of derived types that are available in the XML Schema.
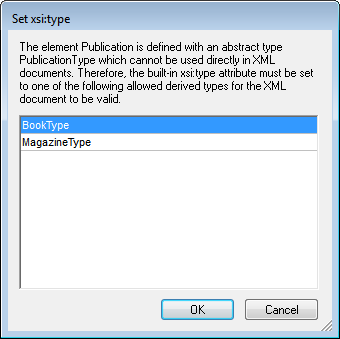
The screenshot above pops up when a Publication element is added. The Publication element is of type PublicationType, which is an abstract complex type. The two complex types BookType and MagazineType are derived from the abstract PublicationType. Therefore, when a Publication element is added to the XML document, one of these two concrete types derived from Publication's abstract type must be specified. The new Publication element will be added with an xsi:type attribute:
<Publication xsi:type="BookType"> ... </Publication>
<Publication xsi:type="MagazineType"> ... </Publication>
...
<Publication xsi:type="MagazineType"> ... </Publication>
Selecting one of the available derived types and clicking OK does the following:
•Sets the selected derived type as the value of the xsi:type attribute of the element
•Inserts the element together with the descendant nodes defined in the content model of the selected derived type.
The selected derived type can be changed subsequently by changing the value of the element's xsi:type attribute in the Attributes Entry Helper. When the element's type is changed in this way, all nodes of the previous type's content model are removed and nodes of the new type's content model are inserted.
Text editing
An Authentic View document will essentially consist of text and images. To edit the text in the document, place the cursor at the location where you wish to insert text, and type. You can copy, move, and delete text using familiar keystrokes (such as the Delete key) and drag-and-drop mechanisms. One exception is the Enter key. Since the Authentic View document is pre-formatted, you do not—and cannot—add extra lines or space between items. The Enter key in Authentic View therefore serves to append another instance of the element currently being edited, and should be used exclusively for this purpose.
Copy as XML or as text
Text can be copied and pasted as XML or as text.
•If text is pasted as XML, then the XML markup is pasted together with the text content of nodes. The XML markup is pasted even if only part of a node's contents has been copied. For the markup to be pasted it must be allowed, according to the schema, at the location where it is pasted.
•If text is pasted as text, XML markup is not pasted.
To paste as XML or text, first copy the text (Ctrl+C), right-click at the location where the text is to be pasted, and select the context menu command Paste As | XML or Paste As | Text. If the shortcut Ctrl+V is used, the text will be pasted in the default Paste Mode of the SPS. The default Paste Mode will have been specified by the designer of the SPS. For more details, see the section Context Menus.
Alternatively, highlighted text can be dragged to the location where it is to be pasted. When the text is dropped, a pop-up appears asking whether the text is to be pasted as text or XML. Select the desired option.
Text formatting
A fundamental principle of XML document systems is that content be kept separate from presentation. The XML document contains the content, while the stylesheet contains the presentation (formatting). In Authentic View, the XML document is presented via the stylesheet. This means that all the formatting you see in Authentic View is produced by the stylesheet. If you see bold text, that bold formatting has been provided by the stylesheet. If you see a list or a table, that list format or table format has been provided by the stylesheet. The XML document, which you edit in Authentic View contains only the content; it contains no formatting whatsoever. The formatting is contained in the stylesheet. What this means for you, the Authentic View user, is that you do not have to—nor can you—format any of the text you edit. You are editing content. The formatting that is automatically applied to the content you edit is linked to the semantic and/or structural value of the data you are editing. For example, an email address (which could be considered a semantic unit) will be formatted automatically in a certain way because it is an email. In the same way, a headline must occur at a particular location in the document (both a structural and semantic unit) and will be formatted automatically in the way the stylesheet designer has specified that headlines be formatted. You cannot change the formatting of either email address or headline. All that you do is edit the content of the email address or headline.
In some cases, content might need to be specially presented; for example, a text string that must be presented in boldface. In all such cases, the presentation must be tied in with a structural element of the document. For example, a text string that must be presented in boldface, will be structurally separated from surrounding content by markup that the stylesheet designer will format in boldface. If you, as the Authentic View user, need to use such a text string, you would need to enclose the text string within the appropriate element markup. For information about how to do this, see the Insert Element command in the Elements Entry Helper section of the documentation.
Using RichEdit in Authentic View
In Authentic View, when the cursor is placed inside an element that has been created as a RichEdit component, the buttons and controls in the RichEdit toolbar (screenshot below) become enabled. Otherwise they are grayed out.

Select the text you wish to style and specify the styling you wish to apply via the buttons and controls of the RichEdit toolbar. RichEdit enables the Authentic View user to specify the font, font-weight, font-style, font-decoration, font-size, color, background color and alignment of text. The text that has been styled will be enclosed in the tags of the styling element.
Inserting entities
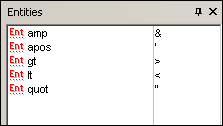
In XML documents, some characters are reserved for markup and cannot be used in normal text. These are the ampersand (&), apostrophe ('), less than (<), greater than (>), and quote (") characters. If you wish to use these characters in your data, you must insert them as entity references, via the Entities Entry Helper (screenshot below).
XML also offers the opportunity to create custom entities. These could be: (i) special characters that are not available on your keyboard, (ii) text strings that you wish to re-use in your document content, (iii) XML data fragments, or (iv) other resources, such as images. You can define your own entities within the Authentic View application. Once defined, these entities appear in the Entities Entry Helper and can then be inserted as in the document.
Inserting CDATA sections
CDATA sections are sections of text in an XML document that the XML parser does not process as XML data. They can be used to escape large sections of text if replacing special characters by entity references is undesirable; this could be the case, for example, with program code or an XML fragment that is to be reproduced with its markup tags. CDATA sections can occur within element content and are delimited by <![CDATA[ and ]]> at the start and end, respectively. Consequently the text string ]]> should not occur within a CDATA section as it would prematurely signify the end of the section. In this case, the greater than character should be escaped by its entity reference (>). To insert a CDATA section within an element, place the cursor at the desired location, right-click, and select Insert CDATA Section from the context menu. To see the CDATA section tags in Authentic View, switch on the markup display. Alternatively, you could highlight the text that is to be enclosed in a CDATA section, and then select the Insert CDATA section command.
Note: CDATA sections cannot be inserted into input fields (that is, in text boxes and multiline text boxes). CDATA sections can only be entered within elements that are displayed in Authentic View as text content components.
Editing and following links
A hyperlink consists of two parts: the link text and the target of the link. You can edit the link text by clicking in the text and editing. But you cannot edit the target of the link. (The target of the link is set by the designer of the stylesheet (either by typing in a static target address or by deriving the target address from data contained in the XML document).) From Authentic View, you can go to the target of the link by pressing Ctrl and clicking the link text. (Remember: merely clicking the link will set you up for editing the link text.)