CALS/HTML Tables
CALS/HTML tables can be inserted by you, the user of Authentic View, for certain XML data structures that have been specified to show a table format. There are three steps involved when working with CALS/HTML tables: inserting the table; formatting it; and entering data. The commands for working with CALS/HTML tables are available as icons in the toolbar (see CALS/HTML table editing icons).
Inserting tables
To insert a CALS/HTML table do the following:
1.Place your cursor where you wish to insert the table, and click the ![]() icon. (Note that where you can insert tables is determined by the schema.) The Insert Table dialog (screenshot below) appears. This dialog lists all the XML element data-structures for which a table structure has been defined. For example, in the screenshot below, the informaltable element and table element have each been defined as both a CALS table as well as an HTML table.
icon. (Note that where you can insert tables is determined by the schema.) The Insert Table dialog (screenshot below) appears. This dialog lists all the XML element data-structures for which a table structure has been defined. For example, in the screenshot below, the informaltable element and table element have each been defined as both a CALS table as well as an HTML table.
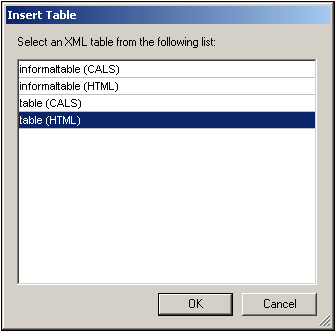
2.Select the entry containing the element and table model you wish to insert, and click OK.
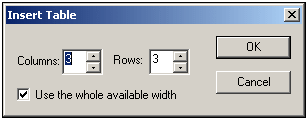
3.In the next dialog (screenshot below), select the number of columns and rows, and specify whether a header and/or footer is to be added to the table and whether the table is to extend over the entire available width. Click OK when done.
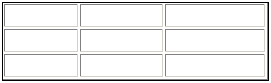
For the specifications given in the dialog box shown above, the following table is created.
By using the Table menu commands, you can add and delete columns, and create row and column joins and splits. But to start with, you must create the broad structure.
Formatting tables and entering data
The table formatting will already have been assigned in the document design. However, you might, under certain circumstances, be able to modify the table formatting. These circumstances are as follows:
•The elements corresponding to the various table structure elements must have the relevant CALS or HTML table properties defined as attributes (in the underlying XML Schema). Only those attributes that are defined will be available for formatting. If, in the design, values have been set for these attributes, then you can override these values in Authentic View.
•In the design. no style attribute containing CSS styles must have been set. If a style attribute containing CSS styles has been specified for an element, the style attribute has precedence over any other formatting attribute set on that element. As a result, any formatting specified in Authentic View will be overridden.
To format a table, row, column, or cell, do the following:
| 1. | Place the cursor anywhere in the table and click the |
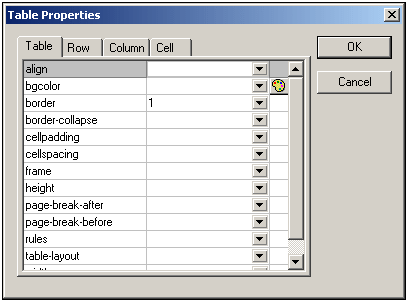
| 2. | Set the cellspacing and cellpadding properties to "0". Your table will now look like this: |

| 3. | Place the cursor in the first row to format it, and click the  (Table Properties) icon. Click the Row tab. (Table Properties) icon. Click the Row tab. |
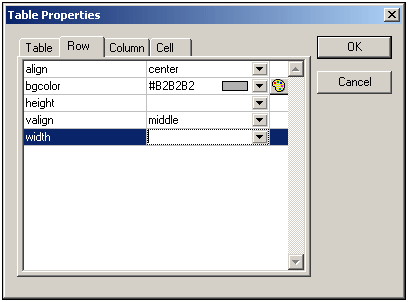
Since the first row will be the header row, set a background color to differentiate this row from the other rows. Note the Row properties that have been set in the figure above. Then enter the column header text. Your table will now look like this:

Notice that the alignment is centered as specified.
| 4. | Now, say you want to divide the "Telephone" column into the sub-columns "Office" and "Home", in which case you would need to split the horizontal width of the Telephone column into two columns. First, however, we will split the vertical extent of the header cell to make a sub-header row. Place the cursor in the "Telephone" cell, and click the |

| 5. | Now place the cursor in the cell below the cell containing "Telephone", and click the |

Now you will have to split the horizontal width of each cell in the "Telephone" column.
You can also add and delete columns and rows, and vertically align cell content, using the table-editing icons. The CALS/HTML table editing icons are described in the section titled, CALS/HTML Table Editing Icons.
Moving among cells in the table
To move among cells in the CALS/HTML table, use the Up, Down, Right, and Left arrow keys.
Entering data in a cell
To enter data in a cell, place the cursor in the cell, and type in the data.
Formatting text
Text in a CALS/HTML table, as with other text in the XML document, must be formatted using XML elements or attributes. To add an element, highlight the text and double-click the required element in the Elements Entry Helper. To specify an attribute value, place the cursor within the text fragment and enter the required attribute value in the Attributes Entry Helper. After formatting the header text bold, your table will look like this.

The text above was formatted by highlighting the text, and double-clicking the element strong, for which a global template exists that specifies bold as the font-weight. The text formatting becomes immediately visible.
Note: For text formatting to be displayed in Authentic View, a global template with the required text formatting must have been created in StyleVision for the element in question.