Info Window
The XSLT tab of the Info Window is displayed only when an XSLT document is the active document in XMLSpy. It displays all the imported and included XSLT files related to the active XSLT document. You can also select an XML file to transform with the XSLT when transformation is started with the XSLT being the active document.
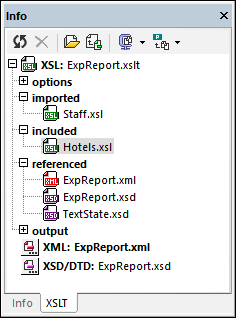
The following files are displayed in the XSLT tab of the Info Window:
•XSLT files: All imported and included XSLT files are listed (see screenshot above). The location of each file is displayed in a pop-up when the mouse cursor is placed over the file. Double-clicking an imported or included file, or selecting it and then clicking the Open icon in the Info Window toolbar, opens the file in a new window. The Go to Include/Import Location icon in the toolbar highlights the include/import declaration in the active XSLT document.
•XML file: An XML file can be assigned to the active XSLT stylesheet for transformations. The location of the assigned XML file is displayed in a pop-up when the mouse cursor is placed over the file. If an XML file is specified and the menu command XSL/XQuery | XSL Transformation (F10) is clicked, a transformation is executed on the defined XML file using the active XSLT document as the stylesheet. The XML file can be selected by clicking the XML icon and browsing; the selected file is displayed in bold face. Alternatively, the XML file can be assigned via the Project Properties dialog (Input XML for XSL/XQuery/Update transformation) or via a processing instruction in the XSLT document: <?altova_samplexml "Products.xml"?>. In each case, the XML file will be shown in the Info Window with the relevant icon:
![]() assigned via the Project Properties dialog
assigned via the Project Properties dialog
![]() assigned via a processing instruction in the XSLT document
assigned via a processing instruction in the XSLT document
![]() assigned by clicking the XML icon and browsing for the required file; entry is in bold font face
assigned by clicking the XML icon and browsing for the required file; entry is in bold font face
In the event that more than one of the above assignments exists, the selection priority is: (i) project; (ii) processing instruction; (iii) browsed by user. The XML file can be opened by double-clicking it or by selecting it and clicking the Open toolbar icon.
•XSD/DTD file: If the selected XML file has a reference to a schema (XML Schema or DTD), then this schema file is displayed in the XSD/DTD entry. Alternatively, just as with the XML file, the schema file can be selected via the Project Properties dialog (Validation) or by clicking the XSD/DTD icon and browsing for the required schema file. If the schema file is selected via the Projects Properties dialog, a Projects icon is displayed next to the entry, otherwise the clickable XSD/DTD icon is displayed with the file entry either in a normal font face (when the schema is referenced from the XML file) or bold font face (schema browsed for by the user via the XSD/DTD icon). Should the schema file be assigned via more than one method, then the order of priority is as follows: (i) project; (ii) browsed by user; (iii) reference in XML document. The location of the assigned XSD file is displayed in a pop-up when the mouse cursor is placed over the file. The schema file can be opened by double-clicking it or by selecting it and clicking the Open toolbar icon.
Note: If an XML or XSD/DTD file is selected via the Project Properties dialog, then to clear this selection, you must go to the Project Properties dialog and clear the setting there. If the selection has been made by browsing via the XML or XSD/DTD icons, then to clear this setting, select the file and click the Clear icon in the Info Window toolbar.
Options
XPath intelligent editing: If an XML file has been assigned, the structure of the XML document is known and intelligent XPath editing will extend to elements and attributes. At locations in the XSLT document where an XPath expression can be entered, available elements and attributes will be shown in a popup. This option is switched on by default. To disable XPath intelligent editing, uncheck the check box. The setting is saved for each XSLT file separately when the file is closed, and will be used each time the file is opened.
Toolbar icons
The Info Window toolbar icons (screenshot below) are, from left to right:
•Reload info: Updates the Info Window to reflect modifications made in the XSLT document.
•Clear XML/XSD assignment: Clears an XML or XSD/DTD assignment made by the user by browsing via the XML or XSD/DTD icons, respectively. Select the file to clear and then click this icon.
•Open document: Opens the selected document.
•Go to import/include location: When an imported or included file is selected, clicking this icon highlights the relevant import or include declaration in the XSLT document.
•Zip all local documents: Zips all the documents listed in the Info Window to a user-defined location. Alternatively, only the selected documents can be zipped; do this by selecting, in the dropdown menu of this icon, the command Zip selected local documents.
•Add all files to projects: Adds all files to the current projects. Alternatively, only the selected documents can be added; do this by selecting, in the dropdown menu of this icon, the command Add selected files to project.