Output Window: Messages
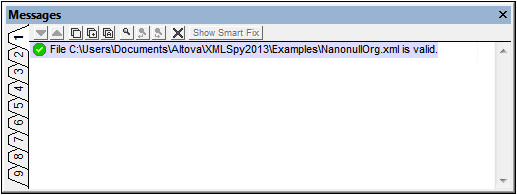
The Messages Window displays messages about actions carried out in XMLSpy as well as errors and other output. For example, if an XML, XML Schema, DTD, or XQuery document is validated and is valid, a successful validation message (screenshot below) is displayed in the Messages Window:

Otherwise, a message that describes the error (screenshot below) is displayed. Notice in the screenshot below that there are links (black link text) to nodes and node content in the XML document, as well as links (blue link text) to the sections in the relevant specification on the Internet that describe the rule in question. Clicking the purple Def buttons opens the relevant schema definition in Schema View.

The Messages Window is enabled in all views, but clicking a link to content in an XML document highlights that node in the XML document in Text View. However, when an XML Schema has been validated in Schema View, clicking a Def button does not change the view.
Note: The output window has nine tabs. You can, therefore, keep an output in one tab and get a new output in another tab.
XML Validation smart fixes
Based on information in the schema, options for a smart fix are also suggested if validation was carried out in Text View or Grid View. To view a list of smart fix options, click the Show Smart Fix button (see screenshot above). A pane with suggested smart fix options appears in the Messages window (screenshot below).
Note that errors in the Messages window are displayed one at a time. Also, errors of well-formedness (such as mismatched start and end tags), if such exist, are displayed prior to validation errors being displayed. So the Show Smart Fix button will be enabled only when a validation error is reached (after all well-formedness errors have been corrected).

In the Smart Fix pane, select one of the suggested smart fixes and click either the Fix + Validate button or the Fix button (see screenshot above). The invalid text in the XML document will be replaced with the selected smart fix. Alternatively, you can double-click the smart fix you want. This action either fixes, or fixes and validates, according to the option selected in the dropdown Options list (see screenshot above). The Fix + Validate command is useful because when another validation is carried out after the fix it will pick up further validation errors if there are any.
To hide the Smart Fix pane, click the Hide Smart Fix button (see screenshot above). For more details, see the section Editing Views | Schema View | Validation and Smart Fixes.
Validating folders and files in the Project window
The Validate command (in the XML menu) is normally applied to the active document. But you can also apply the command to a file, folder, or group of files in the active project. Select the required file or folder in the Project Window (by clicking on it), and click XML | Validate XML or F8. Invalid files in a project will be opened and made active in the Main Window, and the File is not valid error message will be displayed.
Note: You can also carry out the well-formedness check (Check Well-Formedness or F7) in the Project window.