Insert
Mousing over or selecting the Insert command rolls out a submenu with three commands (described below):
Insert File Path
The File Path command is enabled in the Text View and Grid View of documents of any file type. Using it, you can insert the path to a file at the cursor selection point. Clicking the command pops up a dialog (screenshot below) in which you select the required file.
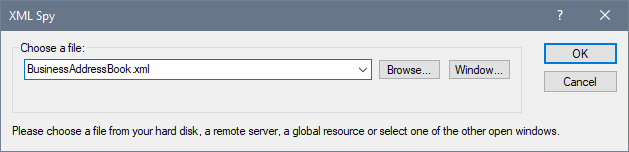
The required file can be selected in one of the following ways: (i) by browsing for the file, URL, or global resource (use the Browse button); (ii) by selecting the window in which the file is open (the Window button). When done, click OK. The path to the selected file will be inserted in the active document at the cursor selection point.
Insert XInclude
The XInclude command is available in Text View and Grid View, and enables you to insert a new XInclude element at the cursor selection point in Text View, or before the selected item in both Text View and Grid View. If in Grid View the current selection is an attribute, the XInclude element is inserted after the attribute and before the first child element of the attribute's parent element. Selecting this command pops up the XInclude dialog (screenshot below).
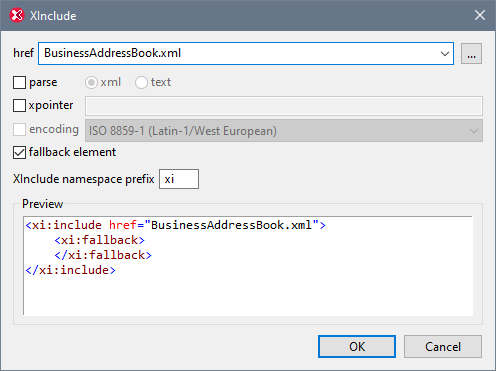
The XML file to be included is entered in the href text box (alternatively, you can browse for the file by clicking the Browse (...) button to the right of the text box). The filename will be entered in the XML document as the value of the href attribute. The parse, xpointer, and encoding attributes of the XInclude element (xi:include), and the fallback child element of xi:include can also be inserted via the dialog. Do this by first checking the appropriate check box and then selecting/entering the required values. In the case of the fallback element, checking its check box only inserts the empty element. The content of the fallback element must be added subsequently in one of the editing views.
The parse attribute determines whether the included document is to be parsed as XML or text. (XML is the default value and therefore need not be specified.) The xpointer attribute identifies a specific fragment of the document located with the href attribute; it is this fragment that will be included. The encoding attribute specifies the encoding of the included document so that XMLSpy can transcode this document (or the part of it to be included) into the encoding of the including document. The contents of the fallback child element replace the xi:include element if the document to be included cannot be located.
Here is an example of an XML document that uses XInclude to include two XML documents:
<?xml version="1.0" encoding="UTF-16"?>
<AddressBook xsi:schemaLocation="https://www.altova.com/sv/myaddresses AddressBook.xsd"
xmlns="https://www.altova.com/stylevision/tutorials/myaddresses"
xmlns:xsi="http://www.w3.org/2001/XMLSchema-instance"
xmlns:xi="http://www.w3.org/2001/XInclude">
<xi:include href="BusinessAddressBook.xml"/>
<xi:include href="PersonalAddressBook.xml"/>
</AddressBook>
When this XML document is parsed, it will replace the two XInclude elements with the files specified in the respective href attributes.
xml:base
When the XML validator of XMLSpy reads an XML document and encounters the include element in the XInclude namespace (hereafter xi:include), it replaces this element (xi:include) with the XML document named in the href attribute of the xi:include element. The document element (root element) of the included XML document (or the element identified by an XPointer) will be included with an attribute of xml:base in order to preserve the base URIs of the included element. If the resulting XML document (containing the included XML document/s or tree fragment/s) must be valid according to a schema, then the document element of the included document (or the top-level element of the tree fragment) must be created with a content model that allows an attribute of xml:base. If, according to the schema, the xml:base attribute is not allowed on this element, then the resulting document will be invalid. How to define an xml:base attribute in an element's content model using XMLSpy's Schema View is described in the xml:Prefixed Attributes section of the Schema View section of the documentation.
XPointers
XMLSpy supports XPointers in XInclude. The relevant W3C recommendations are the XPointer Framework and XPointer element() Scheme recommendations. The use of an XPointer in an XInclude element enables a specific part of the XML document to be included, instead of the entire XML document. XPointers are used within an XInclude element as follows:
<xi:include href="PersonalAddressBook.xml" xpointer="element(usa)"/>
<xi:include href="BusinessAddressBook.xml" xpointer="element(/1/1)"/>
<xi:include href="BobsAddressBook.xml" xpointer="element(usa/3/1)"/>
<xi:include href="PatsAddressBook.xml" xpointer="element(usa)element(/1/1)"/>
In the element() scheme of XPointer, an NCName or a child sequence directed by integers may be used.
•In the first xi:include element listed above, the xpointer attribute uses the element scheme with an NCName of usa. According to the XPointer Framework, this NCName identifies the element that has an ID of usa.
•In the second xi:include listed above, the xpointer attribute with a value of element(/1/1) identifies, in the first step, the first child element of the document root (which, if the document is well-formed, will be its document (or root) element). In the second step, the first child element of the element located in the previous step is located; in our example, this would be the first child element of the document element.
•The xpointer attribute of the third xi:include listed above uses a combination of NCName and child sequence. This XPointer locates the first child element of the third child element of the element having an ID of usa.
•If you are not sure whether your first XPointer will work, you can back it up with a second one as shown in the fourth xi:include listed above: xpointer="element(usa)element(/1/1)". Here, if there is no element with an ID of usa, the back-up XPointer specifies that the first child element of the document element is to be selected. Additional backups are also allowed. Individual XPointers may not be separated, or they may be separated by whitespace: for example, xpointer="element(usa)element(addresses/1) element(/1/1)".
Note: The namespace binding context is not used in the element() scheme because the element() scheme does not support qualified names.
Insert Encoded External File
The Encoded External File command is available in Text View and Grid View. It enables an external file to be included as encoded Base-16 or Base-64 text at any location in the XML document. This feature enables external files to be embedded in the XML document.
Clicking the Insert | Encoded External File command pops up the Insert Encoded External File dialog (screenshot below).
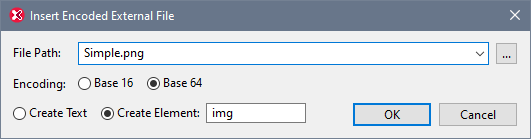
You can browse for or enter the name of the external file to be encoded and embedded. Either a Base-16 or Base-64 encoding must be specified. If you wish to enclose the encoded text in an element, then select Create Element and specify the name of the desired element (see screenshot above). Alternatively, select Create Text to insert the encoded text directly at the cursor location.
On clicking OK, the encoded text of the selected file is inserted at the cursor location—with an enclosing element if this has been specified.
<img ext="png" encoding="xs:base64Binary">
iVBORw0KGgoAAAANSUhEUgAAABAAAAAQAQMAAAAlPW0iAAAABlBMVEUAAAD/
//+l2Z/dAAAAM0lEQVR4nGP4/5/h/1+G/58ZDrAz3D/McH8yw83NDDeNGe4U
g9C9zwz3gVLMDA/A6P9/AFGGFyjOXZtQAAAAAElFTkSuQmCC
</img>
The listing above shows the encoded text of a PNG image file. An img element was created around the encoded text.