Customize Context Menu
The Customize context menu (screenshot below) is the menu that appears when you have the Customize dialog open and then right-click an application menu, a menu command, or a toolbar icon.
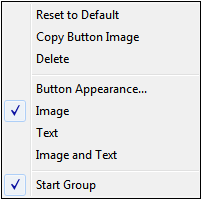
The following functionality is available:
•Reset to Default: Currently no function.
•Copy Button Image: Copies the icon you right-click to the clipboard.
•Delete: Deletes the selected menu, menu command, or toolbar icon. For information about how to restore deleted items, see below.
•Button Appearance: Pops up the Button Appearance dialog (see screenshot below), in which you can set properties that define the appearance of the selected toolbar icon. See the description below for details.
•Image, Text, Image and Text: Mutually exclusive options that determine whether the selected toolbar icon will be an icon only, text only, or both icon and text. You can select one of these options to make the change. Alternatively, you can make this change in the Button Appearance dialog.
•Start Group: Inserts a vertical group-divider to the left of the selected toolbar icon. This makes the selected toolbar icon the first of a group of icons.
The Button Appearance dialog
Right-click a toolbar icon and click Button Appearance to get the Button Appearance dialog (screenshot below). Via this dialog you can edit the toolbar icon image, as well as its text. Currently only toolbar icons for macros and from plug-ins can be edited using this dialog.
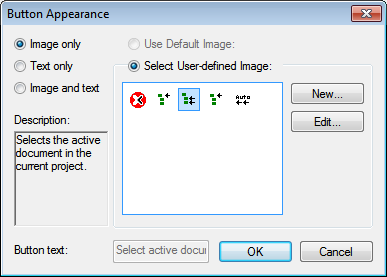
The following editing functionality is available for the selected toolbar icon (the one that was right-clicked to get the Customize context menu):
•Image only, Text only, Image and text: Select the desired radio button to specify what form the toolbar icon will take.
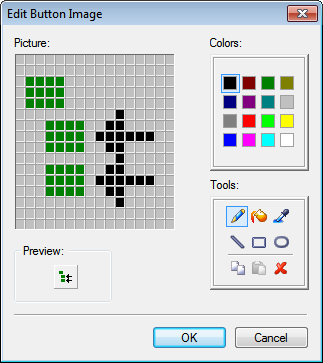
•Image editing: When Image only or Image and text is selected, then the image editing options are enabled. Click New to create a new image that will be added to the user-defined images in the images pane. Select an image and click Edit to edit it.
•Image selection: Select an image from the Images pane and click OK to use the selected image as the toolbar icon.
•Text editing and selection: When Text only or Image and text is selected, then the Button Text text box is enabled. Enter or edit the text and click OK to make this the text of the toolbar icon.
Note: The Button Appearance dialog can also be used to edit the text of menu commands. Right-click the menu command (with the Customize dialog open), click Button Appearance, and then edit the menu command text in the Button Text text box.
Restoring deleted menus, menu commands, and toolbar icons
If a menu, menu command, or toolbar icon has been deleted by using the Delete command in the Customize context menu, these can be restored as follows:
•Menus: Go to Tools | Customize | Menu, and click the Reset button in the Application Frame Menus pane. Alternatively, go to Tools | Customize | Toolbars, select Menu Bar, and click the Reset button.
•Menu commands: Go to Tools | Customize | Commands, and drag the command from the Commands list box into the menu.
•Toolbar icons: Go to Tools | Customize | Commands, and drag the command from the Commands list box into the toolbar.