The Windows
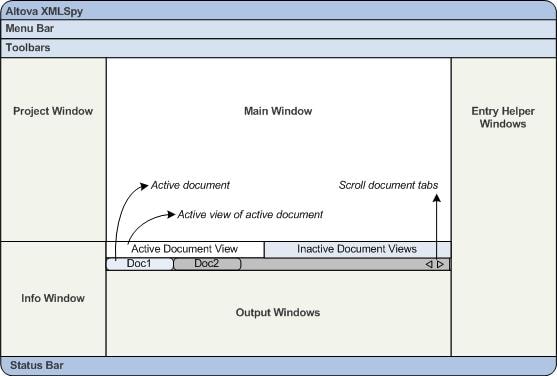
By default, the various windows are located around the Main window (see screenshot below) and are organized into the following window groups:
•Project window
•Info window
•Entry helpers (various, depending on the type of document currently active)
•Output windows: Messages, XPath, XSL Outline, Find in Files, Find in Schemas
In this section, you will learn how to turn on and off the display of window groups and how to move windows around the screen. Being able to manage the display of windows well will be useful when you need more space within the interface.
Switching the display of window groups on and off
Window groups (Project Window, Info Window, Entry Helpers, Output Windows) can be displayed or hidden by toggling them on and off via the commands in the Window menu. A displayed window group can also be hidden by right-clicking its title bar and selecting the command Hide. A hidden window can only be displayed via the Window menu.
Open any XML file in the C:\Documents and Settings\<username>\My Documents\Altova\XMLSpy2026\Examples\Tutorial folder, and practise using these basic commands till you are familiar with the way the commands work. For more information about displaying and hiding window groups, see the section, XMLSpy Interface.
Saved and backup status
By default, XMLSpy backs up unsaved documents at intervals of five seconds. Each file's tab at the bottom of the Main Window provides information via indicator symbols about the file's saved/unsaved and its backup status. You should be aware of the meanings of these indicators since you will come across them constantly during your work. See the Automatic Backup of Files section for information about these indicators.
Moving windows around the screen
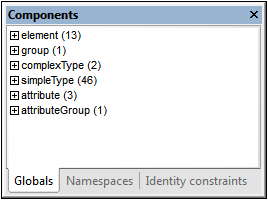
An individual window can either float free of the interface or be docked within it. A window can also be docked as a tab within a window group (window groups are explained above). For example, the screenshot below shows the Components entry helper in Schema View, which has three tabbed windows: the Globals window, Namespaces window, and Identity Constraints window.
A window can be made to float or dock using one of the following methods in any view:
•Double-click the title bar of the window. If docked, the window will now float. If floating, the window will now dock in the last position in which it was docked.
•Right-click the title bar of a window and choose the required command (Floating or Docking).
•Drag the window (using its title bar as a handle) out of its docked position so that it floats. Drag a floating window (by its title bar) to the location where it is to be docked. Two sets of blue arrows appear. The outer set of four arrows enables docking relative to the application window (along the top, right, bottom, or left edge of the GUI). The inner set of arrows enables docking relative to the window over which the cursor is currently placed. Dropping a dragged window on the button in the center of the inner set of arrows (or on the title bar of a window) docks the dragged window as a tabbed window within the window in which it is dropped.
To float a tabbed window, double-click its tab. To drag a tabbed window out of a group of tabbed windows, drag its tab.
To practise moving windows around open any XML Schema file from the C:\Documents and Settings\<username>\My Documents\Altova\XMLSpy2026\Examples\Tutorial folder, and, while in Schema View, try the methods described above till you are able to move windows around the interface comfortably.