Node Operations
There are two major types of nodes you will encounter in an Authentic View XML document: element nodes and attribute nodes. These nodes are marked up with tags, which you can switch on. There are also other nodes in the document, such as text nodes (which are not marked up) and CDATA section nodes (which are marked up, in order to delimit them from surrounding text).
The node operations described in this section refer only to element nodes and attribute nodes. When trying out the operations described in this section, it is best to have large markup switched on.
Note: It is important to remember that only same- or higher-level elements can be inserted before or after the selected element. Same-level elements are siblings. Siblings of a paragraph element would be other paragraph elements, but could also be lists, a table, an image, etc. Siblings could occur before or after an element. Higher-level elements are ancestor elements and siblings of ancestors. For a paragraph element, ancestor elements could be a section, chapter, article, etc. A paragraph in a valid XML file would already have ancestors. Therefore, adding a higher-level element in Authentic View, creates the new element as a sibling of the relevant ancestor. For example, if a section element is inserted after a paragraph, it is created as a sibling of the section that contains the current paragraph element.
Carrying out node operations
Node operations can be carried out by selecting a command in the context menu or by clicking the node operation entry in the Elements entry helper. In some cases, an element or attribute can be added by clicking the Add Node link in the Authentic View of the document. In the special cases of elements defined as paragraphs or list items, pressing the Enter key when within such an element creates a new sibling element of that kind. This section also describes how nodes can be created and deleted by using the Apply Element, Remove Node, and Clear Element mechanisms.
Inserting elements
Elements can be inserted at the following locations:
•The cursor location within an element node. The elements available for insertion at that location are listed in a submenu of the context menu's Insert command. In the Elements entry helper, elements that can be inserted at a location are indicated with the  icon. In the NanonullOrg.xml document, place the cursor inside the para element, and create bold and italic elements using both the context menu and Elements entry helper.
•Before or after the selected element or any of its ancestors, if allowed by the schema. Select the required element from the submenu/s that roll out. In the Elements entry helper, elements that can be inserted before or after the selected element are indicated with the  and
and  icons, respectively. Note that in the Elements entry helper, you can insert elements before/after the selected element only; you cannot insert before/after an ancestor element. Try out this command, by first placing the cursor inside the para element and then inside the table listing the employees.
Add Node link
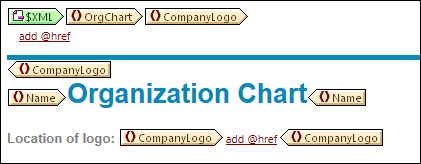
If an element or attribute is included in the document design, and is not present in the XML document, an Add Node link is displayed at the location in the document where that node is specified. To see this link, in the line with the text, Location of logo, select the @href node within the CompanyLogo element and delete it (by pressing the Delete key). The add @href link appears within the CompanyLogo element that was edited (screenshot below). Clicking the link adds the @href node to the XML document. The text box within the @href tags appears because the design specifies that the @href node be added like this. You still have to enter the value (or content) of the @href node. Enter the text nanonull.gif.
If the content model of an element is ambiguous, for example, if it specifies that a sequence of child elements may appear in any order, then the add... link appears. Note that no node name is specified. Clicking the link will pop up a list of elements that may validly be inserted.
Note: The Add Node link appears directly in the document template; there is no corresponding entry in the context menu or Elements entry helper.
Creating new elements with the Enter key
In cases where an element has been formatted as a paragraph or list item (by the stylesheet designer), pressing the Enter key when inside such a node causes a new node of that kind to be inserted after the current node. You can try this mechanism in the NanonullOrg.xml document by going to the end of a para node (just before its end tag) and pressing Enter.
Applying elements
In elements of mixed content (those which contain both text and child elements), some text content can be selected and an allowed child element be applied to it. The selected text becomes the content of the applied element. To apply elements, in the context menu, select Apply and then select from among the applicable elements. (If no elements can be applied to the selected text, then the Apply command does not appear in the context menu.) In the Elements entry helper, elements that can be applied for a selection are indicated with the  icon. In the NanonullOrg.xml document, select text inside the mixed content para element and experiment with applying the bold and italic elements.
The stylesheet designer might also have created a toolbar icon to apply an element. In the NanonullOrg.xml document, the bold and italic elements can be applied by clicking the bold and italic icons in the application's Authentic toolbar.
Removing nodes
A node can be removed if its removal does not render the document invalid. Removing a node causes a node and all its contents to be deleted. A node can be removed using the Remove command in the context menu. When the Remove command is highlighted, a submenu pops up which contains all nodes that may be removed, starting from the selected node and going up to the document's top-level node. To select a node for removal, the cursor can be placed within the node, or the node (or part of it) can be highlighted. In the Elements entry helper, nodes that can be removed are indicated with the  icon. A removable node can also be removed by selecting it and pressing the Delete key. In the NanonullOrg.xml document, experiment with removing a few nodes using the mechanisms described. You can undo your changes with Ctrl+Z.
Clearing elements
Element nodes that are children of elements with mixed content (both text and element children) can be cleared. The entire element can be cleared when the node is selected or when the cursor is placed inside the node as an insertion point. A text fragment within the element can be cleared of the element markup by highlighting the text fragment. With the selection made, select Clear in the context menu and then the element to clear. In the Elements entry helper, elements that can be cleared for a particular selection are indicated with the  icon (insertion point selection) and
  icon (range selection). In the NanonullOrg.xml document, try the clearing mechanism with the bold and italic child elements of para (which has mixed content).
Tables and table structure
There are two types of Authentic View table:
•SPS tables (static and dynamic). The broad structure of SPS table is determined by the stylesheet designer. Within this broad structure, the only structural changes you are allowed are content-driven. For example, you could add new rows to a dynamic SPS table.
•XML tables, in which you decide to present the contents of a particular node (say, one for person-specific details) as a table. If the stylesheet designer has enabled the creation of this node as an XML table, then you can determine the structure of the table and edit its contents. XML tables are discussed in detail in the Tables in Authentic View section.