Context Menu
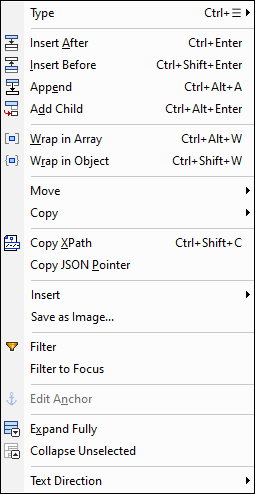
When you right-click a cell in Grid View, a context menu (screenshots below: XML at left, JSON/YAML at right) appears that provides commands for editing content related to the cell and for modifying the display. The context menu can also be accessed by pressing the keyboard's Menu key. The commands of the context menu are described below.

Type
Hovering over the Type command causes a sub-menu to be displayed in which you can select the type of the component. You can also directly access the Type sub-menu via the keyboard shortcut Ctrl+Menu.
Insert After/Before, Append, Add Child
The Insert and Append commands add an item at the same level. (In XML, this is by default an element.) The new item is added, in the case of Insert After and Insert Before, respectively, after and before the selected item, and in the case of Append as the last sibling of the selected item.
The Add Child command appends a new item as a child:
•In XML, the child item is by default an element. Change the name of the newly added element by double-clicking in its name cell and editing. Change the node type by clicking the element's icon (to the left of its name) and selecting the node type you want.
•In JSON and YAML, if a child already exists, the new child will be of the same type as the last child; if no child exists, then the new child will be an empty key:value pair.
Add Attribute (XML Grid View)
Enabled on elements only. It adds to the selected element an attribute with a default name. You can rename the new attribute by double-clicking its name and editing.
Wrap in Element (XML Grid View)
The selected item is given a parent element with a default name. You can rename the new element by double-clicking its name and editing.
Edit as Raw Text (XML Grid View)
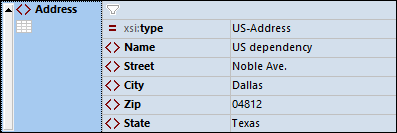
Enables you to edit text content of the selected item as raw text. This is useful, for instance, if you are editing complex content such as HTML code. For example, the screenshot below, shows the Address element in Grid View.
If you switch the display of the Address element to raw text (screenshot below), the grid structure is converted to a single item containing raw text, all of which can be edited as in Text View.

Element Whitespace (XML Grid View)
Available on element nodes, it adds the xml:space attribute to the element's markup and gives this attribute the value you select from the command's submenu.
•However, if you select the Omit value, then the xml:space attribute is not added, which has the effect of normalizing whitespace.
•The Preserve value preserves all whitespace as is and turns off pretty printing for that element. Preserved whitespace is indicated in Grid View by an ellipsis icon.
•The Default value takes the value specified for that element in the schema, which can be useful for overriding an xml:space value that has been inherited from an ancestor element in the XML document.
Wrap in Array, Wrap in Object (JSON/YAML Grid View)
The selected part of the table can be wrapped in either an array or an object.
Move Up/Down/Left/Right
If it is possible to move a component up, down, left or right from its current location in the grid, then the corresponding command/s are enabled. Select the respective command to carry out the move.
Copy
These commands can be used to copy the current selection. Only those options are enabled that are allowed on that component.
Command | Description |
Copy as XML/JSON/YAML Text | Current selection is serialized as XML/JSON/YAML markup |
Copy as Tab-separated Text | Current table selection is serialized as TSV (Tab-Separated Values) |
Copy as Image | Current image cell is copied as image |
Note the following points:
•Copy as Image copies the Base64-encoded string of the selected image. If the string is pasted to a document where the Base64-encoded string can be rendered as an image (for example to another table cell in Table Display), then it will be rendered. Otherwise, it will be pasted as a string.
•To insert text in a cell, copy the text and paste it in the cell.
•To import from file, for example an image, use the command Edit | Insert | Encoded External File. This inserts an image as Base64-encoded string, and displays this string as an image in JSON Grid View. Image file formats that are supported for import are: PNG, JPEG, BMP, GIF, TIFF.
Copy XPath
This command copies to the clipboard an XPath 3.1 locator expression, starting at the document root, that locates the selected node.
Copy XPointer (XML Grid View)
This command copies to the clipboard an XPointer expression that locates the selected node. See Copy XPointer/JSON-Pointer for details.
Copy JSON Pointer (JSON/YAML Grid View)
This command copies to the clipboard a JSON Pointer expression that locates the selected node. For example: /Artists/1/Albums/1/Tracks. See Copy XPointer/JSON-Pointer for more information.
Insert
This command enables you to insert the following useful data in XML, JSON, and YAML documents:
•File Path: Opens a Browse dialog, in which you can browse for the file path you want to insert.
•XInclude (XML documents only): Inserts an XInclude element. A dialog appears in which you can configure the location of the external resource to include as well as the element's other attributes.
•Encoded External File: Enables you to select an image file, which can be inserted in Grid View as an image or as a text-based encoding (Base16 or Base64). In Text View the inserted image will be in its encoded form.
The new data is added immediately after the selected node, at the same hierarchical level.
Save as Image (XML Grid View)
This command is enabled when an image is selected in Grid View. It opens a File Save dialog, in which you can select the location to save to and the file extension. The image will be saved in the format corresponding to the selected file extension.
Filter, Filter to Focus
The Filter command is a toggle command. It adds a filter to the selected element or deactivates a filter. Note that, after you add a filter via this command, you must enter a filter expression; otherwise the filter will automatically be removed. After a filter has been added you can deactivate it by selecting the command again or clicking the filter. To remove the filter, click Remove all filters in the toolbar.
The Filter to Focus command (i) builds a filter on the root element which contains an XPath expression to locate the selected node, and (ii) filters the Grid View display to show the selected node (and its descendants) directly under the root element. This is useful if you want to focus the display on just the selected node. To remove the filter, click the Filter icon in the content cell of the root element.
Edit Anchor (YAML Grid View)
Anchors in YAML documents are created on the values of a key–value pair. This command does the following:
•If no anchor exists on the selected node, then an anchor cell is created on the key's value. You must then enter a name for the anchor. If no name is entered, then the anchor cell is removed and the anchor is not created.
•If an anchor does exist on the selected node, then the anchor's name is selected and you can edit the name. If you delete the name, the anchor will be deleted.
When considering anchors in Grid View, we can think of a YAML node as being one of two types:
•A mapping or a sequence: The anchor will be created on the entire content of the mapping or sequence
•A key–value pair: The anchor will be created on the key's value.
Expand Fully
This command is enabled if the selected component or any of its descendants is collapsed. It expands the component and all descendant components.
Collapse Unselected
This command collapses all components except the selected component and its ancestor components.
Text Direction
This command is available for nodes containing text (or, in JSON, a String type), and switches the reading order to start from either the left or the right of the cell. This is useful when using languages such as Arabic and Hebrew.