Tracepoints
Tracepoints enable you to trace content generated by an XSLT instruction. In the screenshot below, each tracepoint (up to that point in the debugging session) is listed in the Trace tab of the Trace window. Select one of the Trace items to show the XSLT content generated at the tracepoint. The content will be displayed in the Result pane to the right.

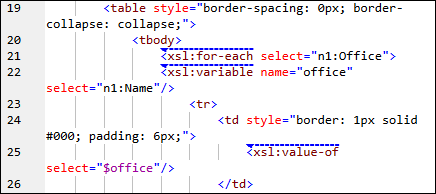
The screenshot above shows that two tracepoints have been set: (i) on the xsl:variable and the xsl:value-of instructions. Since both these instructions occur inside an xsl:for-each instruction that selects the n1:Office element, the processor loops through the n1:Office elements of the XML document. For each n1:Office element, the $office variable will be set to the value of the n1:Name child element (of the current n1:Office element). The xsl:value-of instruction outputs the value of the $office variable (which will be that of the n1:Name element).
In the screenshot, the Debugger has progressed through two n1:Office elements. The xsl:variable and the xsl:value-of instructions are listed for each of the two n1:Office elements. Select any of the four items to show, in the Result pane, the result generated by that specific instruction.
You can set as many tracepoints as you like. As the debugger progresses through the XSLT document, all encountered tracepoints will be listed in the Trace tab, and you can select any of the listed instructions to see the result it generates.
Important points
Note the following points:
•Tracepoints can be set (i) on XSL instructions and literal results in XSLT stylesheets and (ii) on nodes in XML and XQuery documents.
•Tracepoints cannot be defined on closing nodes.
•A tracepoint is shown as a dashed blue line.
•It is possible to set both a tracepoint and a breakpoint for the same instruction/node. The instruction/node is then marked with a combined dashed blue and dashed red line (see screenshot above).
•Results are displayed in the Trace window only after the traced instruction is completed.
•Tracepoints that have been set for a document remain in that document until it is closed. If you switch to a view that is not Text View or Grid View, tracepoints will be deleted.
•You can also use a tracepoint to see what result would be generated by an XPath expression that has tracepoint node as its context node. How to do this is described below.
Insert and remove tracepoints
Tracepoints can be set in Text View and Grid View. Place the cursor at the point where you wish to insert the tracepoint—or in the tracepoint if you want to remove it—and then do one of the following:
•Select XSL/XQuery | Insert/Remove Tracepoint.
•Press Shift+F9.
•Right-click and select Breakpoints/Tracepoints | Insert/Remove Tracepoint.
To remove a tracepoint, you can also use the XSLT Breakpoints/Tracepoints dialog (described below).
XSLT Breakpoints/Tracepoints dialog
Access the XSLT Breakpoints/Tracepoints dialog (screenshot below) by clicking either the menu command XSL/XQuery | Breakpoints/Tracepoints... or the command's toolbar icon.

The XSLT Breakpoints/Tracepoints dialog provides the following functionality:
•List all breakpoints and tracepoints in all currently open XML, XSLT, and XQuery documents.
•Change a breakpoint to a tracepoint and vice versa, by using the arrow buttons between the respective panes and clicking OK when done.
•Disable/enable a breakpoint or tracepoint by, respectively, unchecking/checking its check box and clicking OK when done. Disabling a breakpoint or tracepoint enables you to skip over it without having to remove it.
•Remove one or all breakpoints/tracepoints by clicking the respective button and clicking OK when done.
•Go directly to the breakpoint/tracepoint in the respective document and edit the document. Click the respective Edit Code button (see screenshot below).
•Set an XPath expression on a tracepoint to check the value the expression returns. How to do this is described below.
Set an XPath expression on a tracepoint
If you set an XPath expression on a tracepoint, the tracepoint does not return the content generated by the corresponding XSLT instruction. Instead, it returns the result of evaluating the XPath expression relative to the context node of the tracepoint. This result is displayed in the Trace window.
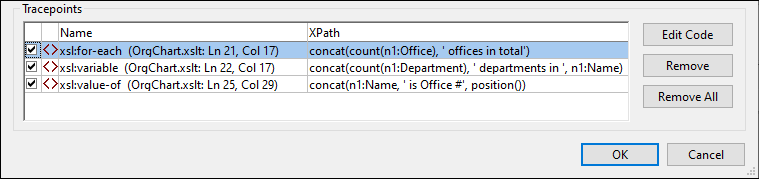
For example, in the screenshot below, we have set three tracepoints. The first tracepoint (on line 21) has as its context node the parent node of the n1:Office element. The other two tracepoints, because they are inside the xsl:for-each instruction, would both have the n1:Office element as their respective context nodes.
Now, let's say we set, in the XSLT Breakpoints/Tracepoints dialog (see above), XPath expressions for each of the three tracepoints as shown in the screenshot below. Note that the context node of the first tracepoint is the parent node of the n1:Office element, which enables us to count the n1:Office elements as child nodes. For the second tracepoint, where the context node is the n1:Office element, we can count child n1:Department elements.
On running the Debugger (XSL/XQuery | Start Debugger), the results of the XPath expressions will be displayed in the Trace window (see screenshot below).

Note the following points:
•Since there are three n1:Office elements in our example, the xsl:for-each loop is executed once for each of the n1:Office elements. Consequently, the other two tracepoints within the loop are evaluated for each office and return data corresponding to the respective offices.
•The XPath expression of the xsl:for-each tracepoint is evaluated when processing of the instruction is completed.