Formatting in Text View
Text View offers a number of text formatting options. These are listed below.
Fonts
The font-family, font-size, font-style, and text background-color can be customized separately for the following groups of documents: (i) generic XML documents (including HTML); (ii) XQuery documents; and (iii) CSS documents.
Text items in a document that have different semantics, can be colored differently. For example, you can color element names, attribute names, and element content differently. When you set different colors for different text items, the syntax-coloring feature is enabled. Text fonts are customized in the Fonts and Colors section of the Options dialog.
Indentation
You can indent a document to show its structure, as in the screenshot below. When the document is shown with this kind of hierarchical indentation, it is said to be pretty-printed. In a pretty-printed document, each deeper level will be displayed with a deeper indent than its parent element. To see a document in its pretty-printed form, you must: (i) set up its indentation (according to your preference) and (ii) apply pretty-printing to it.

To set up and apply pretty-printing, carry out the following steps. Note that the set up of pretty-printing is application-wide. This means that pretty-printing settings will be applied to all XML and JSON documents after the settings have been saved. Consequently, settings need to be edited only when you want to change the pretty-printing display of your documents. Once the application-wide settings have been made, you must apply pretty-printing individually to each document. A document is always displayed with the pretty-printing that was applied to it, and its display formatting will not change till the next time pretty-printing is applied.
1.In the Pretty-printing section of the Options dialog (Tools | Options), enable pretty-printing by checking the option Use indentation determined by the tab configuration of Text View. It is this setting that switches on the indentation that you will see in a pretty-printed document. If the Use Indentation option is not checked, then every line in the document will start with a zero indent.
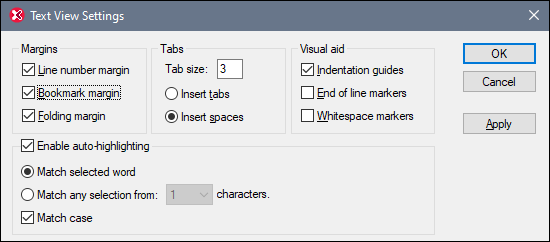
2.While still in the Pretty-printing section (see previous point), click the Text View Settings button (at top right) to go to the Text View Settings dialog (screenshot below) and set the amount and type of indentation. (Alternative ways to access the Text View Settings dialog are (i) the menu command View | Text View Settings and (ii) the Text View Settings icon in the Text toolbar.) In the Text View Settings dialog, the Tab size field specifies the number of spaces that make up a tab as well as an indent. Choose whether pretty-printing indents will be composed of tabs or spaces by selecting either Insert Tabs or Insert Spaces. In either case, the size of each indent will be equivalent to the X number of spaces specified in the Tab size field (since 1 tab = X spaces).
3.After having set up application-wide pretty-printing as described in the previous two steps, you can apply pretty-printing to individual documents. Make the document you want to pretty-print the active document. Click the Edit | Pretty-Print command or the Pretty Print icon in the Text toolbar. This will cause the document text to be displayed according to the formatting specified in the Pretty Printing section of the Options dialog. Note that the Pretty-Print command removes unnecessary leading or trailing whitespace.
Note: Indentation guides are vertical dotted lines (see screenshot at the start of this section). They are toggled on and off via the Indentation Guides check box in the Visual Aid pane of the Text View Settings dialog (see screenshot above).
Note: For information about whitespace handling, see the section Whitespace.
Using tabs and spaces for formatting
You can use tabs and spaces for formatting text, especially for non-XML documents, where the pretty-printing option is not available. When you press Return or Shift+Return, the cursor will jump to a position on the next line that corresponds to the starting position of the previous line.
Word-wrapping
Lines of text that are longer than the breadth of the Main Window can be made to wrap by toggling the View | Word Wrap command on; the corresponding icon is in the Text toolbar.