Generate SOAP Web Service (Java)
This topic explains how to generate a SOAP Web service with MapForce. Generating a SOAP Web service covers Steps 2-5 described in SOAP Web Service Configuration and involves the following procedures:
1.Generating code (in this example, Java) from a sample MapForce project
2.Building the code
3.Deploying the service to a server
4.Calling the Web service
For more information about each procedure, see the subsections below. The sample Web service project discussed in this topic is called getAuthor.mfp. The project was created in the topic called Create SOAP Web Service Project. This project and all the files associated with it are available in the Tutorial folder.
For simplicity, this example uses a basic Web server configuration and should not be taken as prescriptive. In a production environment, you may need to use a different approach depending on your Web server, security policies in your organization, and other factors.
To call the SOAP Web service, we use Altova XMLSpy Enterprise Edition. If you do not have XMLSpy, you will need a SOAP client to test the Web service, or, alternatively, write program code that can call the Web service. You can also test the Web service by creating a Web service call in MapForce.
Download and unpack Tomcat, Axis2, and Ant
To be able to follow the steps above, you must have the following technologies installed:
•Java SE JDK 8, 11, 17, 21 (including OpenJDK)
•Apache Tomcat (Web server that will host the service)
•Apache Axis2 (Web service engine and framework that facilitates the creation, deployment, and usage of Web services; integrated with Tomcat)
•Apache Ant (command-line tool that will be used to build code)
Download Tomcat, Axis2, and Ant, and unpack their respective packages to a local directory.
Configure Tomcat, Axis2, and Ant
After you have unpacked Tomcat, Axis 2, and Ant, you need to set the following environment variables:
•The CATALINA_HOME environment variable must be set to the location where Tomcat is installed.
•The ANT_HOME environment variable must be set to the directory where Ant is installed.
•The AXIS2_HOME environment variable must be set to the directory where Axis2 is installed.
•The JAVA_HOME environment variable must be set to the directory where Java JDK is installed.
•The PATH environment variable must include the path to %ANT_HOME%\bin.
In this example, the web service will be uploaded to Tomcat from the Axis2 administration page. To integrate Axis2 with Tomcat, follow the steps below:
1.Copy the axis2.war file from the Axis2 package to Tomcat's %CATALINA_HOME%\webapps directory.
2.Run Tomcat.
3.Check that Axis2 is running by opening the following page: http://localhost:8080/axis2.
To check that Ant is running, type ant in the command line. The message Buildfile: build.xml does not exist! means that Ant is configured and is looking for a build file. For more details about Ant configuration, see the Ant manual.
Step 1: Generate Java code
The first step is to generate Java code for the Web service project. Follow the instructions below:
1.Open the getAuthor.mfp project.
2.Right-click the project in the Project window and select Generate code in | Java. By default, MapForce puts generated code into a new folder called output that is located in the same folder as the project. If you want to change the output settings, right-click the project in the Project window and select Properties from the context window.
For more information about generating Java code, see Generating Java Code. For details about project settings, see Project Settings.
Step 2: Build code
As a result of the code generation, several new files have been created, among which is the file called build.xml. This file is used as a configuration script that defines how source code is to be built, which includes compilation, testing, packaging, deployment, and other tasks.
To build the Java code that you generated in the previous step, run Ant in the command line in the same directory as the build.xml file (screenshot below). For the scope of this tutorial, we will leave the default settings as is. However, if you want to change the output directory, see Project Settings.

As soon as the Java code has been built, an Axis Archive (.aar) file with a default name Mapping.aar is created in the output directory. A .aar archive packages all the necessary components of a Web service into a single file, which makes it easy to deploy the archive to Apache Axis2.
It is recommended to give the archive a meaningful name to distinguish it from other archives you may have uploaded or plan to upload to the server. In our example, the archive is called getAuthor.aar.
Step 3: Deploy the Web service to Tomcat
In Step 3, our task is to deploy the getAuthor.aar archive to Tomcat through the Axis2 administration page. Follow the instructions below:
1.Run Tomcat.
2.Open the Axis2 Web administration page (http://localhost:8080/axis2/axis-admin/upload) and upload the getAuthor.aar archive created in the previous step.
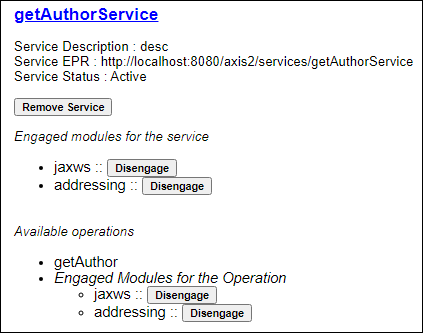
A new Web service called getAuthorService is now available and active on the Axis2 administration page (screenshot below).
Step 4: Call the Web service
The final step is to call the Web service. To call the Web service we have just deployed, we will use Altova XMLSpy Enterprise Edition.
Use previously created request file
If you have already created a sample request file (in our example, getAuthorRequest.xml described in Create Web Service Project), take the steps below:
1.Open getAuthorRequest.xml in XMLSpy. The Query element has Iceland as its value, which means we expect the server to return all the Icelandic authors and their Book records. You can experiment with the request file and set a different value of the Query element (e.g., France).
2.Click Send Request to Server in the SOAP menu.
3.Leave all the default settings in the SOAP Request Settings dialog box and click OK. XMLSpy will initiate the call, and a response message will open in a new XML file, which contains all the relevant Author records. For details about the response message, see Create SOAP Web Service Project.
Create a new request file
If you want to create a new request file in XMLSpy, follow the instructions below:
1.Run XMLSpy.
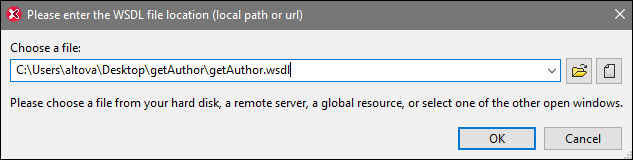
2.Go to the SOAP menu and click Create New SOAP Request. When prompted, enter the location of the WSDL file (screenshot below).
3.Click OK. When prompted to select a SOAP operation, select getAuthor and confirm the selection.
4.Set the value of the Query element to a country of interest (e.g., UK).
5.Follow Steps 2-3 described in Use Previously Created Request File above.