Inserting Columns Between Existing Ones
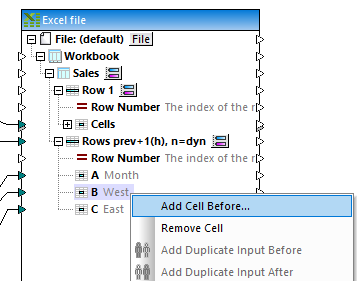
When you map data to an Excel spreadsheet, it is possible to easily add new columns in between any of the existing columns, without redoing the existing mapping connections. To do this, right-click a cell in the Excel component, and select Add Cell Before from the context menu.
Note: The Add Cell Before command is available if the cell belongs to a row range (that is, it must be child of a "Row" or "Rows" item of an Excel component). Also, the option Show separate items for columns must be enabled in the "Select Range of Cells" dialog box (see Selecting Ranges of Cells).
For example, let's suppose you have created a mapping which writes data from an XML file to an Excel spreadsheet (such as Sales_to_Excel.mfd from the folder <Documents>\Altova\MapForce2026\MapForceExamples\). This mapping outputs an Excel spreadsheet which consists of three columns (Month, West, and East), as illustrated below.
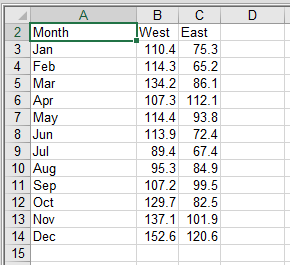
Output of mapping Sales_to_Excel.mfd
Assuming that you need to add a new column immediately before "West" (for example, "North"), this is possible without redoing any of the existing connections, as follows:
1.Right-click the cell B on the mapping, and select Add Cell Before from the context menu.
2.Optionally enter a column name (for example, "North").
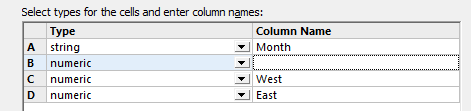
3.Click OK.
The new column ("North", in this example) has now been added to the mapping, and it is now possible to draw a mapping connection to this column. All the existing connections are not affected by the change.
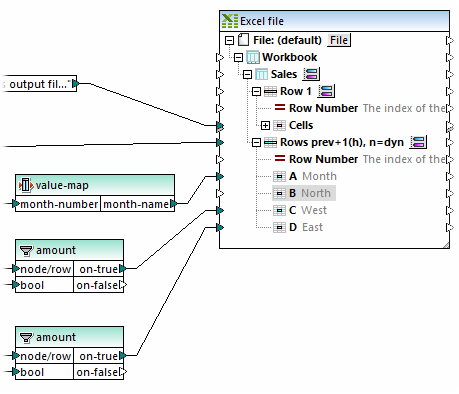
Sales_to_Excel.mfd mapping (modified)
Existing columns can also be removed in a similar fashion: right-click a cell on the mapping, and select Remove Cell from the context menu.