Define Structure and Extract Data
In this topic, the following procedures will be described:
•Using suggestions to extract table structure and data automatically
•Defining other extraction rules manually
•Saving the template
The order in which you design your template can vary and does not have to be the same as described above.
Extract table structure and data automatically
In the first step, we will extract data from the table. The simplest way to do this is to use the PDF Extractor's suggestion for the table (marked green in the screenshot below). To use the suggestion, double-click the Table? button in the top left corner of the green frame. The cells containing information about the price and tax will be processed separately.

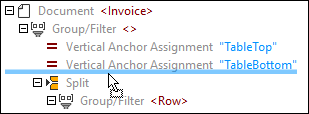
As soon as you double-click the Table? button, the following tree structure appears in the Schema pane:
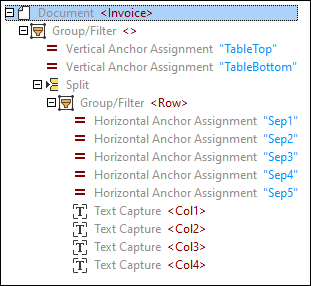
The Schema pane is a toolbox of objects that determine how data will be extracted. At this stage, the template has the following structure:
•the top-most node that represents the root (Invoice)
•the Group/Filter object that groups and filters pages of a PDF document
•two vertical assignments (Top and Bottom) that identify the locations where the table starts and ends
•the Split object that splits the table into rows
•the Group/Filter object that groups together the rows of the table
•five horizontal assignments that mark the positions of anchors separating the columns
•four text captures that refer to the names of the table columns
For more information about each object, see Template Objects.
Note about multipage documents
When your PDF document contains multiple pages, and you accept an automatic table suggestion on a particular page, you will get a Group/Filter object for this page only. If you want to include other pages of the document as well, you can configure the Group/Filter object accordingly.
Tree structure and data in the Output pane
Simultaneously with the tree structure of extraction rules in the Schema pane, the tree with the data extracted from the table appears in the Output pane (see extract of code listing below).
<Invoice>
<Row>
<Col1>Description</Col1>
<Col2>Hours</Col2>
<Col3>Rate ($/hr)</Col3>
<Col4>Amount ($)</Col4>
</Row>
<Row>
<Col1>Garden design</Col1>
<Col2>6</Col2>
<Col3>50</Col3>
<Col4>300</Col4>
</Row>
<...>
</Invoice>
To check the correspondence between the structure in the Output pane and the objects, click an element or its value in the Output pane. This highlights the corresponding instance of the object in yellow and the borders of each instance of the object in pink in the PDF View pane and marks the corresponding object in the model tree in the Schema pane (screenshots below).
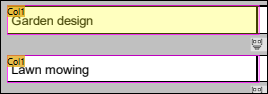
Highlighted cell in PDF View pane
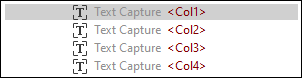
Highlighted object in Schema pane
Adjust table data
The table in this tutorial has column headers that we do not want to include in our template. To exclude the header row, take the steps below:
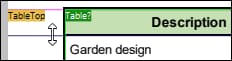
1.Click the vertical assignment TableTop in the Schema pane.
2.Click the TableTop label in the table in the PDF View pane. As soon as you do this, a double-headed arrow appears (screenshot below), which allows you to adjust the position of the TableTop line. In our example, the TableTop line has been dragged down to exclude the header row of the table, which also excludes the names of the column headers from the output.
Give rows and table columns descriptive names
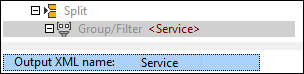
The Split object in the Schema pane contains a Group/Filter object with a default name Row. To change the name of the row, click the Group/Filter node in the tree, type Service in the Output XML name field in the Properties Pane, and press Enter. The Group/Filter node now looks as follows:
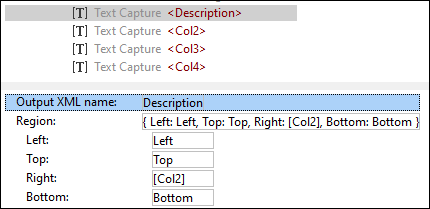
The default names of table columns are Col1, Col2, etc. To change the default names of the columns, click the text capture of interest in the Schema pane and type a new name in the Output XML name field in the Properties Pane. In this tutorial, the name of the first column is Description (screenshot below). Besides the new name of the column, you can also see the position of the region in the PDF document.
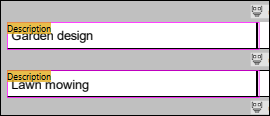
Changing an object name in the Properties Pane also changes the text label in the PDF View pane (screenshot below). Clicking an object in the Schema pane highlights its location in the PDF View pane. For example, in the screenshot below, the cells with the Description labels are highlighted in pink.
The next step is to change text captures Col2, Col3, and Col4 to Hours, Rate, and Amount, respectively.
Define other extraction rules manually
Besides extracting table data, we also want to include information about the invoice name, client, invoice number and date, price and tax, and terms and conditions. At this stage, the goal is to extract these pieces of information manually. It is assumed that information about the contractor is the same throughout all invoices issued by this company and is not relevant to the template and future mapping. Therefore, the information about the contractor will not be included in the template.
To extract PDF data manually, follow the instructions below:
1.Click the root or the Group/Filter object under the root node to be able to see the whole PDF document.
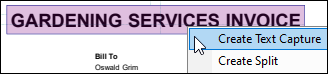
2.The first piece of information to extract is the header: Select a rectangle that contains the entire header (screenshot below).
3.Right-click the rectangle and select Create Text Capture from the context menu (screenshot below).
4.A new text capture with a default name Capture will appear in the tree in the Schema pane. By default, a new capture is placed at the bottom of the tree in the Schema pane. Since this capture corresponds to the invoice header, the capture's logical position is in the upper part of the tree. Therefore, press the new capture, drag it to the top of the tree and drop the capture before the Split object, as shown in the screenshot below.
5.Change the name of the capture: Click the capture in the Schema pane, type Header in the Output XML name field in the Properties Pane, and click Enter.
6.The next step is to extract the client details: Select a rectangle that includes all the client details (screenshot below), right-click the rectangle, and select Create Text Capture from the context menu. An alternative solution is to create separate text captures for each piece of information (e.g., ClientName, Address, etc.). For simplicity, we have decided to treat all the client details as one unit of information.
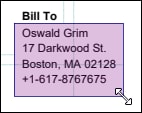
7.Give a name to the new capture (in our case, BillTo), drag it and drop it under the Header capture.
8.Repeat the steps above to create new text captures for the invoice number and date, name them InvoiceNo and Date, respectively, and place them under the BillTo capture.
9.Then create text captures for the values of the Subtotal, Sales Tax, and Total cells, and the text under Terms and Conditions, give names to these captures (Subtotal, Tax, Total, and Terms in our example), and leave them at the bottom of the tree.
10.Check whether the structure in the Output pane corresponds to your desired result.
Save template
The final step in the template design is to save it. Do it as follows:
1.Click Save or Save As in the File menu. Alternatively, click the ![]() toolbar button.
toolbar button.
2.In the Save As dialog that pops up give your new template a name and select the location where the template should be saved. In our example, the template is named GardenInvoice.pxt.
3.Click Save to confirm.
The template is now ready to be imported into MapForce. For details, see Import Template into MapForce.