General Procedures and Features
This section explains how to add a database to your mapping, select, remove, and edit database objects, handle database relationships, and configure various database settings.
Database column icons
Database tables are represented by the ![]() icon. Database columns are represented by the
icon. Database columns are represented by the ![]() icon. If there is a constraint set for the column, the column's icon will have an additional symbol. If a column has more than one constraint assigned to it, only the constraint with the highest priority is shown in the column icon. The priority of constraints is described in the table below, starting with the highest priority.
icon. If there is a constraint set for the column, the column's icon will have an additional symbol. If a column has more than one constraint assigned to it, only the constraint with the highest priority is shown in the column icon. The priority of constraints is described in the table below, starting with the highest priority.
This column is used as the table's primary key. | |
This column has a unique constraint. | |
This column has a foreign key that references the primary key of a different table. | |
This column contains XML data. | |
There is a default value set for this column. If no value is supplied to this column, the default value will be inserted instead. |
Add a database to your mapping
To be able to add a database to your mapping, you must select one of the following transformation languages: Built-In, C++, C#, or Java. SQLite databases are supported only in Built-In. If you intend to deploy the mapping to FlowForce Server, execute it with MapForce Server, or use features such as Bulk Transfer and stored procedures, you must select Built-In.
Once the desired transformation language is selected, you can add a database to the mapping in one of the following ways:
•Select Database in the Insert menu.
•Click the ![]() toolbar button.
toolbar button.
When you take any of these actions, the database connection wizard appears, guiding you through the steps required to connect to the database. For more information about how to connect to a database, see Connecting to a Data Source. Once the database connection is successfully established, you are prompted to select database objects that you would like to add to your mapping (see subsections below).
Databases can also be added to the mapping as variables. When you add a database structure as a variable, the same database connection wizard appears.
Add database objects
As soon as you have connected to the data source, you are prompted to select data objects you would like to include in your mapping. The Insert Database Objects dialog below shows the structure of the Altova.sqlite database. To include a database object in the mapping, select the check box next to it and click OK. In our example, we have included all the user tables.
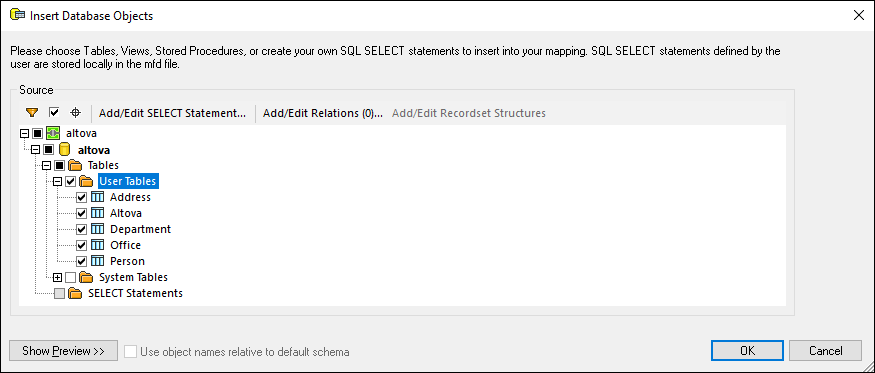
Structure of Insert Database Objects dialog
The top node ![]() in the structure indicates the database connection. The subsequent structure varies depending on the database kind. For example, Oracle and IBM DB2 databases have a schema node
in the structure indicates the database connection. The subsequent structure varies depending on the database kind. For example, Oracle and IBM DB2 databases have a schema node ![]() under the connection node, while other database types have a catalog (database)
under the connection node, while other database types have a catalog (database) ![]() node. The bold font indicates the default catalog (database) or schema, as applicable.
node. The bold font indicates the default catalog (database) or schema, as applicable.
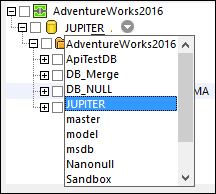
If your database user account has access to multiple databases or schemas on the server, you can switch to any of them by clicking the ![]() icon (see below).
icon (see below).
Options available in Insert Database Objects dialog
The options available in the Insert Database Objects dialog are described below.

The 
|
 (
(The
|
The
|
 (
(The Add/Edit SELECT Statement button enables you to add and edit custom SELECT statements for the current database. The data returned by such statements becomes available as a mapping source. For more information, see Custom SELECT Statements.
|
The Add/Edit Relations button enables you to define local primary and foreign key relationships between fields in the database, in addition to those that may already exist in the database. For more information, see Local Relationships.
|
The Add/Edit Recordset Structures button applies to databases that support stored procedures. The button is enabled only if a stored procedure is currently selected in the database tree.
|
The Show Preview button enables you to quickly preview the data of the currently selected table or view. Note that you can also browse and query a database independently of the mapping process, by using the Database Browser. For more information, see Query Databases.
|
In MapForce, making database objects names relative to a schema is important if you plan to switch to a different database later. This is also useful if the database schema has been renamed on the server, and you need to update the mapping accordingly. If the new schema has the same structure as the one used at mapping design time, you can switch to it without having to change the mapping connections manually.
Note the following:
•Using object names relative to a default schema is possible for only databases that support schemas: IBM DB2, IBM Informix, IBM Db2 for i (iSeries), Oracle, PostgreSQL, Progress OpenEdge, SQL Server and Sybase. •It is not possible to use relative names if the database component includes local relationships or SELECT Statements as Virtual Tables. •The Use object names relative to default schema check box affects the generated C#, C++, and Java program code. When this check box is selected, all the database references also become relative in the generated code.
To make database objects names relative to the default schema, take the following steps:
1.Open the Insert Database Objects dialog or right-click the title bar of the existing database component and select Add/Remove/Edit Database Objects from the context menu. 2.Select one or more objects that belong to the default schema or to the default catalog (database) and schema. The default database and schema are shown in bold. In the example below, the default catalog is Sandbox, and the default schema is user. This structure is specific for SQL Server databases and may vary in other database types. 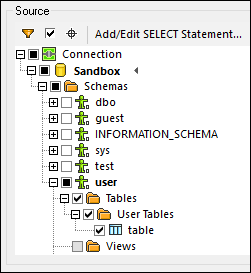 3.Select the Use object names relative to default schema check box. Note that this check box is grayed out if the database does not support relative object names.
If the objects that you need in the mapping are in a different schema (not the default one), you have the following alternatives:
•You can connect as another database user that has access to the required default schema. •If you have the required privileges, you can reconfigure the database server so as to change the default schema of the existing database user.
The example below shows how to change the default schema of a database user. The example is based on SQL Server and assumes that the Sandbox catalog and both the user and the schema already exist.
Switch to a DB/schema without losing mapping connectionsWhen database objects names are relative to a schema, you can switch to a new database or schema without losing mapping connections. The following options are available:
•Open the database component settings and click Change. Follow the wizard steps to connect to the new database as a new user. If the new database has the same structure, all the connections in the mapping will be updated automatically. This means that these connections will now match the default catalog and schema of the new database user. •If you need to switch to a new database on a regular basis, it is recommended to define the database connection as a Global Resource. For example, the Global Resource could have two configurations: a default configuration for the development database and a production configuration.
If database objects appear in red after switching, this indicates that they do not exist in the new database schema.
|
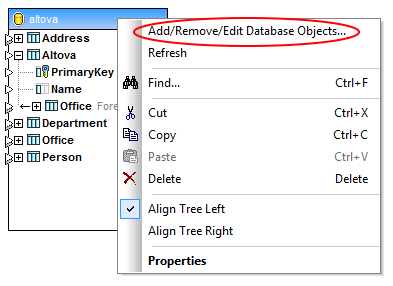
Edit database objects
To change database objects, right-click the database component and select Add/Remove/Edit Database Objects from the context menu (see below). This opens the Add/Remove/Edit Database Objects dialog, which allows you to define the same settings and properties as in the Insert Database Objects dialog.
SQL auto-completion suggestions
When you type SQL statements in certain contexts, MapForce may suggest text entries automatically. Auto-completion is available in the SQL Editor (see DB Query Pane), the Custom SQL text box in the Database Table Actions dialog box, and the Add SELECT Statement dialog box.
To disable auto-completion suggestions, take the following steps:
1.Select the Tools | Options menu item or press Ctrl+Alt+O.
2.Open the Database | SQL Editor section.
3.Clear the Automatically open check box in the Entry Helpers section.
To invoke auto-completion suggestions manually, press Ctrl+Space.
To find out more about other database-related settings, see Database.