Change Message Structure
In each <Message>.Config file, the structure of a Message element is determined by the XML schema of the EDI standard that you are customizing. For details, see EDI Configuration Schemas. To change the structure of the message, you will need to consult both the documentation of your custom EDI standard and the XML schema. This topic explains how to add segments, data elements, and composites, create groups and loops, specify the type and length of data elements, and specify mandatory/optional elements.
Add segments, data elements, and composites
To add data elements, segments, composites, and subcomposites, create <Data>, <Segment>, <Composite>, and <SubComposite> elements as follows:
•The .Segment file must contain the list of all globally-defined segments and data elements.
•The .Config file corresponding to each message type must contain the actual structure of that message (the hierarchy of segments, composites, and data elements).
The .Segment file makes it possible to define a data element once and reuse this element in multiple messages in .Config files.
Example 1: Add data elements
The code listing below shows how the F100 data element is defined in the X12.Segment file of the HIPAA.X12 collection:
<Data name="F100" type="string" maxLength="3" minLength="3" info="Currency Code" />
The code listing below shows how the CUR segment of the Health Care: Professional (837-Q1) transaction references the F100 data element:
<Include href="X12.Segment" />
<...>
<Segment name="CUR" minOccurs="0" info="Foreign Currency Information">
<Data ref="F100" info="Currency Code" />
</Segment>
The extract above also has a reference to the external X12.Segment file (<Include href="X12.Segment" />) in which the F100 data element was defined.
Example 2: Add segments
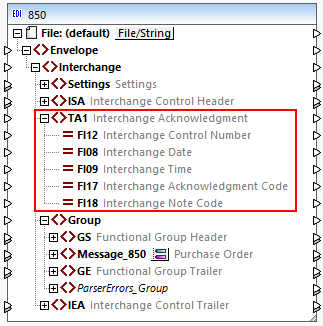
This subsection shows how to add an optional segment TA1. This segment is used in X12 and HIPAA documents to acknowledge the reception of an interchange and check the syntactical correctness of the envelope segments. To include the TA1 segment in an EDI component, follow the instructions below.
1.Create a custom EDI collection using the X12 collection as a model. This ensures that your changes do not affect the original default configuration.
2.Open Envelope.Config of your custom EDI collection in an XML editor.
3.Add <Segment ref="TA1" minOccurs="0" maxOccurs="unbounded"/> as shown below:
<?xml version="1.0" encoding="UTF-8"?>
<Config xmlns:xsi="http://www.w3.org/2001/XMLSchema-instance" xsi:noNamespaceSchemaLocation="../EDIConfig.xsd" Version="3">
<Meta>
<Release>6020</Release>
<Agency>X12</Agency>
</Meta>
<Format standard="X12"/>
<Include href="X12.Segment"/>
<Include href="X12.Codelist"/>
<Include collection="EDI.Collection"/>
<Group name="Envelope">
<Group name="Interchange" maxOccurs="unbounded">
<Segment ref="ISA" minOccurs="0"/>
<Segment ref="TA1" minOccurs="0" maxOccurs="unbounded"/>
<Group name="Group" maxOccurs="unbounded">
...
</Group>
<Segment ref="IEA" minOccurs="0"/>
</Group>
</Group>
</Config>
4.Save the file.
The line highlighted above adds a reference to the TA1 segment defined in X12.Segment. You can now view the structure of the TA1 segment in MapForce as follows: Insert an EDI component, select your custom collection and a relevant message type. In our example, we have selected Message 850. The TA1 segment is now included in the 850 component (red rectangle below).
Create groups and loops
When you create or change EDI structures, it is often required to create a group of segments or data elements. A message in an EDI component is also considered a group, since it groups multiple segments this message consists of. Groups can have child groups. Groups can be repeated multiple times, in which case they become loops. Groups and loops can be created by adding a <Group> element. Use the maxOccurs attribute to set the maximum number of occurrences of a loop. For example, the following code listing shows a loop that can occur up to 25 times, is optional, and consists of two segments:
<Group name="LoopSAC" maxOccurs="25" minOccurs="0">
<Segment ref="SAC"/>
<Segment ref="CUR" minOccurs="0"/>
</Group>
Specify type and length of data elements
Use the type attribute of a data element to specify its data type. The possible data types are generally any of XML Schema types that are used in the default configuration files. The following simple types are not supported: anyType, ENTITIES and QName.
Use the minLength and maxLength attributes of a data element to specify its minimum and maximum length.
Specify mandatory/optional data elements
For mandatory data elements, the default value of the minOccurs attribute is 1. To specify that a data element is optional, set the minOccurs attribute to 0. For example, the code listing below shows two mandatory data elements (F1331 and F1332) and one optional data element (F1325). The absence of the minOccurs attributes from the first two data elements indicates that F1331 and F1332 take the default value equal to 1.
<Composite name="C023" info="Health Care Service Location Information">
<Data ref="F1331"/>
<Data ref="F1332"/>
<Data ref="F1325" minOccurs="0"/>
</Composite>