Add a NoSQL Database
To be able to work with NoSQL databases in MapForce, you will need to add a NoSQL database as a mapping component and assign a schema to it. Follow the instructions below.
Add a NoSQL database to your mapping
For NoSQL databases, MapForce supports only Built-In as the transformation language. The instructions below explain how to add collections from a MongoDB database to a mapping. Our sample database is called doc.
1.In the first step, we need to select a source database (MongoDB in our case). Go to the Insert menu and click Database. Alternatively, click the toolbar button  (Insert Database).
2.Select MongoDB in the Connection Wizard and click Next.
3.The Select a Database dialog box asks you to provide the following parameters: Host, Port, Database, Username, and Password. Enter the required parameters and click Connect. Depending on the database type, connection details will vary. For more information, see MongoDB Connection, CouchDB Connection, and CosmosDB Connection.
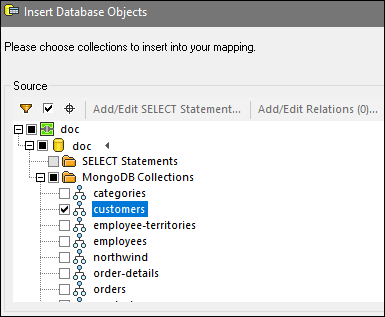
4.The dialog box Insert Database Objects will open and ask you to select collections you would like to use in your mapping (see screenshot below). Check the relevant boxes and click OK.
5.Now your NoSQL database component contains a collection called customers (see screenshot below).
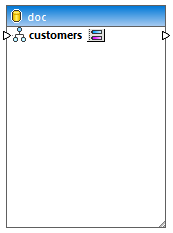
The next step will be to assign a JSON schema to define the structure of your collection.
Note: When you connect to a MongoDB cluster, you may need to contact your IT department to get firewall access to the IP addresses of your cluster and port.
Assign JSON schema
After selecting the relevant documents from the doc collection, we must assign a JSON schema to the NoSQL component. Follow the instructions below:
1.Click the ![]() button (Assign JSON Schema) located to the right of the collection name (customers). This opens the dialog box Assign JSON Schema to Collection (see screenshot below).
button (Assign JSON Schema) located to the right of the collection name (customers). This opens the dialog box Assign JSON Schema to Collection (see screenshot below).
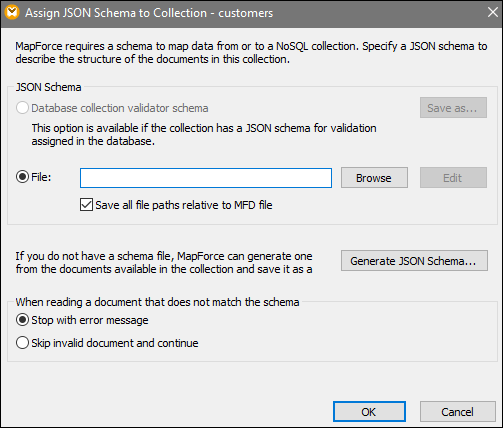
2.To assign a JSON schema, you can choose one of the three options: (i) choosing a schema assigned in your database; (ii) browsing for the existing JSON schema on your local machine; (iii) having MapForce generate a new schema file.
i.If you choose the first option, you will also be able to export the JSON schema from the database (click Save as).
ii.If you already have a JSON schema for your source file, click Browse and search for the relevant schema. When you choose to upload your schema file, the Edit button is enabled. When you click this button, your schema file will be opened in Altova XMLSpy if it is installed on your machine.
iii.If you do not have a schema, MapForce can generate it for you. In this case, click Generate JSON Schema.
You must also specify whether document processing will stop or continue if there are documents that do not match the schema (see the last section of the dialog box above). Note that both of these options apply at mapping runtime.
3.If you click Generate JSON Schema, the dialog box Generate JSON Schema will open. Leave the FILTER and SORT text boxes empty if you do not want to specify any filtering and sorting criteria. Then click OK. Note that you can also specify the number of documents the parser needs to analyze. The SKIP option tells the parser to skip the first N documents in the collection. The LIMIT option instructs the parser to analyze only the first N documents in the collection. The schema of the database component will then be based on the structure of the documents specified by the combination of these criteria. For more information about FILTER and SORT, see the subsection below.
4.When you click OK, you will need to give your schema file a name and select a folder for the schema. After you have done this, click OK again.
Now your database component has a tree structure and is ready for mapping.
FILTER and SORT
Without any query options in the FILTER and SORT text boxes (the Generate JSON Schema dialog box), MapForce will read all the documents in the collection to generate a schema. However, collections may contain thousands of documents, which could lead to a considerable processing time. In this case, the best strategy would be to select a subset of documents that cover all structure variants that you want to process in your mapping. In this context, the term structure variants specifies which properties exist in the document and which types these properties may have.
It is unlikely that documents with completely different structures will be stored in the same collection, but there may be many additional fields which only occur in some documents. The following scenarios are possible:
•If the filter selects only documents that do not have a field present in some other documents, the schema will not contain that field. If such a field is encountered later at runtime in a document, a validation error will occur or there will be no node to map to in the target component.
•If all sampled documents do contain a specific property, this property will be marked as required in the schema, and a document (which may have been added later to this collection) without this property will be invalid against the schema.
In practice, a schema generated from a limited sample of documents may be incomplete and require manual modifications: e.g., to allow additional properties, to make some properties optional, or to allow additional data types for some properties.
FILTER example
In the subsection Add a NoSQL database, we created a NoSQL database component that contains a document called customers. Now we would like MapForce to take the filtering criteria into consideration while generating a new schema. In our customers collection, there are documents of two types (see below).
doc.customers1
"CustomerID": "ALFKI",
"CompanyName": "Alfreds Futterkiste",
"ContactName": "Maria Anders",
"ContactTitle": "Sales Representative",
"Address": "Obere Str. 57",
"City": "Berlin",
"Region": "NULL",
"PostalCode": "12209",
"Country": "Germany",
"Phone": "030-0074321",
"Fax": "030-0076545"
doc.customers2
"0": "BOTTM",
"1": "Bottom-Dollar Markets",
"2": "Elizabeth Lincoln",
"3": "Accounting Manager",
"4": "23 Tsawassen Blvd.",
"5": "Tsawassen",
"6": "BC",
"7": "T2F 8M4",
"8": "Canada",
"9": "(604) 555-4729",
"10": "(604) 555-3745"
Now we want our schema file to be based on the structure with the name fields (doc.customers1). The screenshot below illustrates our filtering criterion that runs as follows: Select only those documents in which the CustomerID field exists (see screenshot below). The parser will run through the list of all the documents in the collection and choose only those that satisfy this criterion. To find out more about syntax for querying documents in a collection, see the MongoDB documentation.

After filtering your data, you could also choose to sort it, for example, based on the City field. You could then specify how many documents from the sorted sample to skip (SKIP) and/or to take into account (LIMIT) for your schema generation.
Important
When you choose to filter and/or sort your data, a subset of your documents like the one in doc.customers2 will not conform to the generated schema, which will cause validation errors. To avoid these errors, select Skip invalid documents and continue in the dialog box Assign JSON Schema to Collection (see screenshot above). |