DB Table Actions: Settings
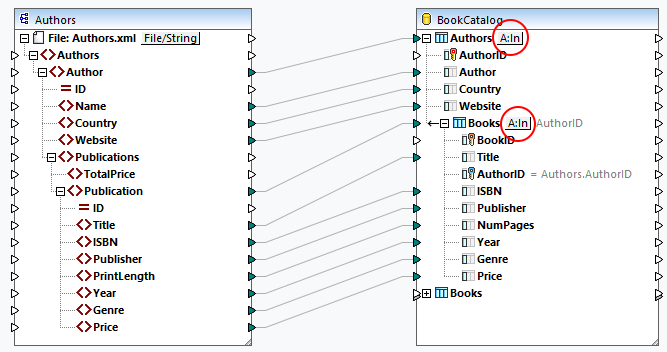
When you map data to a database table, this table will have the Database Actions button next to it. The screenshot below shows that we map XML data to two database tables, and each table has its own Database Actions button (circled red below).
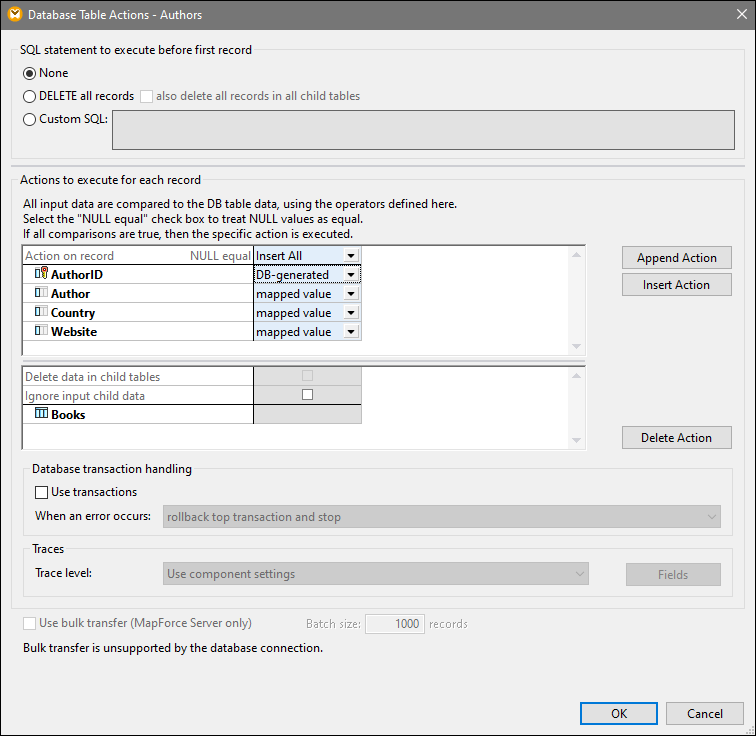
Clicking the Database Actions button opens the Database Table Actions dialog box (see below), in which you can configure various settings, actions and options. The Database Table Actions dialog comprises five parts:
1.Actions to be performed before any actions defined for each record
2.Actions defined for each record
3.Database transaction settings
4.Tracing and error logging settings
5.Bulk transfer settings
To find out more about each part of the dialog, see the subsections below.
SQL statement to execute before first record
In this section, you can define SQL statements that will be executed before any actions defined in the Actions to execute for each record section. The following options are available:
•The None option means that no action will be performed. This is the default setting.
•The DELETE all records option will delete all records from the selected table. Additionally, you can choose to delete all records in all child tables (the also delete all records in all child tables check box).
•The Custom SQL setting enables you to write a custom SQL statement that will affect the whole table. For example, you can add a statement that will supply tracking information about a mapping. Note that support for multiple SQL statements in one query depends on the database, connection method, and the driver used.
For more information about these actions, see DB Table Actions: Scenarios.
Actions to execute for each record
The Actions to execute for each record section allows you to define database actions that will be performed for each record in your database. To manage table actions, click the Append Action, Insert Action, or Delete Action buttons. Multiple actions can be defined if necessary. Any table actions defined after the first Insert All or Insert Rest action will never be executed, because the subsequent conditions cannot be satisfied. If you have added a table action after the Insert All or Insert Rest action, a dialog box will inform you that the subsequent table action will be deleted.
For each action, all input data is compared to the database data. If all the comparisons are true, a specific action will be performed. The defined table actions are processed from left to right. For example, if you have defined an Update If condition and then an Insert Rest condition, the Update If action will be processed first. If the Update If condition is not satisfied, then the Insert Rest action will be performed. If neither condition is satisfied, no action will take place.
Mapped value/DB-generated/max() + 1
When you set up the Insert All or Insert Rest action, you can decide how values are to be generated. The following options are available: mapped value, DB-generated, and max() + 1. The mapped value option means that source data will be mapped to the database field directly. The mapped value option is the standard setting for most database fields.
When autoincrement is set for the primary key(s) in your database, you can choose between a mapped value and a DB-generated value. When there is no autoincrement, you can choose between a mapped value and the max() + 1 option. The max() + 1 option generates numeric values based on the existing values in the database. For example, if a table has three records with primary keys 1, 2, and 3, then the primary key of a new record will be 4.
NULL equal
When you select the NULL equal check box next to a record (screenshot below), null values in the source record and null values in the target record will be considered equal. Not selecting this check box may lead to incorrect results. You can use the NULL equal check box if all of the following conditions are true:
•The field for which you want to enable the NULL equal option is nullable. This means that this field has been configured in such a way that it can accept NULL values.
•One or more of the following actions have been configured: Ignore If, Update If, or Delete If.
•One or more table actions (e.g., Ignore If) have at least one equal or equal (ignore case) condition (see Author field in screenshot below).
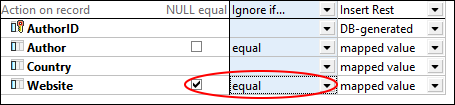
The image above shows that two actions have been set up for the Authors table: Ignore If and Insert Rest. The Ignore If condition will compare the Author and Website values in the source with the Author and Website values in the database. If these values are the same, these records will be ignored in the database, and the records from the source that have no counterparts in the database will simply be inserted into the database.
The NULL equal option has been enabled for the Website column. For example, one of Author records has a null value in the Website field in the source and target. With the NULL equal option enabled, this Author record will be ignored and will not be inserted into the database. However, if the NULL equal check box is not selected, the record will no longer satisfy the Ignore If condition and will be inserted into the database.
Child tables
If a foreign-key relationship exists in your database, you will be able to see the names of child tables in the Database Table Actions dialog (Books in Database Table Actions dialog above). The following options will become available:
•Delete data in child tables: This option may be particularly meaningful when you set up, for example, the Update If action for a parent table and the Insert All action for its child table. The Update If condition will update only those parent records that exist both in the source and the database. The Update If condition will prevent you from getting duplicate records in the parent table.
The Delete data in child tables option will delete only those Book records whose parent records (Authors) satisfy the Update If condition (i.e., exist in the source and the database). Deleting child records will prevent you from getting duplicate or orphaned data in the child table. The Insert All action defined for the child table will insert only those source child records whose parent records satisfy the Update If condition.
•Ignore input child data: This option is useful when you want to update only a parent table and leave all its child records unchanged.
Database transaction handling
The Database transaction handling section enables you to roll back an operation or sequence of operations (transaction) in case of a database-related error (e.g., NULL values inserted into non-NULL columns). To enable transactions at table-action level, select the Use transactions check box in the Database Table Actions dialog box (screenshot below).

The following transaction-handling options are available:
•Rollback top transaction and stop: Since transaction handling can be configured at different levels of the database hierarchy, the top transaction can refer to (i) the transaction at database-component level if you have enabled transactions at that level or (ii) to the transaction defined in the topmost table. The changes made to the database will be rolled back for each level of the hierarchy up to the topmost level, and then execution will stop.
•Rollback top transaction and continue: Same as above, but the mapping continues to run after the rollback (e.g., to process another target component if such a component exists).
•Rollback current transaction and stop: When a database-related error occurs, only the changes enclosed in the current transaction will be rolled back, and the processing of subsequent records will stop. The changes made previously outside of the current transaction will be committed.
•Rollback current transaction and continue: Same as above, but the mapping continues to run after the rollback.
For more information about various transaction-handling scenarios, see Transaction Rollback: Scenarios.
Traces
When a mapping writes data to a database, you can enable database tracing and error logging. Tracing is useful if you want to track all the changes made to the database during the execution of the mapping. The changes made to the database are logged in a trace report. If there are errors during the execution, these errors will also be logged.
For more information about the structure of a trace report, see Trace File. For an example that has tracing enabled, see Scenario 1 in Transaction Rollback: Scenarios.
To enable tracing at table level, take the steps below:
1.Make sure that the tracing level at database-component level is set to Always or Error.
2.Click the Table Action button next to the table for which you want to enable tracing.
3.Select one of the following trace levels in the Traces section of the Database Table Actions (screenshot below): (i) the Always disabled option means that no tracing will occur for this table; (ii) the Limit to errors option restricts tracing only to error events; (iii) the Use component settings option inherits the settings that were defined at component level.

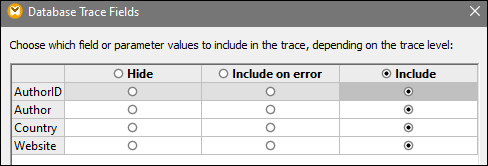
Tracing at database field level
When you enable tracing at database-component level and table level, all the fields (database columns) are included in the tracing report by default (screenshot below). If you want the trace report to include tracing information only about specific database fields, click the Fields button in the Database Table Actions dialog box. You can choose to hide fields, include them in any case or include them only in case of an error.
Use bulk transfer
The Use bulk transfer option means that multiple INSERT statements are executed as one query. Using this option dramatically speeds up the Insert process, because only one statement needs to be executed instead of many. The Use bulk transfer option is configured in MapForce, but the actual bulk transfer of data occurs when the mapping is run by MapForce Server.
Prerequisites
The bulk transfer option is supported when the following conditions are true:
•The mapping transformation language is set to Built-In.
•The mapping is run by MapForce Server (standalone or under FlowForce Server management).
•The MapForce Server license is not limited to single-thread execution on a multi-core machine. This means that the Limit to single thread execution option in the Server Management tab of Altova LicenseServer must be disabled.
•The Insert All action is set for the relevant database table.
•The table into which you want to bulk-insert data must not have any related tables, views, or stored procedures referencing the table in the mapping.
•The database driver supports bulk-insert operation in WHERE conditions.
Support for the bulk-insert operation depends on the database type and the driver used (table below).
DB Type | ADO | ODBC | JDBC | ADO.NET | Native |
|---|---|---|---|---|---|
Access | No | No | n/a | n/a | n/a |
DB2 | No | Yes | Yes | Yes | n/a |
Firebird | n/a | Yes | Yes | No | n/a |
Informix | No | Yes | Yes | Yes | n/a |
iSeries | No | Yes | Yes | Yes | n/a |
MariaDB | No | Yes | Yes | No | n/a |
MySQL | n/a | Yes (MySQL Version 5 or later is required) | Yes | No | n/a |
Oracle | No | Yes | Yes | Yes | n/a |
PostgreSQL | n/a | Yes | Yes | n/a | Yes |
Progress | n/a | Yes | Yes | n/a | n/a |
SQL Server | Yes | Yes | Yes | Yes | n/a |
SQLite | n/a | n/a | n/a | n/a | No |
Sybase | No | Yes | Yes | n/a | n/a |
Teradata | n/a | Yes | Yes | n/a | n/a |
Note: To enable bulk-insert support for MySQL and MariaDB via JDBC, use the rewriteBatchedStatements=true connection option.
Sample DB
To test the bulk-insert operation, you can use SQL Server and the AdventureWorks database. When you load this database into your mapping and open the Database Table Actions dialog, you will be able to specify the batch size (1000 records in our example). The batch size defines the number of records that will be inserted at a time. It is important to note that the Use bulk transfer option and the Use transactions option are mutually exclusive: When one of these options is enabled, the other option becomes inactive.

Next step
Now that the bulk-insert option is enabled, the next step is to execute the mapping in MapForce Server (standalone or under FlowForce Server management).