Decision Tables
A decision table is a set of rules that evaluate one or more input conditions and provide the corresponding output value(s). A decision table has the following characteristics:
•Each row in a decision table represents a rule.
•Each rule consists of conditions (inputs) and actions (outputs).
•If all the input conditions of a rule are true, the corresponding action will be performed if it satisfies the hit policy.
•For each decision table, there is a hit policy that defines which rule(s) are implemented and which outputs are generated. For details, see Hit Policy below.
Decision tables are commonly used in process automation and decision management systems to:
•Simplify complex decision logic by breaking it into manageable rules
•Ensure consistency across different scenarios by using a centralized rule set
•Enable non-technical users to define and manage logic without coding
How to add a Decision Table to a mapping
To add a Decision Table component to a mapping, take one of the steps below:
•Click the menu item Insert | Decision Table.
•Click the  toolbar command.
•Select the Decision Table component in the Processing tab of the Component Gallery (can be accessed via the  toolbar command).
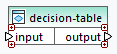
After you have taken one of the steps above, the Decision Table component appears in the mapping (screenshot below).
Structure of a Decision Table
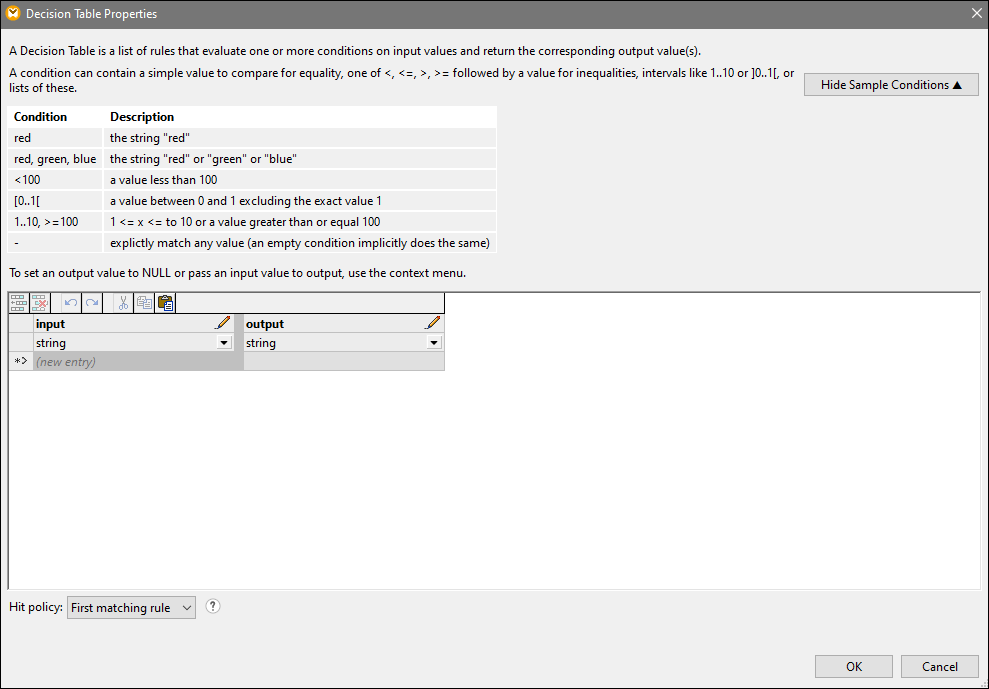
Double-clicking a Decision Table's header opens this component's properties (screenshot below). The dialog is organized as follows:
•The first half of the Decision Table Properties dialog describes the syntax and provides examples of various conditions (the Show/Hide Sample Conditions button).
•The second half of the dialog enables you to configure input and output values that will constitute the rules.
Define inputs/outputs
By default, there is one input column and one output column. To add more inputs and/or outputs:
1.Return to the Decision Table component and click the relevant (  ) icon.
2.Edit the newly created input/output as needed in the Decision Table Properties dialog.
For each input and output, set an appropriate data type, which you can do via the dropdown list of an input/output (screenshot below). You can also rename any column by clicking the pen icon or by double-clicking the relevant column header. To add or edit a value, double-click the relevant cell and enter the value.
Context menu of output cells
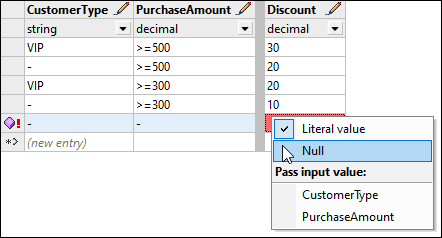
Right-clicking a cell in the output column (Discount in our case) opens the cell's context menu (screenshot below). This menu enables you to:
•Enter a fixed value in an output cell (Literal value)
•Set an output value to null
•Pass values from existing input columns if the data types are compatible
Buttons for managing table data
The buttons shown in the table below enable you to manage table data.
Button | Description |
|---|---|
Inserts a row above the selected row. | |
Deletes the selected row permanently. | |
 | Reverses the previous action. |
 | Restores the last undone action. |
Deletes the selected row and copies it to the clipboard. | |
Copies the selected cell(s) to the clipboard. | |
Pastes the copied table from the clipboard. |
Hit policy
Hit policy determines how to handle inputs that match multiple rules and specifies which outputs to return.
First matching rule
The first-matching-rule policy means the following:
•The Decision Table evaluates rules from top to bottom.
•Only the first matching rule is executed.
•All subsequent matching rules are ignored.
This policy is useful when rules are mutually exclusive or when priority matters.
All matching rules
The all-matching-rules policy works as follows:
•The Decision Table evaluates all rules.
•Every matching rule is executed, and the outputs are returned as a sequence.
This policy is useful when multiple rules should apply simultaneously.
Example
A bank wants to decide what benefits to give a loan applicant based on two conditions:
•Credit score
•Income level
The rules are as follows:
Credit Score | Income Level | Action |
|---|---|---|
≥ 750 | ≥ 50,000 | Lower interest rate |
≥ 700 | ≥ 40,000 | Higher loan limit |
≥ 650 | ≥ 30,000 | Cash bonus |
For example, a customer has a credit score of 760 and income of 60,000.
First-matching rule
•The rules are evaluated from top to bottom.
•Only Rule 1 applies: Lower interest rate.
All-matching rules
•All rules that match the conditions apply.
•The customer details match all the rules.
•The output includes the following sequence: Lower interest rate, higher loan limit, cash bonus.
Use-case scenario: Customer discount rules
The example described in this subsection shows how a retail company applies discounts based on customer type and purchase amounts.
Mapping
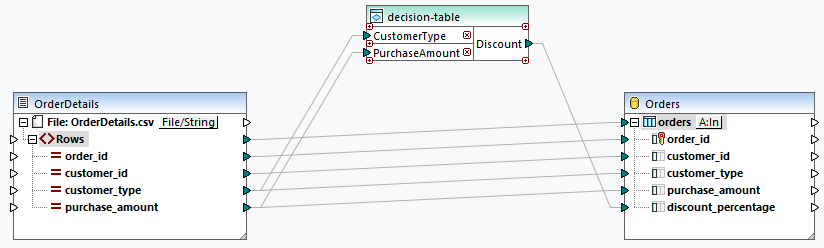
We have created the mapping below to showcase the usage of the Decision Table component.
Source
The source component is a CSV file that contains a list of order details:
order_id,customer_id,customer_type,purchase_amount ORD-1001,CUST-501,VIP,600.00 ORD-1002,CUST-502,Regular,450.00 ORD-1003,CUST-503,New Customer,250.00 ORD-1004,CUST-504,VIP,180.00 ORD-1005,CUST-505,Regular,520.00 ORD-1006,CUST-506,New Customer,150.00 |
Decision Table
The Decision Table applies discount rules based on customer_type and purchase_amount. The screenshot below demonstrates how the discount rules have been defined in the Decision Table. The hit policy is set to First Matching Rule. The "-" sign represents any value.
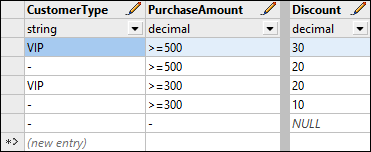
The rules are evaluated as follows:
•If the purchase amount of a VIP customer is 500 or more, this customer receives a 30% discount.
•If the purchase amount of any customer is 500 or more, this customer receives a 20% discount.
•If the purchase amount of a VIP customer is 300 or more, this customer receives a 20% discount.
•If the purchase amount of any customer is 300 or more, this customer receives a 10% discount.
•If none of the rules above apply, the null value is output.
Target
The target component is an SQLite database named Orders that stores information about customer orders. Each row represents a single order and contains the order identifier, the customer, the type of customer, the purchase amount, and the applicable discount. The discount_percentage field is nullable, stores the discount calculated by the Decision Table, and represents the percentage of the purchase amount to be deducted for the order.
Output
After running the mapping and writing the data to the database, we get the following output:
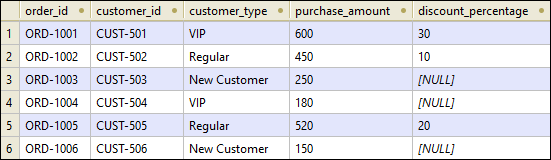
Since the orders 1003, 1004, and 1006 do not meet any input conditions in the Decision Table, the discount_percentage values for these orders have been set to null.