Integration at Application Level
Integration at application level allows you to embed the complete interface of MapForce into a window of your application. With this type of integration, you get the whole user interface of MapForce, including all menus, toolbars, the status bar, document windows, and helper windows. Customization of the application's user interface is restricted to what MapForce provides. This includes rearrangement and resizing of helper windows and customization of menus and toolbars.
The only ActiveX control you need to integrate is MapForceControl. Do not instantiate or access MapForceControlDocument or MapForceControlPlaceHolder ActiveX controls when integrating at application-level.
If you have any initialization to do or if you want to automate some behaviour of MapForce, use the properties, methods, and events described for MapForceControl. Consider using MapForceControl.Application for more complex access to MapForce functionality.
In C# or VB.NET with Visual Studio, the steps to create a basic, one-form application which integrates the MapForce ActiveX controls at application level are as follows:
1.Check that all prerequisites are met (see Prerequisites).
2.Create a new Visual Studio Windows Forms project with a new empty form.
3.If you have not done that already, add the ActiveX controls to the toolbox (see Adding the ActiveX Controls to the Toolbox).
4.Drag the MapForceControl from the toolbox onto your new form.
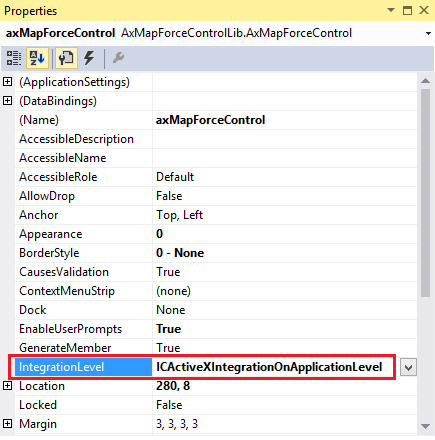
5.Select the MapForceControl on the form, and, in the Properties window, set the IntegrationLevel property to ICActiveXIntegrationOnApplicationLevel.
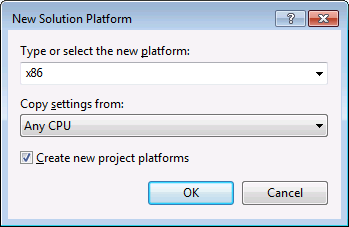
6.Create a build platform configuration that matches the platform under which you want to build (x86, x64). Here is how you can create the build configuration:
a.Right-click the solution in Visual Studio, and select Configuration Manager.
b.Under Active solution platform, select New... and then select the x86 or x64 configuration (in this example, x86).
You are now ready to build and run the solution in Visual Studio. Remember to build using the configuration that matches your target platform (x86, x64).