Example: Join Tables in SQL Mode
This example illustrates how to join data from two database tables, using a MapForce join component. The join operation is performed in SQL mode, as described in Joins in SQL Mode. Note that joining three or more tables works in a very similar way, see also Example: Create CSV Report from Multiple Tables.
The example is accompanied by a mapping sample which is available at the following path: <Documents>\Altova\MapForce2026\MapForceExamples\Tutorial\JoinDatabaseTables.mfd.
JoinDatabaseTables.mfd
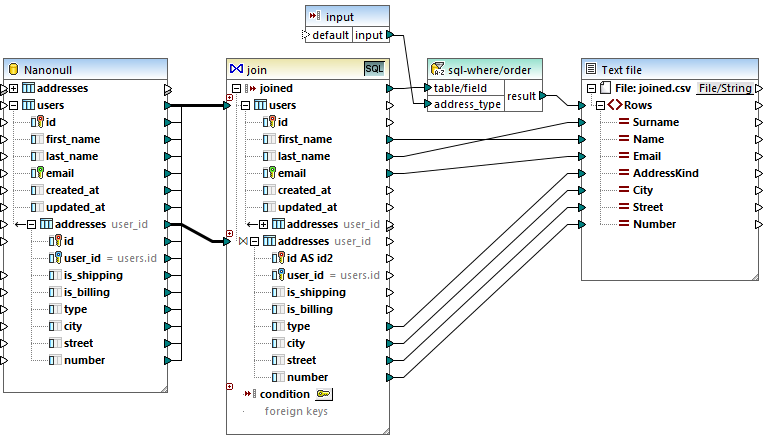
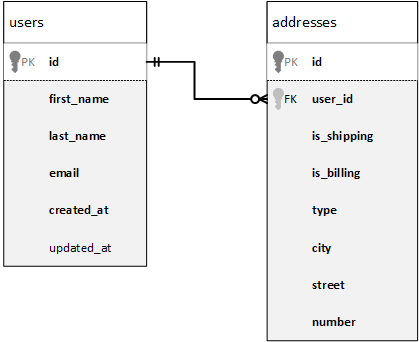
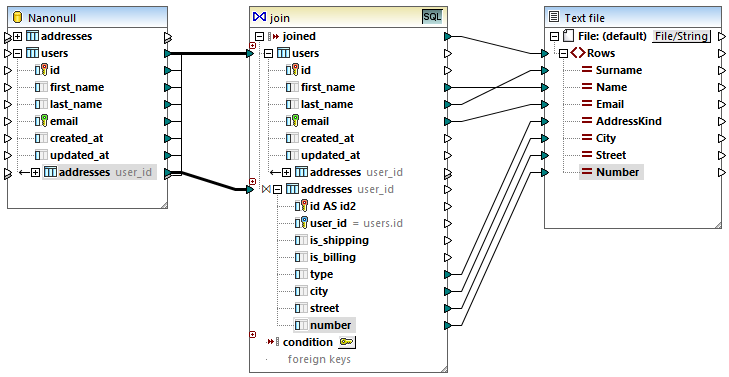
The purpose of the mapping above is to combine data from two source database tables into a single target CSV file. As illustrated in the database diagram below, the first table (users) stores people's names and emails, and the second table (addresses) stores people's addresses. The two tables are linked by a common field (id in users corresponds to user_id in addresses). In database terminology, this kind of relation is also known as a "foreign key relationship".
For convenience, the image below illustrates the actual data in both tables.
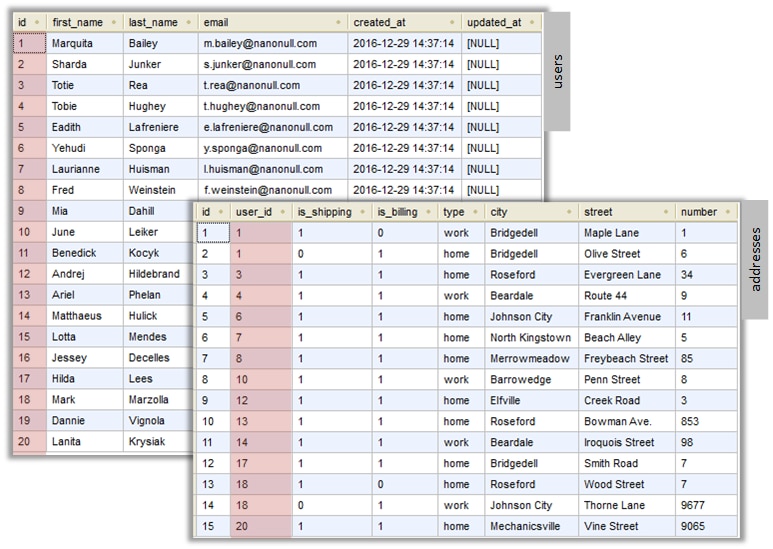
Each user record in the users table can have zero or more addresses in the addresses table. For example, a user may have one address of type "home", or two addresses (one of type "home" and another of type "work"), or no address at all.
The goal of the mapping is to retrieve full data (name, surname, email, city, street, number) of all users that have at least one address in the addresses table. It should also be possible to easily retrieve only addresses of a specific kind (for example, only home addresses, or only work addresses). The kind of addresses to retrieve ("home" or "work") should be supplied as a parameter to the mapping. The retrieved people records must be sorted alphabetically by last name.
The mapping requirement will be accomplished with the help of a Join component, as illustrated in the steps below.
Note: Using a Join component is not the only way to join database tables or views. Joins applicable to databases can also be performed by using SQL SELECT statements, see SQL SELECT Statements as Virtual Tables. A major difference between SQL SELECT statements and Join components is that the former are written by hand so they might provide more flexibility. Join components are a simpler alternative if you do not feel comfortable writing SQL statements by hand.
Step 1: Add the source database
1.On the Insert menu, click Database. (Alternatively, click the Insert Database  toolbar button).
2.Select "SQLite" as database kind, and click Next.
3.Browse for the Nanonull.sqlite file available in the folder: <Documents>\Altova\MapForce2026\MapForceExamples\Tutorial\, and click Connect.
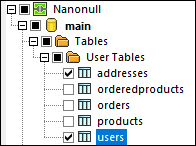
4.When prompted, select the addresses and users tables.
Step 2: Add the join component
1.On the Insert menu, click Join. (Alternatively, click the Join  toolbar button).
2.Draw a connection from the users table to the first input of the join component.
3.Expand the users table and draw a connection from the addresses table (child of users) to the second input of join component. The  button enables you to add more tables if necessary; however, in this example, only two tables are being joined.
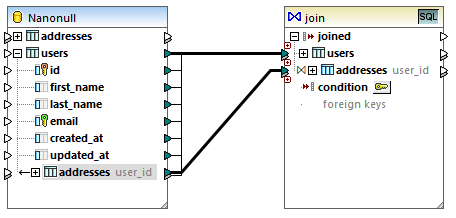
Note: It is also possible to add the connection directly from the addresses table (the one which is not child of users); however, in this case, the join conditions would have to be defined manually, as described in Adding Join Conditions. For the purpose of this example, make sure to create the connections as shown above. This ensures the required join condition is created automatically.
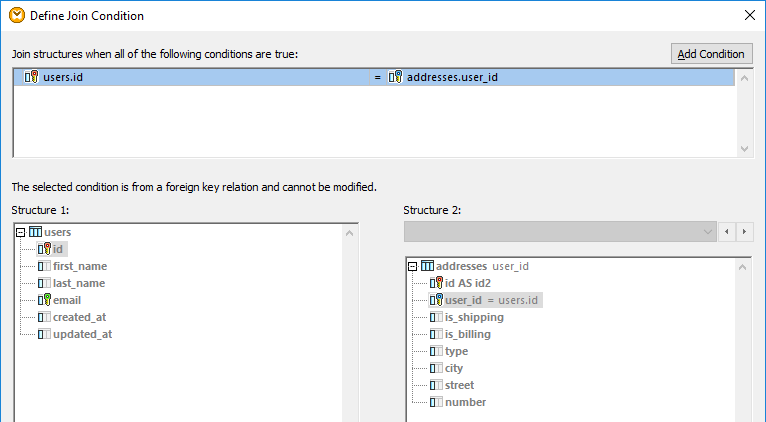
4.Click the Define Join Condition  button available on the join component. Notice that the join condition has been created automatically (users.id = addresses.user_id).
Step 3: Add the target CSV component
1.On the Insert menu, click Text File. (Alternatively, click the Insert Text File ![]() toolbar button).
toolbar button).
2.When prompted to choose a text processing mode, select Use simple processing for standard CSV... .
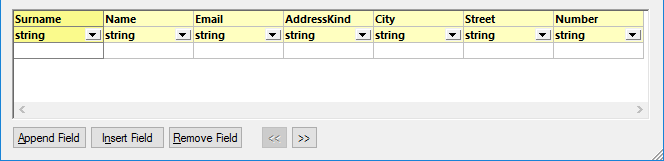
3.Click Append Field several times to create seven CSV fields. Leave all other settings as is.
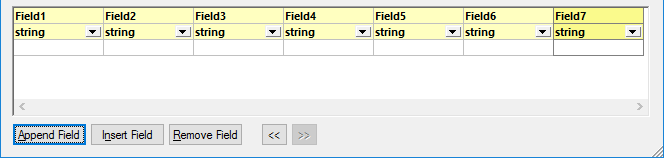
4.Double-click the title cell of each field to give it a descriptive name (this will make your mapping easier to read).
5.Draw the mapping connections between the Join component and the CSV component as shown below. The connection between the joined item of the join component and the Rows item of the target component means "create as many records (rows) in the target as there are records that meet the join condition".
Step 4: Add the SQL WHERE/ORDER condition and input parameter
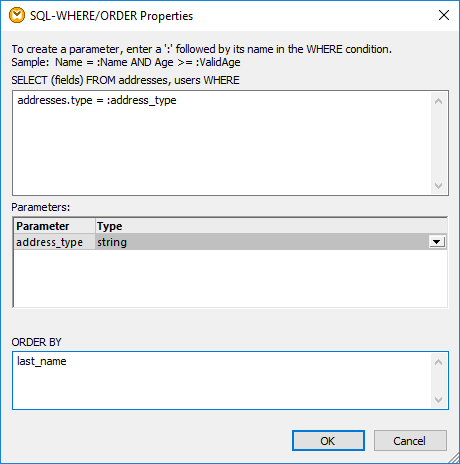
1.Right-click the connection between the joined item of the Join component and the Rows item of the target CSV component, and select Insert SQL-WHERE/ORDER.
2.Enter the WHERE and ORDER BY clauses as shown below.
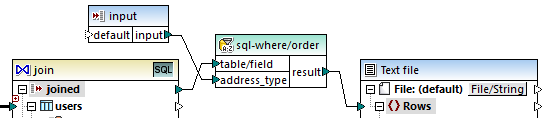
3.On the mapping, add an input component (using the Insert | Insert Input menu command) and connect its output to the address_type parameter created in the previous step.
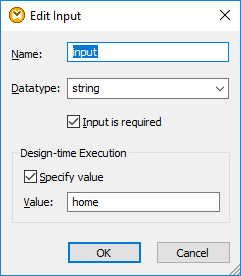
4.Double-click the input component and configure it as shown below. A design-time value is required (in this case, "home") to preview the mapping output in MapForce. If you want the preview to retrieve work addresses, replace this value with "work".
The mapping explained
The join condition automatically created in step 2 ensures that only records which satisfy the join condition users.id = addresses.user_id are copied to the target. The join condition was added automatically because the two tables are bound by a foreign key relationship and the mapping connections were drawn accordingly. For more information about table relationships, see Handling Database Relationships. Because this example has made use of the already existing table relationships, you did not have to define any join conditions manually. For an example that shows you how to define join conditions manually, see Example: Create CSV Report from Multiple Tables.
The two source tables are from the same database and from the same component, so this join benefits from the SQL  mode. Since SQL mode is enabled, the join operation is undertaken by the database, not by MapForce. In other words, an INNER JOIN statement is generated internally by MapForce and sent to the database for execution. The type of the join (INNER JOIN) is indicated by the Inner Join
 ![]() icon in front of the addresses table on the Join component. You can also change the join type to LEFT OUTER JOIN
icon in front of the addresses table on the Join component. You can also change the join type to LEFT OUTER JOIN ![]() , as described in Changing the Join Mode. Note, however, that changing the join mode does not affect the output of this example.
, as described in Changing the Join Mode. Note, however, that changing the join mode does not affect the output of this example.
The SQL WHERE/ORDER component added in step 4 enables filtering (to retrieve either home or work addresses) and sorting the recordset. Notice that the WHERE clause created a parameter :address_type of type string. This parameter makes it possible to supply the address kind (home or work) from the mapping. For more information about SQL WHERE/ORDER, see Filtering and Sorting Database Data (SQL WHERE/ORDER).
Finally, the input component makes it possible to supply the actual parameter value when the mapping runs. Note that, when the mapping runs outside MapForce (for example, when it is executed by MapForce Server on a different machine), the input must be supplied at mapping runtime as a command-line parameter, so the design-time value mentioned above is ignored. For more information, see Supplying Parameters to the Mapping.