Configure .mff File
This topic provides instructions on how to configure a MapForce Function File file (.mff). A .mff file is a configuration file in XML format that allows importing functions from custom Java, C#, or C++ libraries into MapForce so that they appear in the Libraries window. A .mff file is an intermediary between your custom libraries and MapForce. The .mff file must be configured to specify i) the interfaces for the custom functions and ii) where the implementation can be found in the generated code.
Important:
•The *.mff library files must be valid against the following schema: C:\Program Files\MapForceLibraries\mff.xsd. The mff.xsd schema defines the custom library configuration and is for internal use only. Altova GmbH retains the right to change this file format with new releases.
•It is only possible to define one C#, C++, or Java class per .mff file.
Sample .mff for C#
The following code listing illustrates a sample .mff file for C++:
<?xml version="1.0" encoding="UTF-8"?>
<mapping version="9" library="mylib" xmlns:xs="http://www.w3.org/2001/XMLSchema" xmlns:xsi="http://www.w3.org/2001/XMLSchema-instance" xsi:noNamespaceSchemaLocation="mff.xsd">
<implementations>
<implementation language="cpp">
<setting name="namespace" value="mylib"/>
<setting name="class" value="Greetings"/>
<setting name="path" value="C:\Libraries\cpp"/>
<setting name="include" value="Greetings.h"/>
<setting name="source" value="Greetings.cpp"/>
</implementation>
</implementations>
<group name="greetings">
<component name="sayhello">
<sources>
<datapoint name="ismorning" type="xs:boolean"/>
</sources>
<targets>
<datapoint name="result" type="xs:string"/>
</targets>
<implementations>
<implementation language="cpp">
<function name="SayHello"/>
</implementation>
</implementations>
<description>
<short>result = sayhello(ismorning)</short>
<long>Returns "Good morning" or "Good day", depending on the input parameter.</long>
</description>
</component>
</group>
</mapping>
Imported custom library
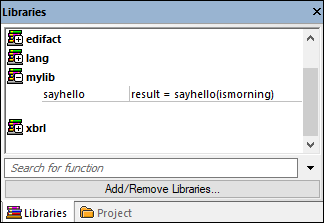
The image below shows how a custom .mff file may look after being imported into MapForce. Notice that the custom library mylib appears as a library entry (sorted alphabetically), containing the sayhello string function.
Configuration steps
To configure the .mff file, follow the instructions below.
Step 1. Configure the library name
The library name can be found in the .mff file (see below). By convention, library names are written in lowercase in MapForce; however, you can also use uppercase letters.
<mapping version="9" library="mylib" xmlns:xs="http://www.w3.org/2001/XMLSchema" xmlns:xsi="http://www.w3.org/2001/XMLSchema-instance" xsi:noNamespaceSchemaLocation="mff.xsd">
In the sample above, the entry that will appear in the Libraries window is called mylib.
Step 2. Configure the language implementations
The <implementations> element is a mandatory element which specifies which languages your library should support, and it must be added as a child element of <mapping> (see example below).
<!-- ... -->
<mapping version="9" library="mylib" xmlns:xs="http://www.w3.org/2001/XMLSchema" xmlns:xsi="http://www.w3.org/2001/XMLSchema-instance" xsi:noNamespaceSchemaLocation="mff.xsd">
<implementations>
<implementation language="cpp">
<setting name="namespace" value="mylib"/>
<setting name="class" value="Greetings"/>
<setting name="path" value="C:\Libraries\cpp"/>
<setting name="include" value="Greetings.h"/>
<setting name="source" value="Greetings.cpp"/>
</implementation>
</implementations>
<!-- ... -->
The settings within each <implementation> element allow the generated code to call the specific functions defined in Java, C++ or C#. A .mff file can be written so that it targets more than one programming language. In this case, every additional language must contain an additional <implementation> element. The specific settings for each programming language are discussed below.
Java library reference
<!-- ... -->
<implementation language="java">
<setting name="package" value="com.hello.functions"/>
<setting name="class" value="Greetings"/>
</implementation>
<!-- ... -->
It is important for the generated code to be able to find your Greetings.class file. Therefore, make sure to add a reference to your class to the Java class path.
C# library reference
<!-- ... -->
<implementation language="cs">
<setting name="namespace" value="MyLibrary" />
<setting name="class" value="Greetings" />
<setting name="reference" value="C:\Libraries\cs\MyLibrary\bin\debug\MyLibrary.dll" />
</implementation>
<!-- ... -->
For C#, it is important that the namespace in the code should correspond to the namespace defined in the .mff file (in the code listing above, the namespace is MyLibrary). The same is true for the class name (in the code listing above, the class name is Greetings). The third setting, reference, provides the path of the dll that is to be linked to the generated code.
C++ library reference
<!-- ... -->
<implementation language="cpp">
<setting name="namespace" value="MyLibrary"/>
<setting name="class" value="Greetings"/>
<setting name="path" value="C:\Libraries\cpp"/>
<setting name="include" value="Greetings.h"/>
<setting name="source" value="Greetings.cpp"/>
</implementation>
<!-- ... -->
For C++, note the following:
•namespace is the namespace in which your Greetings class will be defined. It must be equal to the library attribute in mapping element.
•path is the path in which the include and the source files are to be found.
•When code for a mapping is generated, the include and source files will be copied to the directory targetdir/libraryname, which is defined when you select the menu command File | Generate code in | C++, and included in the project file.
All the include files you supply will be included in the generated algorithm.
Step 3. Add a component
In the Libraries window, each function appears nested under a function group, for example, string functions. In the .mff file, a function corresponds to a <component> element. Conversely, each <component> must be nested under a <group> element, for example:
<!-- ... -->
<group name="string functions">
<component name="sayhello">
<!-- ... -->
</component>
</group>
<!-- ... -->
The code shown below defines a sample function (component) called sayhello.
<!-- ... -->
<component name="sayhello">
<sources>
<datapoint name="ismorning" type="xs:boolean"/>
</sources>
<targets>
<datapoint name="result" type="xs:string"/>
</targets>
<implementations>
<!-- ... -->
</implementations>
<description>
<short>result = sayhello(ismorning)</short>
<long>Returns "Good morning" or "Good day", depending on the input parameter.</long>
</description>
</component>
<!-- ... -->
This is how the component above would look in MapForce:
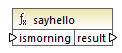
In the code listing above, the <datapoint> element can be loosely defined as the input or output parameter of a function (also known as an input or output connector). The type argument of the <datapoint> element specifies the data type of the parameter or the data type of the return value. Only one target datapoint is allowed for each function. The number of source datapoints you can define is not limited.
The data type of each datapoint must be one of the XML Schema types (e.g., xs:string, xs:integer, etc.) These data types must correspond to the data types of the function's parameters you defined in your Java, C++ or C# library. To find out more about mapping of XML Schema datatypes to language types, see Data Type Mapping.
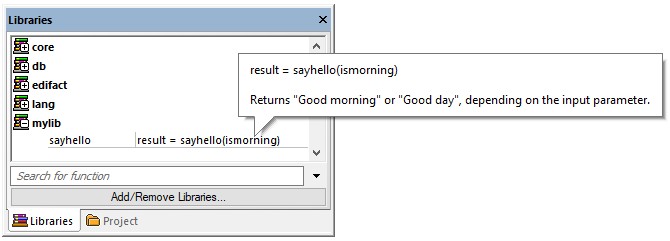
Functions are accompanied by short and long descriptions in the Libraries window. The short description is always shown to the right of the function name, while the long description is displayed as a tooltip when you place the mouse cursor over the short description (see screenshot below).
Step 4. Define language implementations
We can now connect the function in the Libraries window with the function in the custom Java, C# or C++ classes. This is achieved through the <implementation> element. One function may have multiple <implementation> elements—one for each supported programming language. A function may be called Hello in Java or SayHello in C++. This is why you need to specify a separate function name for each programming language. A function for each of the three programming languages might look as follows:
<!-- ... -->
<component name="sayhello">
<!-- ... -->
<implementations>
<implementation language="cs">
<function name="HelloFunction"/>
</implementation>
<implementation language="java">
<function name="Hello"/>
</implementation>
<implementation language="cpp">
<function name="SayHello"/>
</implementation>
</implementations>
<!-- ... -->
</component>
<!-- ... -->
The value you supply as a function name must match the name of the method in the Java, C# or C++ class.