Custom Namespaces
When a mapping produces XML output, MapForce automatically derives the namespace (or set of namespaces) of each element and attribute from the target schema. This is the default behavior that is suitable for most scenarios of XML output generation. However, there are cases in which you may want to manually declare the namespace of an element directly from the mapping.
Declaring custom namespaces is meaningful only for target XML components and applies to elements only. The Add Namespace command is not available for attributes, wildcard nodes, and for nodes which receive data from a copy-all connection.
To understand how custom namespaces work, follow the instructions in the subsection below.
Declare namespace manually
For this example, you will need the following mapping: BasicTutorials\Tut1-OneToOne.mfd.
Add a namespace
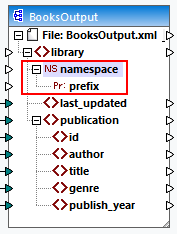
Open the mapping, right-click the library node in the BooksOutput component, and select Add Namespace from the context menu. Now two new nodes are available under the library element: namespace and prefix (see screenshot below).
Supply namespace values
The next step is to supply values to the namespace and prefix nodes. In order to do it, we will use two constants with the following string values: altova.library and lib (see screenshot below).
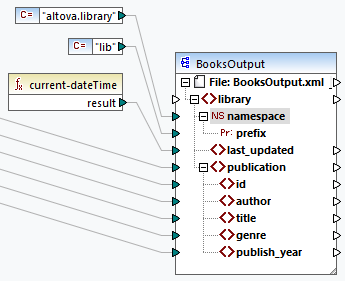
Note: Both the namespace and prefix input connectors must be mapped even if you provide empty values to them.
Output
In the generated output, an xmlns:<prefix>="<namespace>" attribute is added to the element, where <prefix> and <namespace> are values that are supplied by the mapping. The output will now look as follows (note the highlighted part):
<?xml version="1.0" encoding="UTF-8"?>
<library xmlns:xsi="http://www.w3.org/2001/XMLSchema-instance" xmlns:lib="altova.library" xsi:noNamespaceSchemaLocation="Library.xsd">
...
You can also declare multiple namespaces for the same element, if necessary. To do this, right-click the node again and select Add Namespace from the context menu. A new pair of namespace and prefix nodes become available, to which you can connect new prefix and namespace values.
Declare a default namespace
If you want to declare a default namespace, map an empty string value to prefix. The output would then looks as follows (note the highlighted part):
<?xml version="1.0" encoding="UTF-8"?>
<library xmlns="altova.library" xmlns:xsi="http://www.w3.org/2001/XMLSchema-instance" xsi:noNamespaceSchemaLocation="Library.xsd">
...
If you need to create prefixes for attribute names, for example <number prod:id="prod557">557</number>, you can achieve this by using dynamic access to a node's attributes (see Mapping Node Names) or by editing the schema so that it has a prod:id attribute for <number>.
Remove a namespace
To remove a previously added namespace declaration, right-click the ns:namespace node and select Remove Namespace from the context menu.